Businesses can import vendors and customers into Odoo to expedite data input procedures or transfer data from another platform. Compared to manual entry, importing data saves time by enabling the rapid and efficient addition of multiple vendor and customer records.
Importing Customers in Odoo 17
To import the customers, you must first download the customer import template. We can edit and personalize the template after downloading it, and then upload it to the Odoo database.
Go to the Sales app to download the required import template. Requests? Clients. You may open the export option on the customer's page by turning on the list view, choosing a record to export, and clicking the actions button.

A new window with fields to export on the right and available fields on the left appears when you click on Export. Every field that can be added to the template that we are exporting at present.
By clicking the Add icon, we can add the fields we wish to export from the available fields section to the ‘fields to export’ area. If the template needs to be saved under a certain name, we can use it if we need to export the data more than once.
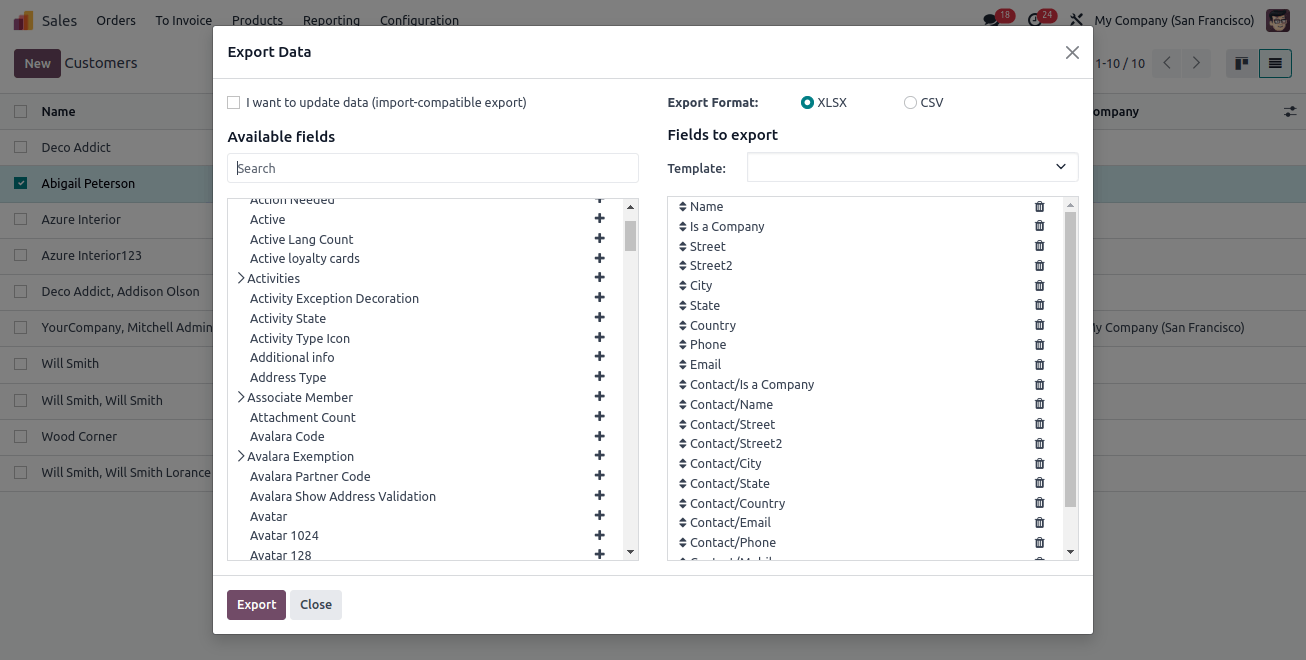
There is also an option labeled ‘I want to update data.’ Only the fields that can be imported are displayed when that option is checked.
To identify the existing data that needs to be changed, an additional field called external ID is added to the file we are exporting.
Odoo 17 then maps the field with the unique ID supplied when we import the data. You have a lot more field possibilities when the box is left unchecked since all of the fields are presented, not just the ones that can be imported.
CSV and XLSX are the two export formats available using this procedure. Commas are used to separate items in a CSV file, while the XLSX file includes information about each worksheet's layout and content.
To see more sub-field options, use the > (right arrow) icon, and to discover specific fields, use the search bar. In the exported file, we can also drag the
fields to put them in the order we choose and remove any fields that are not needed.
We are adding the following fields at this point:
Name: Display the name of the customer.
Is a company: This is a boolean field; if it is true, we can offer 1 if it is a company, and 0 if it is an individual.
Street: Display the Street of the customer.
Street 2: Display the Street 2 of the customer.
City: Display the City of the customer.
State: Display the State of the customer here.
Country: Display the Country of the customer.
Phone: Display the Contact number of the customer.
Email: You can enter the contact's email address in this section.
The following fields can be added to a customer to add more contacts:
Contact/Is a company: This is a boolean field; if it is true, we can offer 1 if it is a company, and 0 if it is an individual.
Contact/Name: Display the Name of the contact.
Contact/Street: Display the Street of the contact.Contact/Street 2: Display the Street 2 of the contact.
Contact/City: Display the City of the contact.
Contact/State: Display the State of the contact.
Contact/Country: Display the Country of the contact.
Contact/Phone: Here we can provide the Contact number of the contact.
Contact/Mobile: Here we can provide the Contact number of the contact.
Contact/Email: The email of the contact can be provided in this field.
Contact/Address Type: In this area, we can indicate if the additional contact is a delivery address, invoice address, contact, or other address.
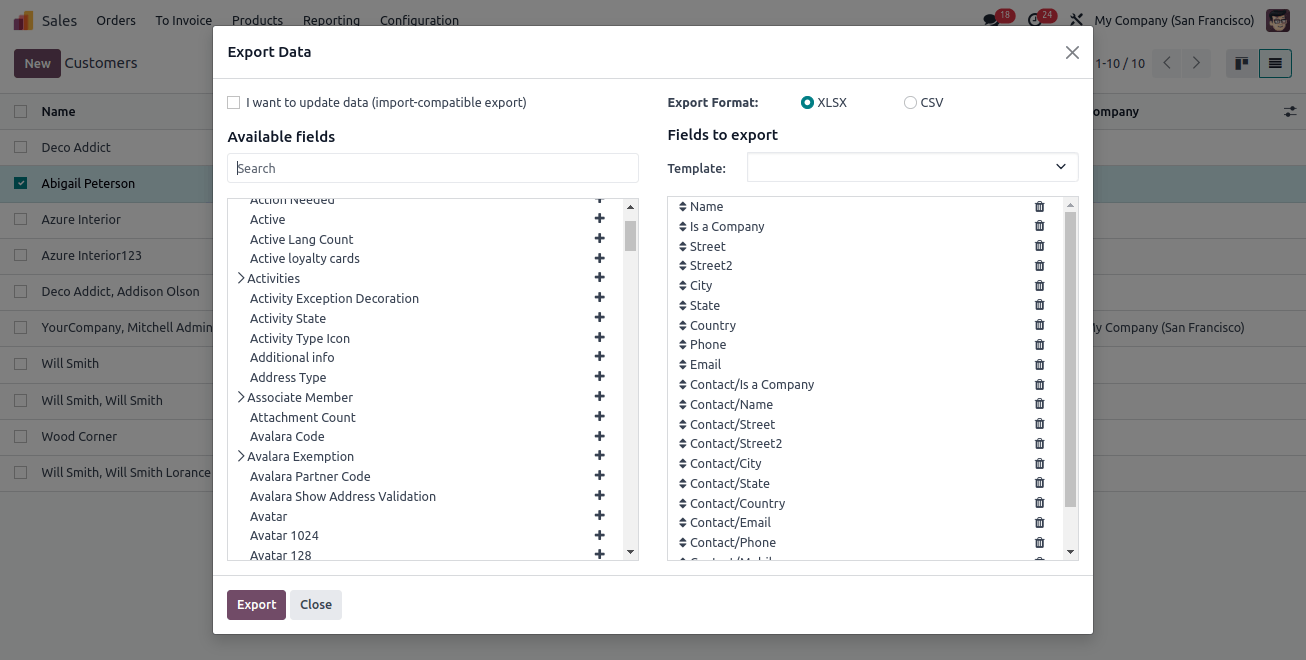
We can export the template by clicking the export button once all the fields have been added. Then alter the template to suit your needs.


We may return to the customer’s page after making updates to the customer template spreadsheet, click the gear symbol in the upper left corner, and choose Import Records.
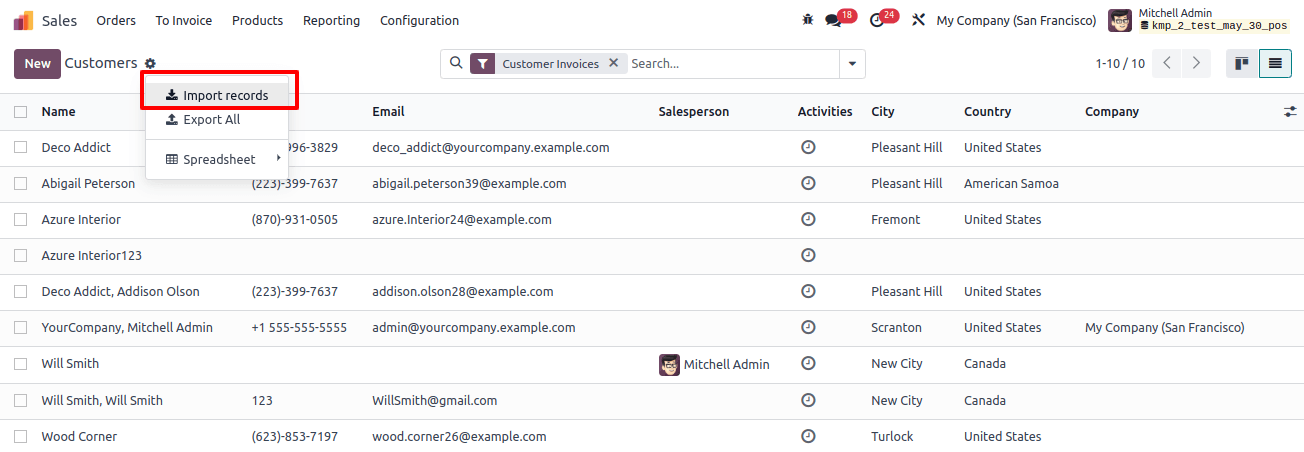
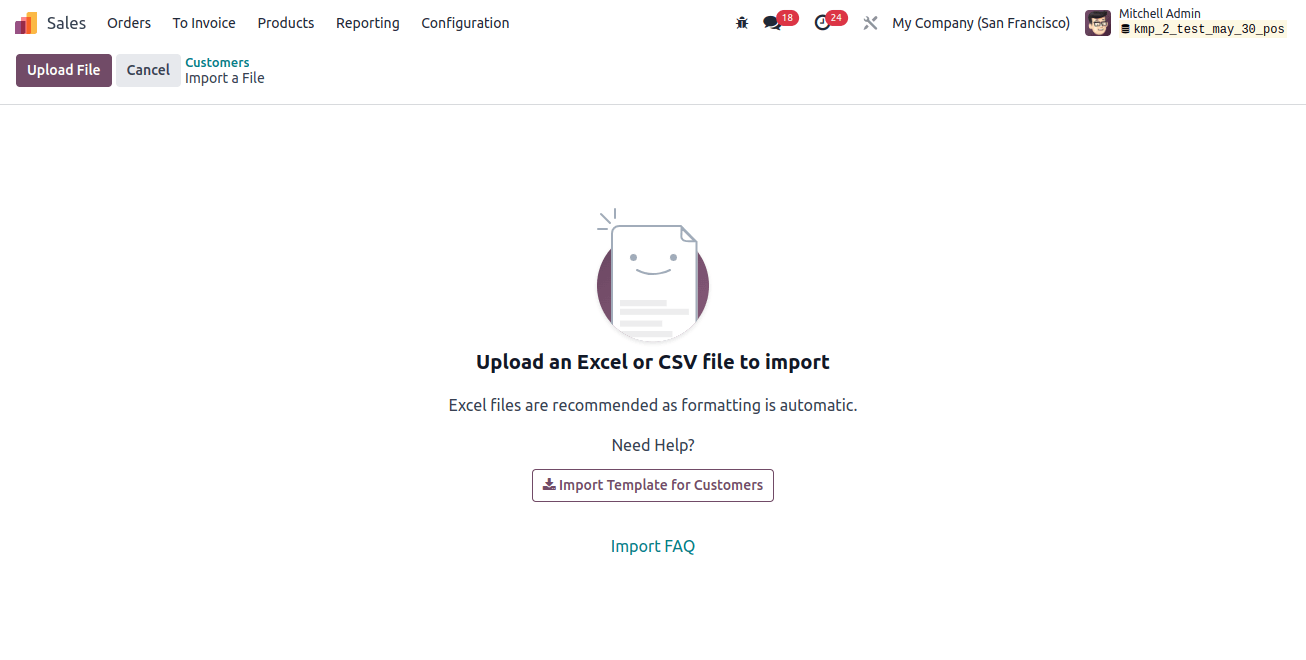
The option to upload the file from our system is located in the upper left corner.
After uploading the file, a page with every element of the most recent version of the customer template spreadsheet divided by File Column, Odoo Field, and Comments appears.
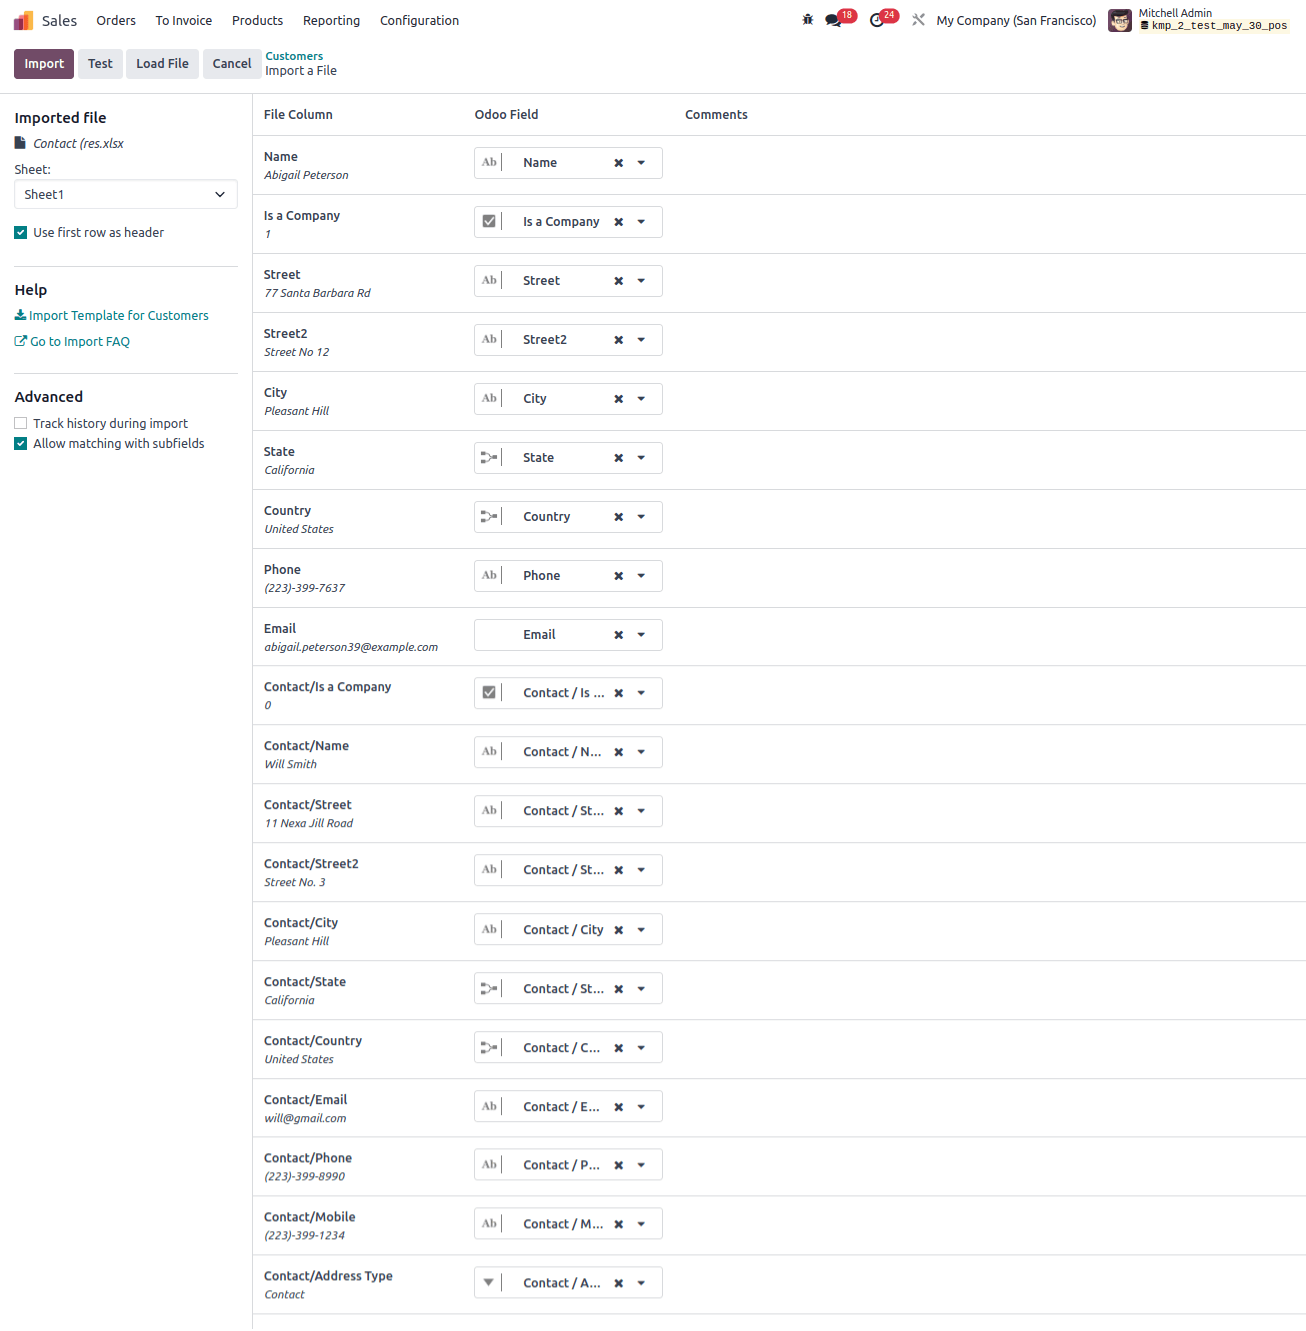
The file column can now be manually assigned to an Odoo Field if required.
To ensure that all the fields and columns are properly aligned and everything is in working order, click the Test button located in the upper-left corner.
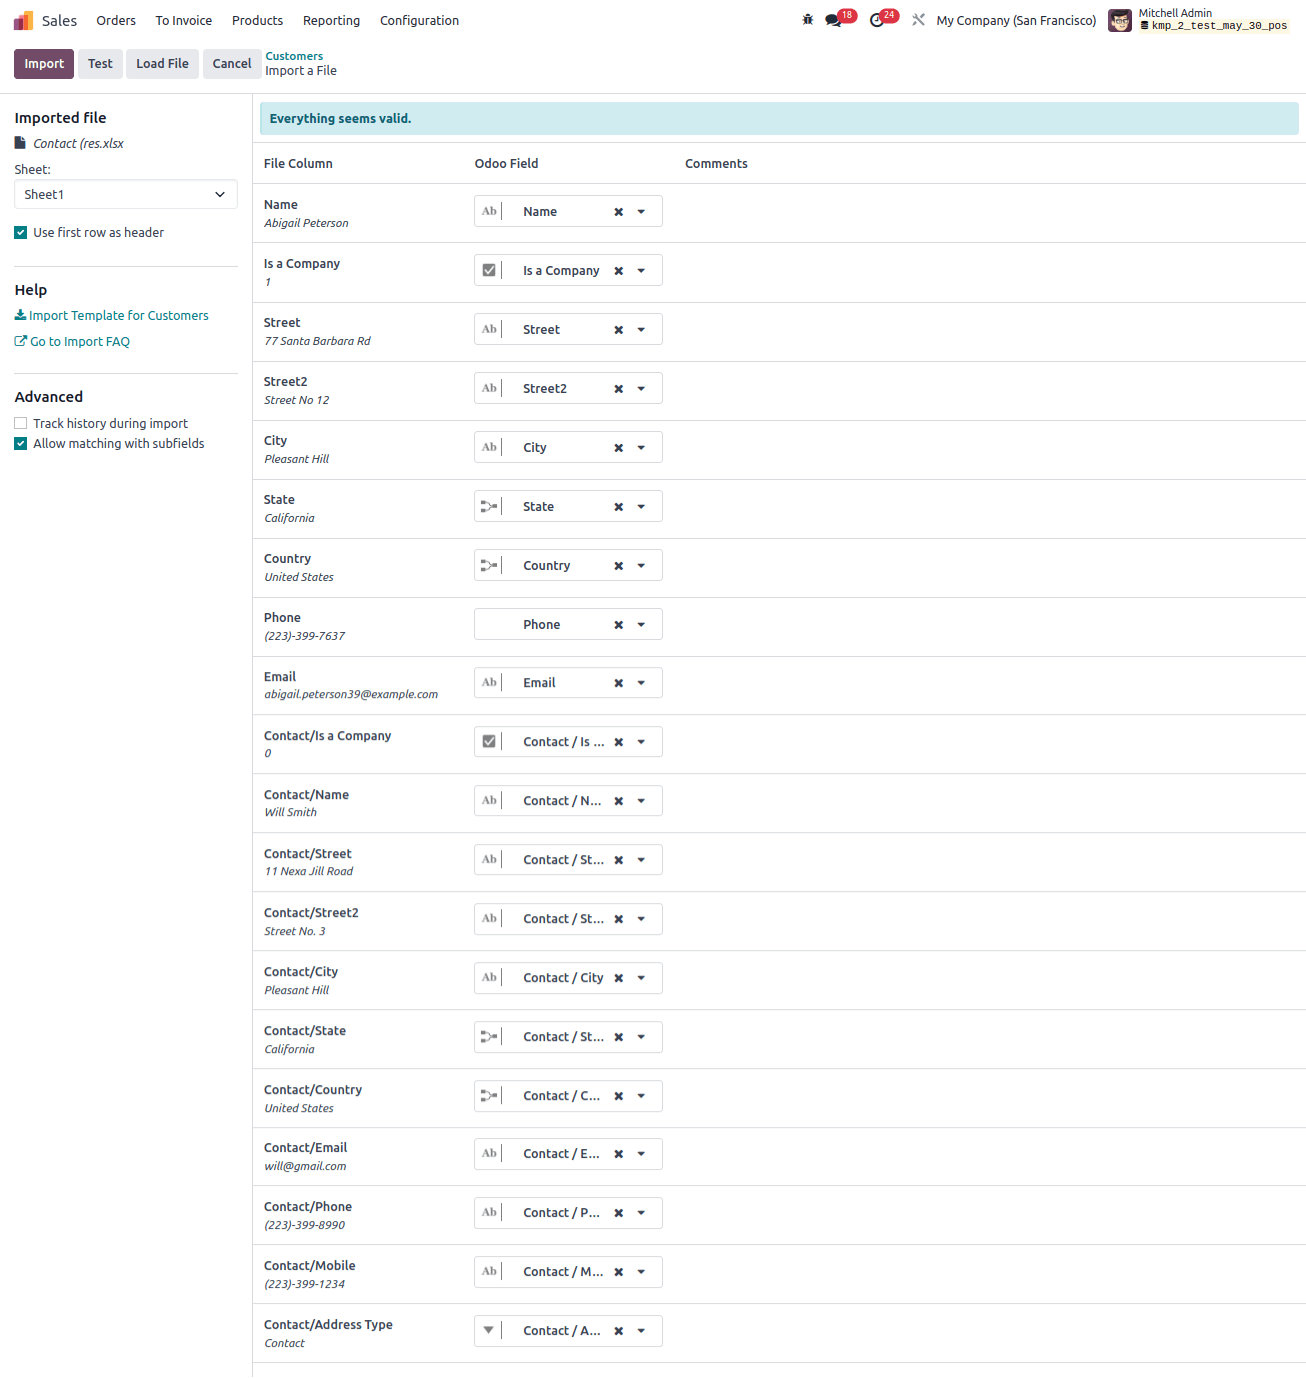
If everything is deployed correctly, Odoo displays a blue banner at the top of the page informing the user that everything appears to be valid.
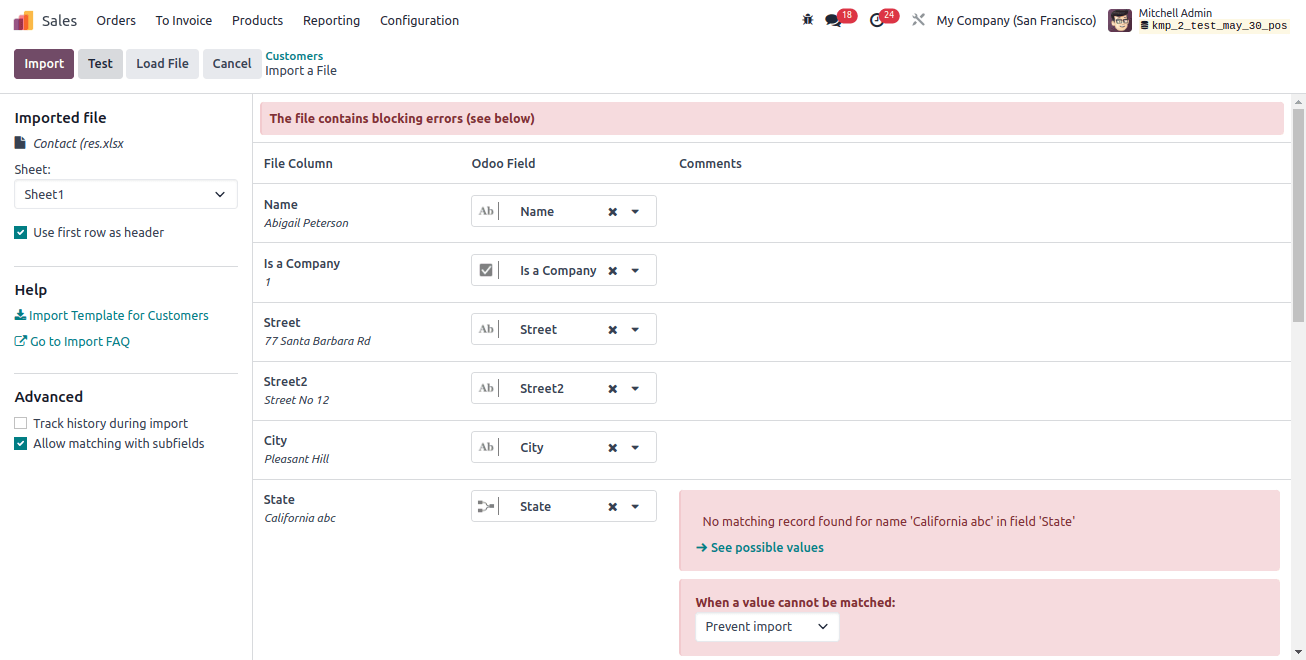
If any errors are found, a red banner at the top of the page will tell you where to look for each problem and how to fix it.
We can import the records by clicking the Import button after all errors have been corrected. A pop-up notification in the upper-right corner of the screen indicated the number of customers that were successfully imported when the records were imported.
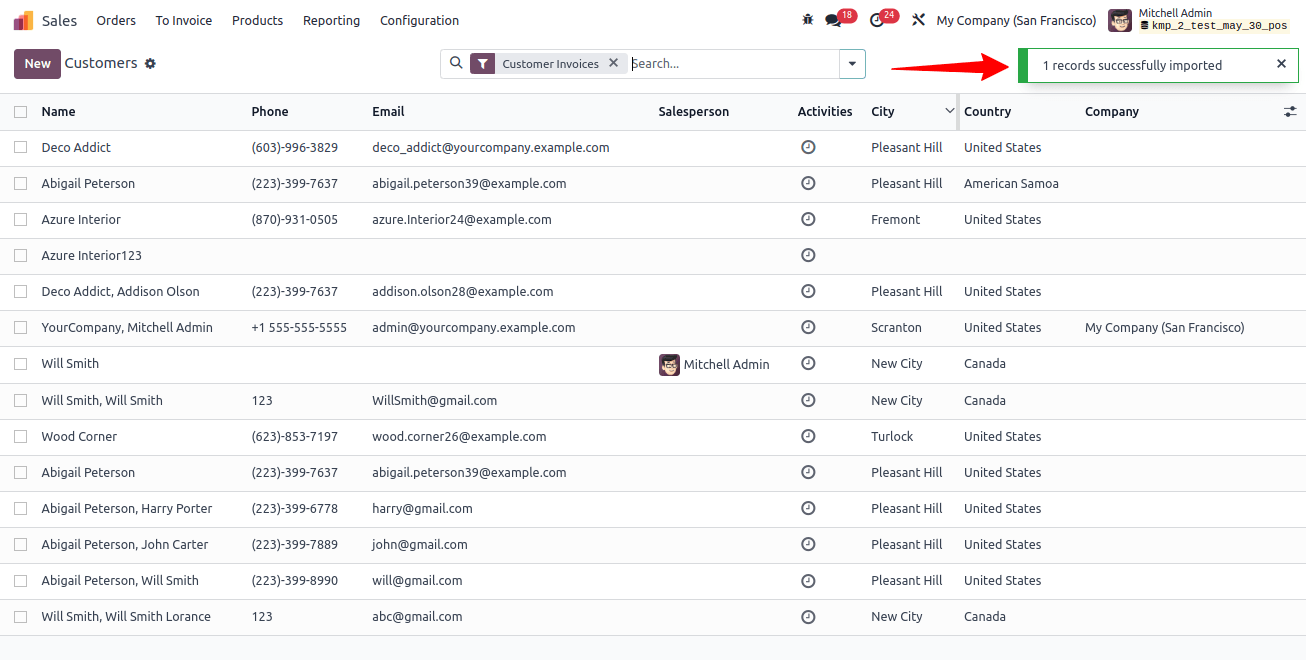
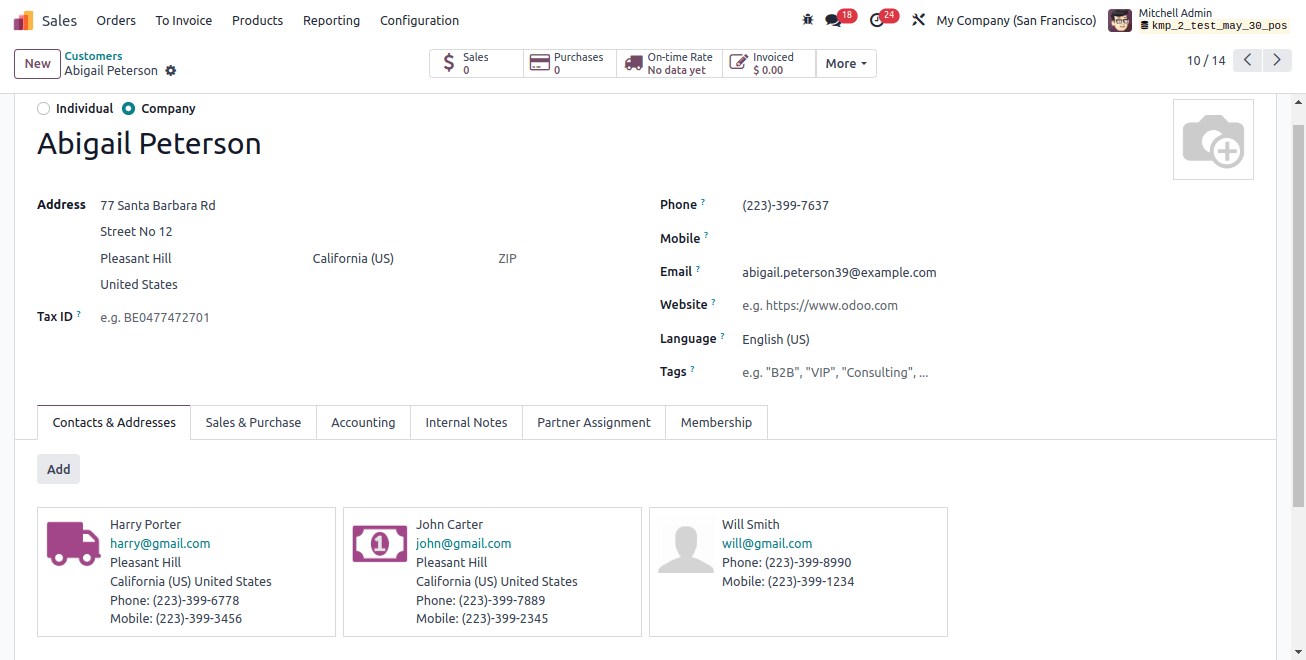
On the customer's page, we can now access and modify all of the recently imported customers as well as see them.
Importing Vendors in Odoo 17
It is necessary to obtain the vendor import template before you may import the vendors. We can edit and personalize the template after downloading it, and then upload it to the Odoo database.
To obtain the required import template, go to the Purchase app. Requests? Suppliers. You can open the vendor’s website in list view mode, choose a record to export, and then click the actions button to make the export option visible.

A new window with fields to export on the right and available fields on the left appears when you click on Export.
By selecting the plus icon, we can add the fields that we wish to export from the list of accessible fields to the export area.
If the template needs to be saved under a certain name, we can use it if we need to export the data more than once.
A new one with fields to export on the right and available fields.
There is also an option labeled "I want to update data (import-compatible export)". Only the fields that can be imported are displayed when that option is checked.
To identify the existing data that has to be changed, we can add an external ID field to the file we are exporting. When we import the data, Odoo maps the field with the unique ID supplied.
You have a lot more field possibilities when the box is left unchecked since all of the fields are presented, not just the ones that can be imported.
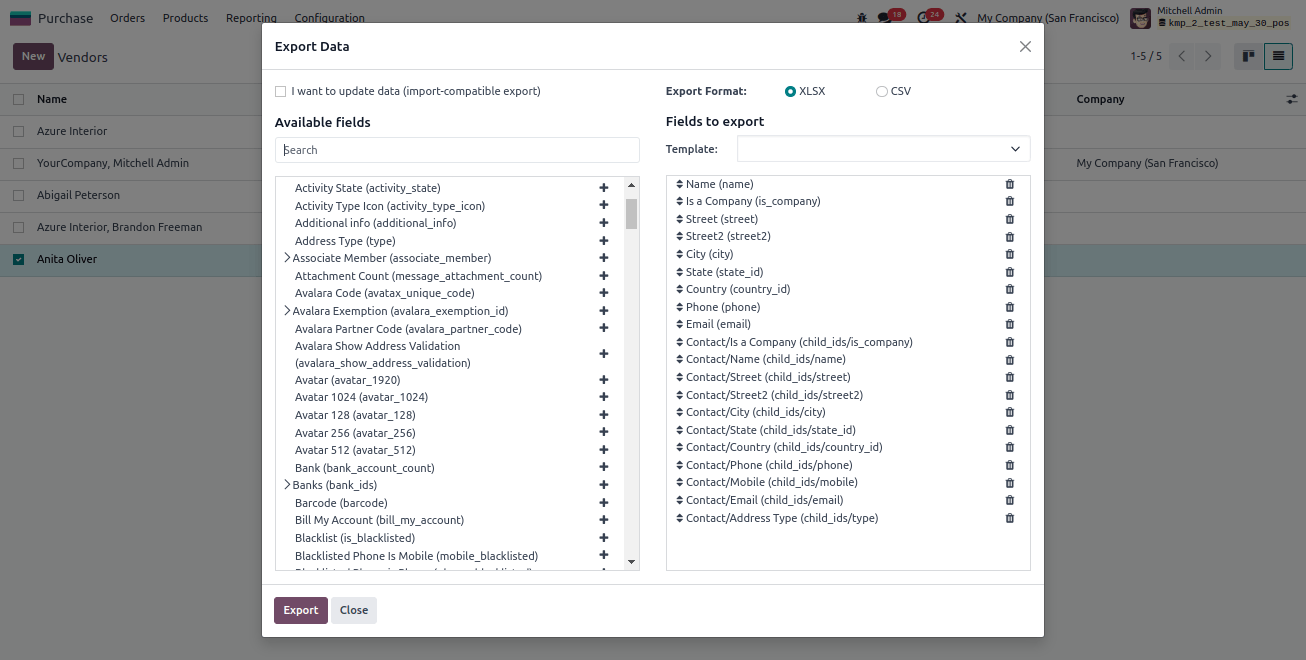
The exporting process offers two export formats:.csv and .xlsx. Items in the a.csv file are separated by commas, whereas the a.xlsx file contains details on every worksheet in the file, including layout and content.
To see more sub-field options, use the > (right arrow) icon, and to discover specific fields, use the search bar.
In the exported file, we can also drag the fields to put them in the order we choose. A trash icon allows us to remove fields that are not needed.
Here we are adding the following fields:
Name: Display the name of the vendor.
Is a company: It's a boolean field; if it's true, we can provide 1 if it's a firm, and 0 if it's an individual.
Street: Street of the vendor can be provided in this field.
Street 2: Street 2 of the vendor can be provided in this field.
City: We can display the City of the vendor in this field.
State: The state of the vendor can be provided in this field.
Country: The country of the vendor can be provided in this field.
Phone: The contact number of the vendor can be provided in this field.
Email: The email of the vendor can be given in this field.
Multiple contacts can be added under a vendor by adding the following fields:
Contact/Is a company: This is a boolean field; if it is true, we can offer 1 if it is a company, and 0 if it is an individual.
Contact/Name: Display the Name of the contact.
Contact/Street: Display the Street of the contact.
Contact/Street 2: Display the Street 2 of the contact.
Contact/City: Display the City can be.
Contact/State: Display the State of the contact.
Contact/Country: Display the Country of the contact.
Contact/Phone: We can supply the contact's phone number here.
Contact/Mobile: Here we can provide the Contact number of the contact.
Contact/Email: The email of the contact can be provided in this field.
Contact/Address Type: In this area, we can indicate if the additional contact is a delivery address, invoice address, contact, or other address.
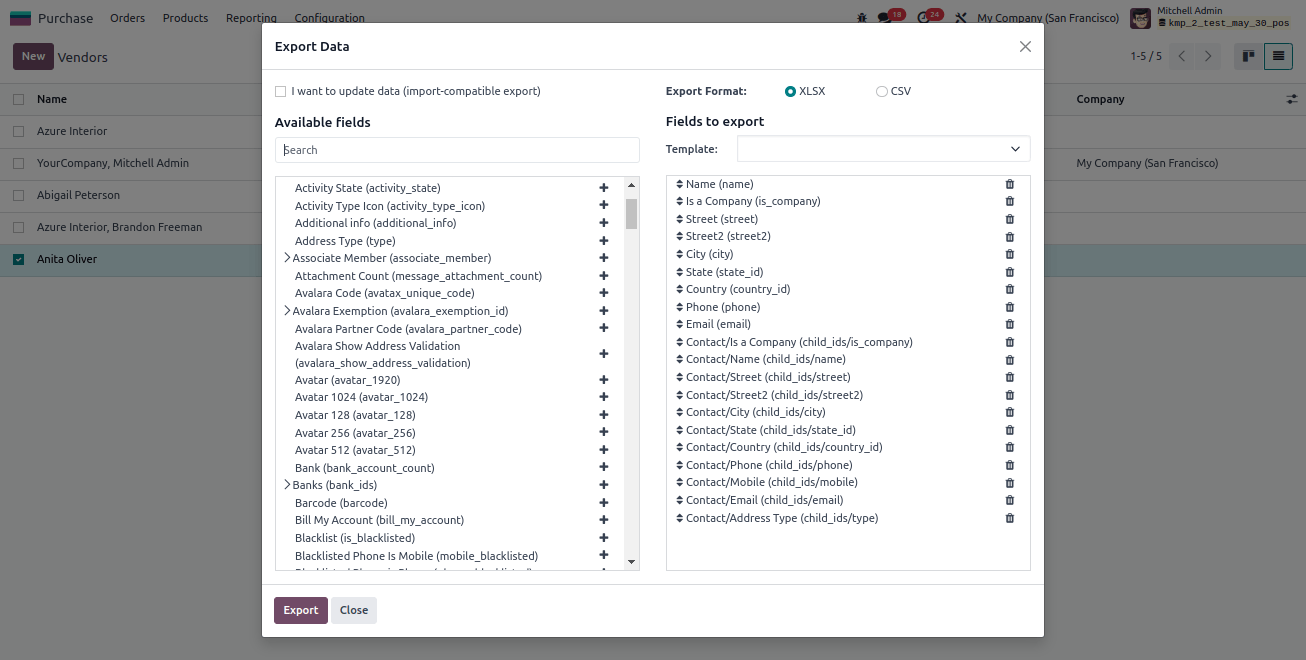
We can export the template by clicking on the export button once all the fields have been added. Then alter the template to suit your needs.


We may return to the vendor’s page after making changes to the vendor template spreadsheet, click the gear symbol in the upper left corner, and choose Import Records.

The option to upload the file from your system is located in the upper left corner.
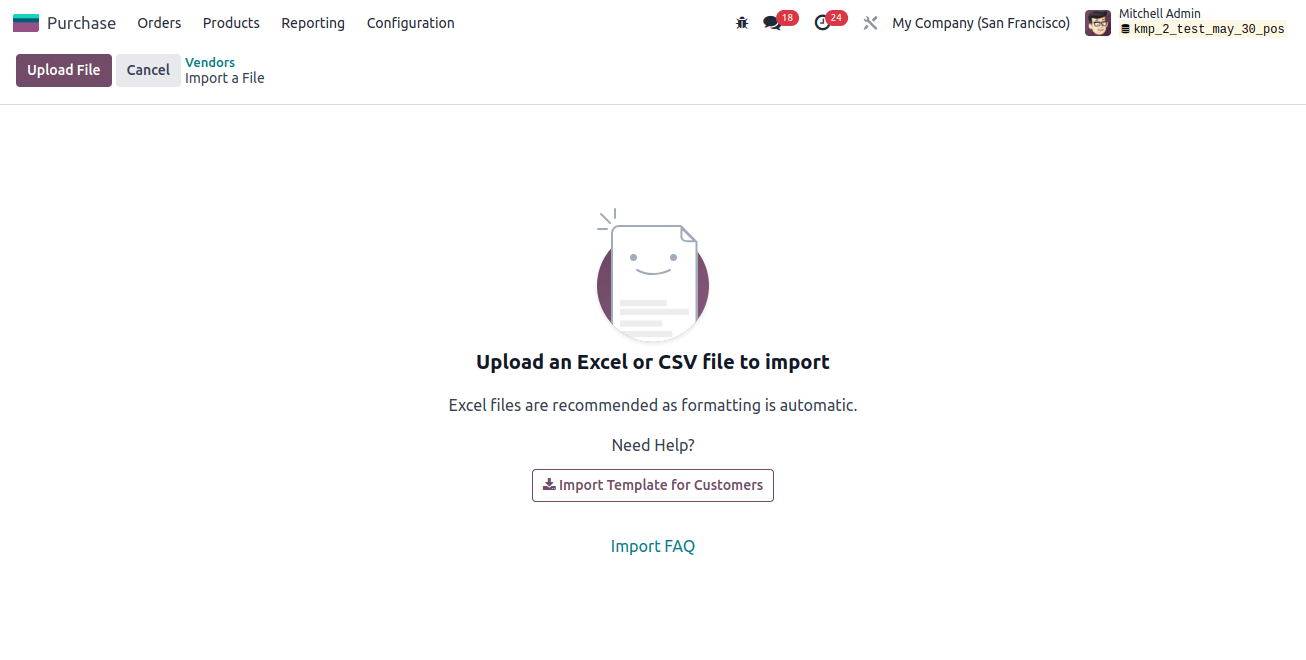
A page displaying every component of the freshly set-up vendor template spreadsheet—divided by File Column, Odoo Field, and Comments—appears upon file upload.
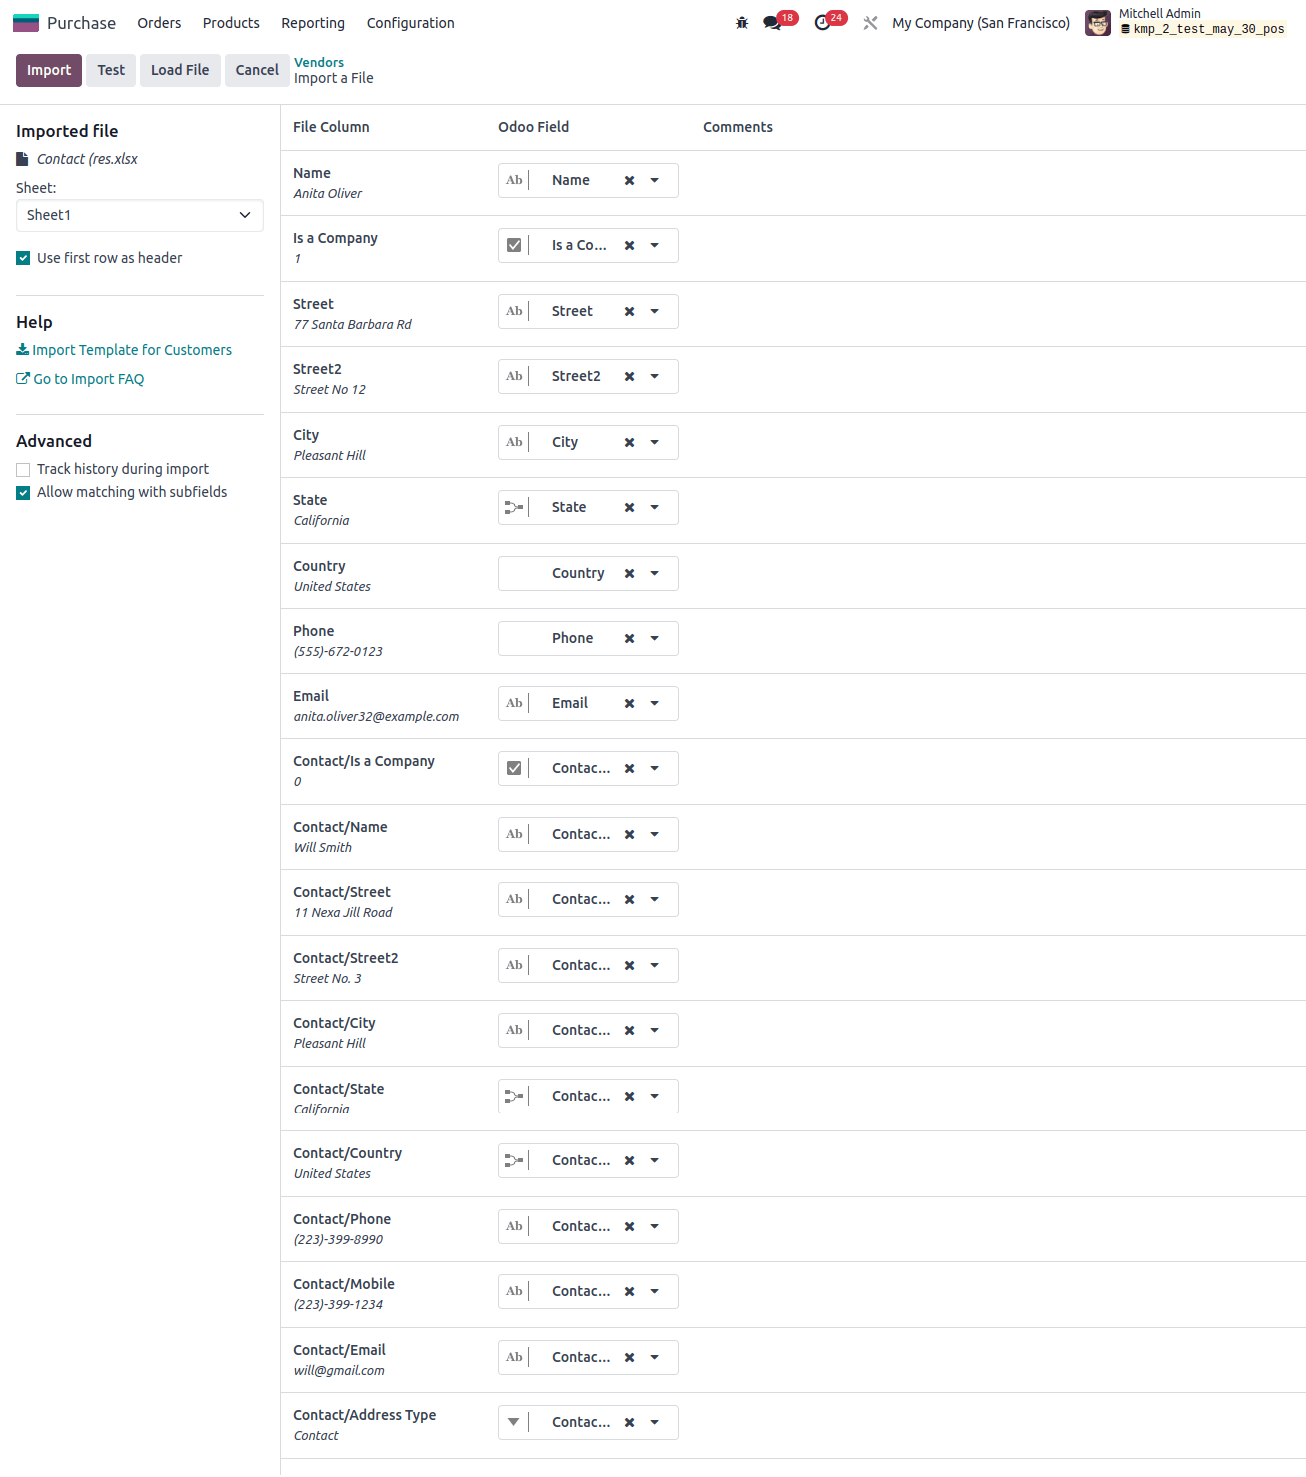
If needed, we can now manually designate the file column to an Odoo Field.
Clicking the test button in the top-left corner will allow us to verify that all the fields and columns are positioned correctly and that nothing is out of place.
If everything is implemented correctly, Odoo displays a blue banner at the top of the page informing the user that everything appears legal.
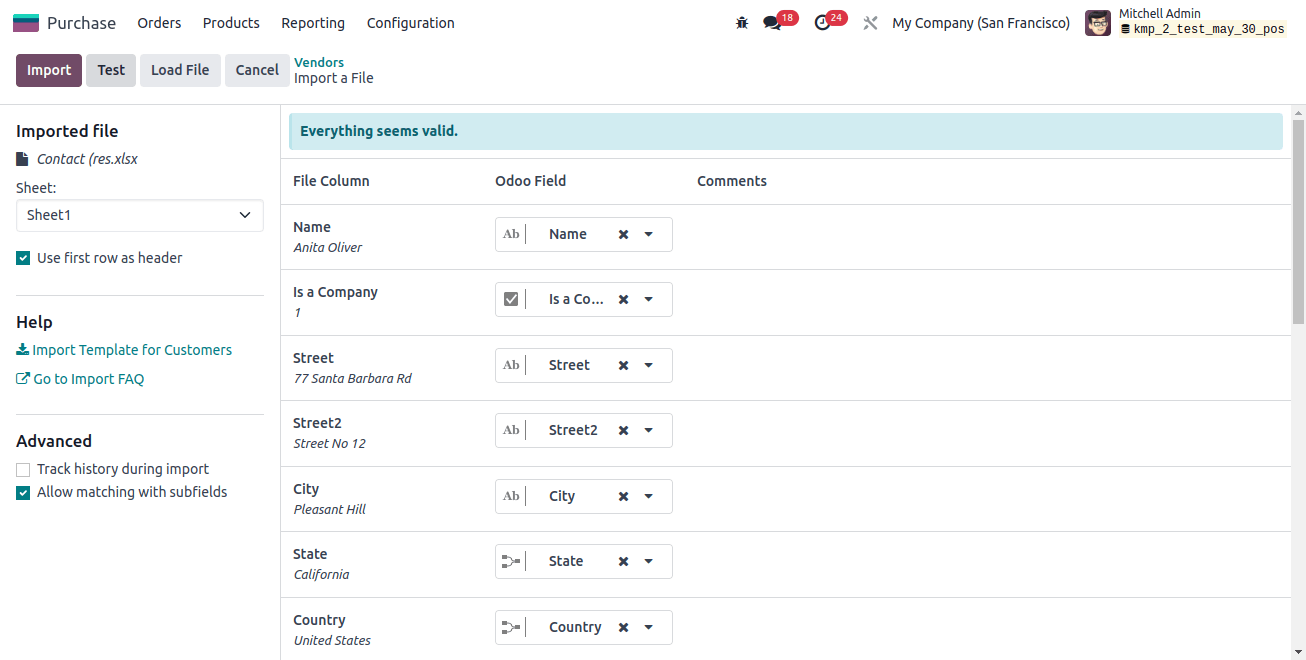
If there are any errors, the top of the page is marked with a red banner that provides details on how to fix each problem and where to locate it.
We can import the records by clicking the Import button after all errors have been corrected.
A pop-up notification in the upper-right corner of the screen notifies the user of the number of vendors that were successfully imported when the records are imported.
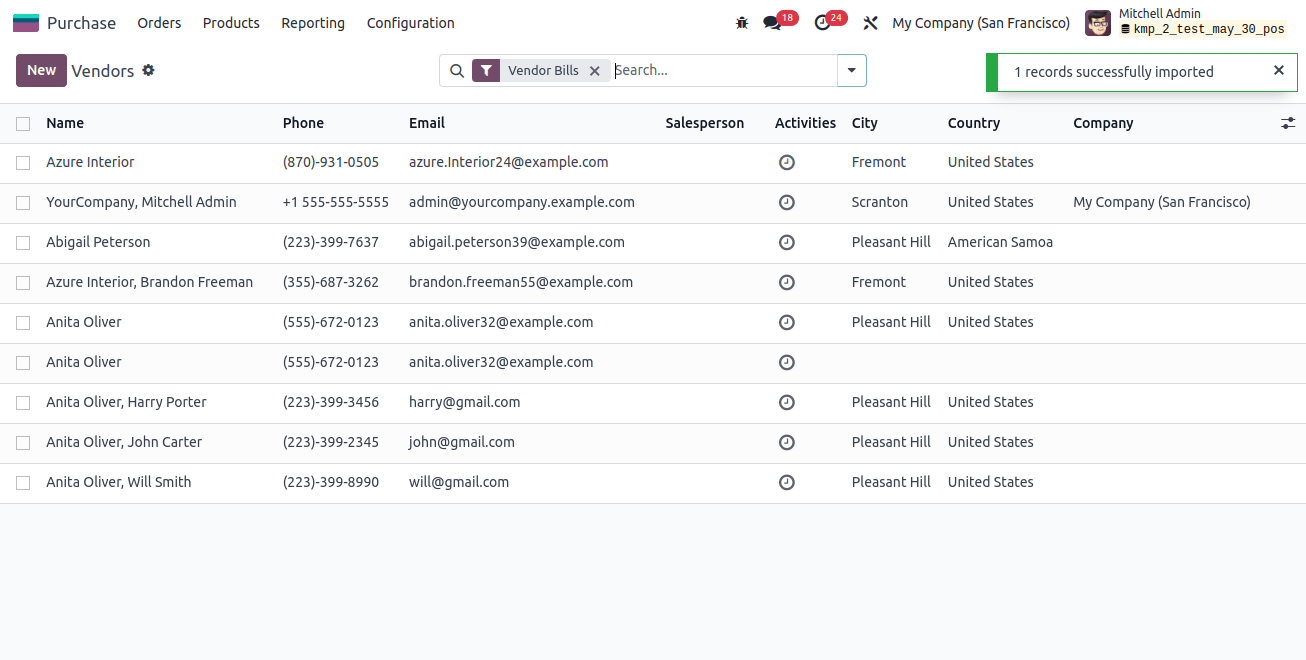
From the vendors tab, we can now access and modify all of the recently imported vendors in addition to seeing them.
From the vendors tab, we can now access and modify all of the recently imported vendors in addition to seeing them.
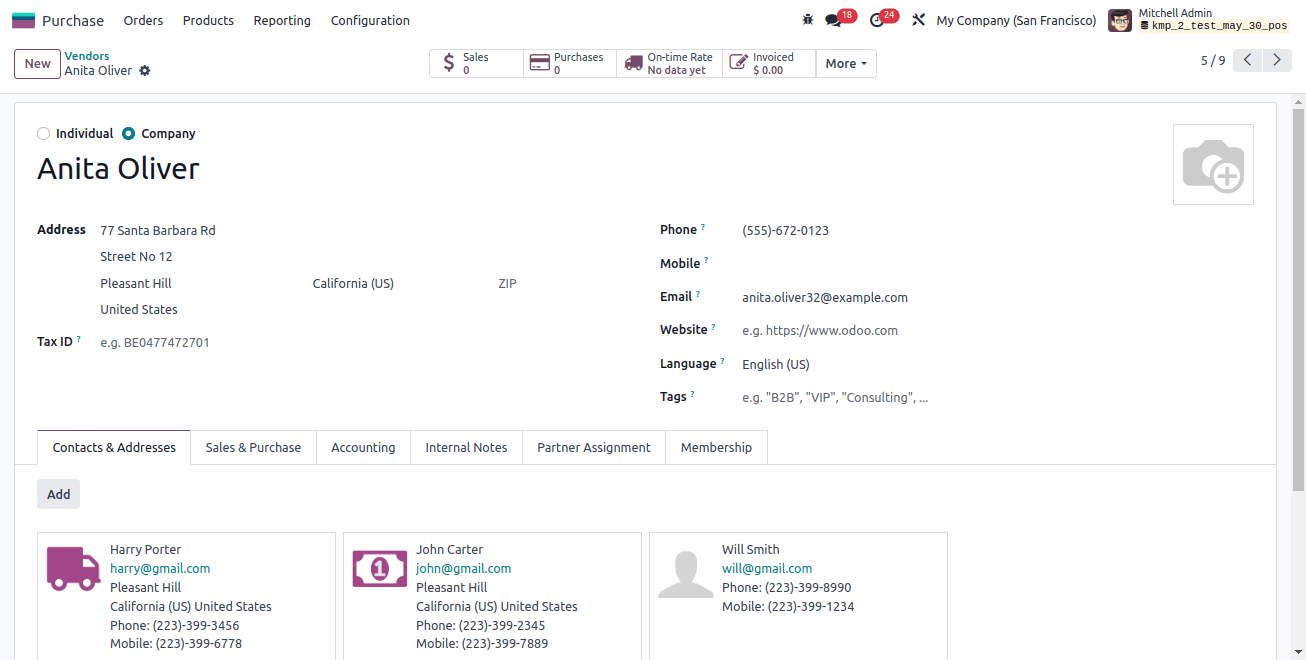
importing vendors and customers into Odoo 17 from the contact module
In Odoo 17, we can also import Vendors and Customers from the Contact Module. Go to the Contacts app for that. Relationships.
You can enable the list view on the Contacts page, choose a record to export, and then click the actions button to make the export option visible.
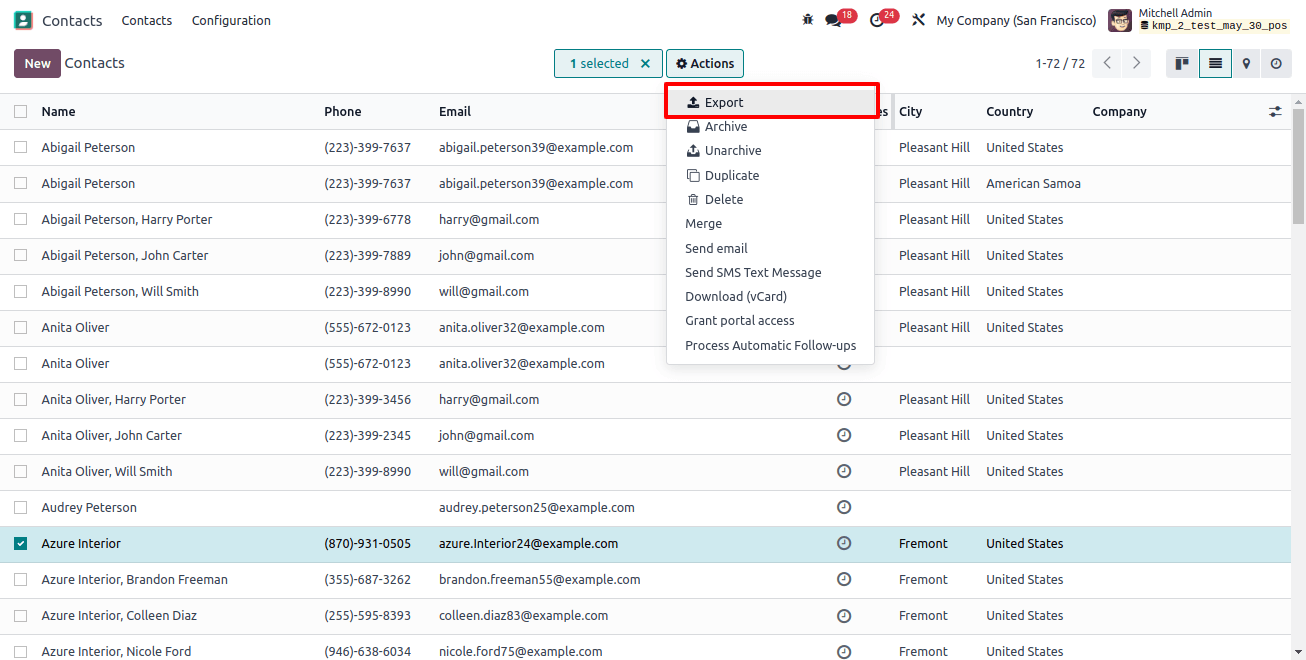
A new window with fields to export on the right and available fields on the left appears when you click on Export. All the fields that can be added to the template we are exporting are listed in the available fields.
By clicking the Add icon, we can add the fields we wish to export from the available fields section to the "fields to export" area.
If the template needs to be saved under a certain name, we can use it in the event that we need to export the data more than once.
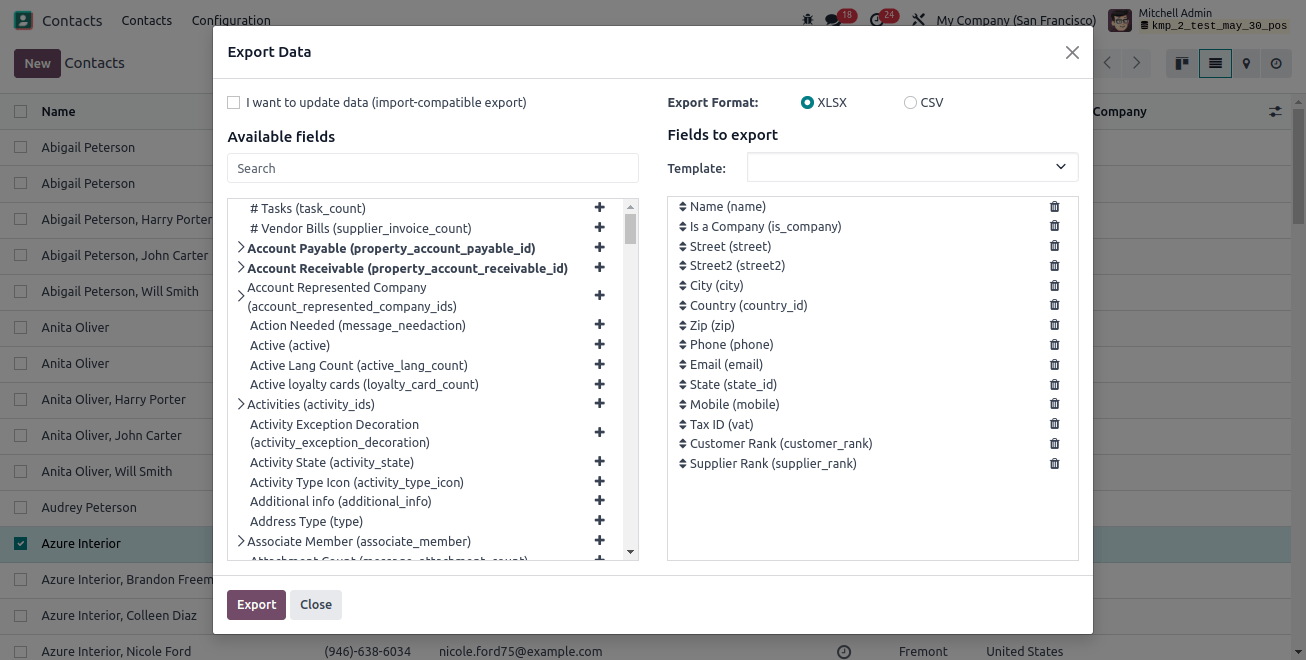
There is also an option labeled "I want to update data (import-compatible export)". Only the fields that can be imported are displayed when that option is checked.
To identify the existing data that has to be changed, we can add an external ID field to the file we are exporting.
When we import the data, Odoo maps the field with the unique id supplied.
You have a lot more field possibilities when the box is left unchecked since all of the fields are presented, not just the ones that can be imported.
The exporting process offers two export formats:.csv and.xlsx. Items in a.csv file are separated by commas, whereas a.xlsx file contains details on every worksheet in the file, including layout and content.
To see more sub-field options, use the > (right arrow) icon, and to discover specific fields, use the search bar.
In the exported file, we can also drag the fields to put them in the order we choose and remove any fields that are not needed.
Here we are adding the following fields:
Name: Display the name of the contact.
Is a company: It is a boolean field, if it is true, that is, if it is a company, we can give 1, and if it is an individual we can give 0.
Street: A Street of contact can be provided in this field.
Street 2: Street 2 of the contact can be provided in this field.
City: We can display the City of the contact in this field.
State: State of the contact can be provided in this field.
Country: The country of the contact can be provided in this field.
ZIP: The zip of the contact can be given under this field
Phone: The contact number of the contact can be provided in this field.
Mobile: The mobile number of the contact can be provided in this field.
Email: The email of the contact can be given in this field.
Tax id: Tax id of the contact can be given under this field.
Customer rank: We can give the customer rank as 1 if the contact we are importing is a customer.
Supplier rank: We can give the supplier rank as 1 if the contact we are importing is a supplier.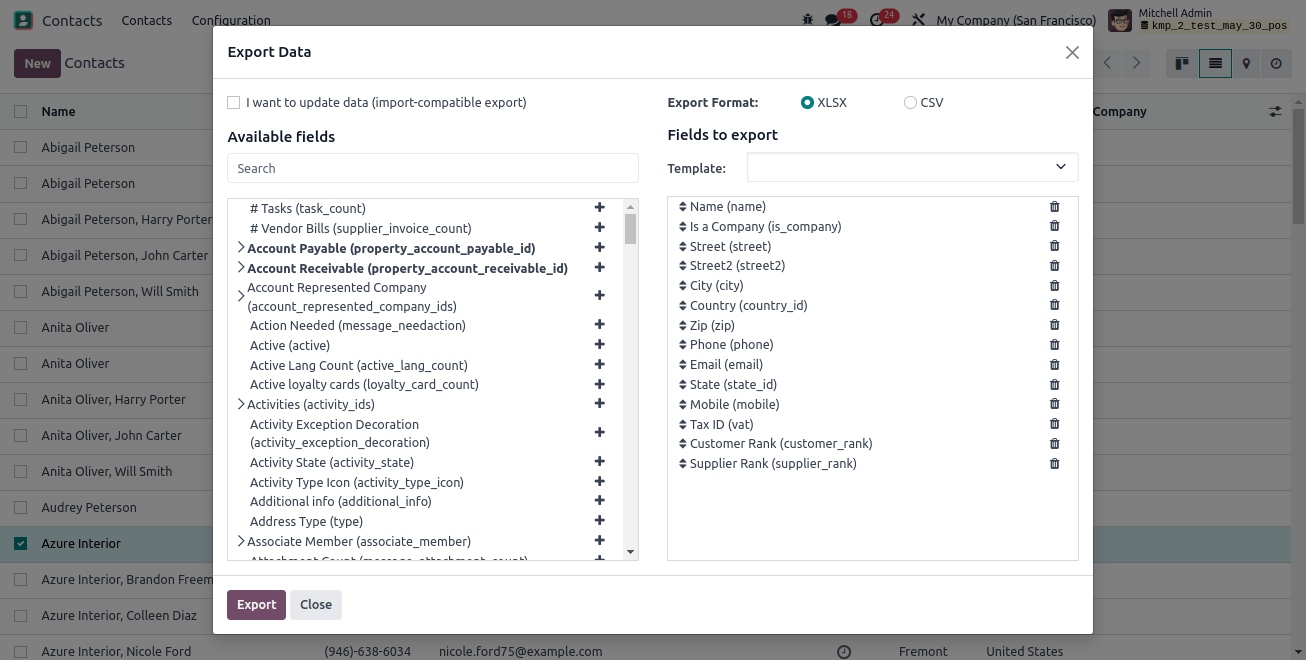
We can export the template by clicking the export button once all the fields have been added. Then make necessary updates to the template.

We may return to the contacts page after making changes to the contact template spreadsheet, click the gear symbol in the top left corner of the contact page, and choose Import Records.
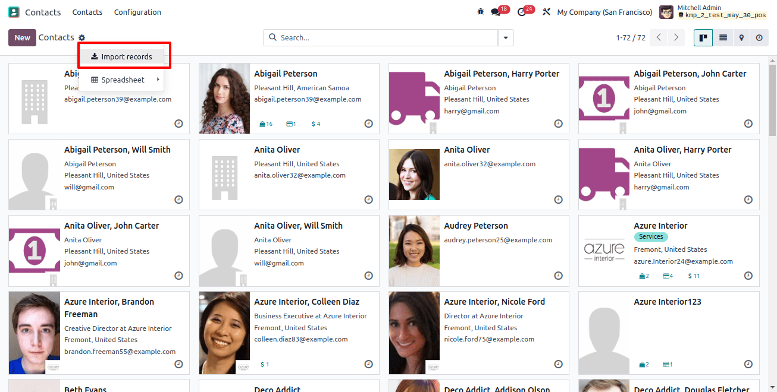
The option to upload the file from our system is located at the upper left corner.
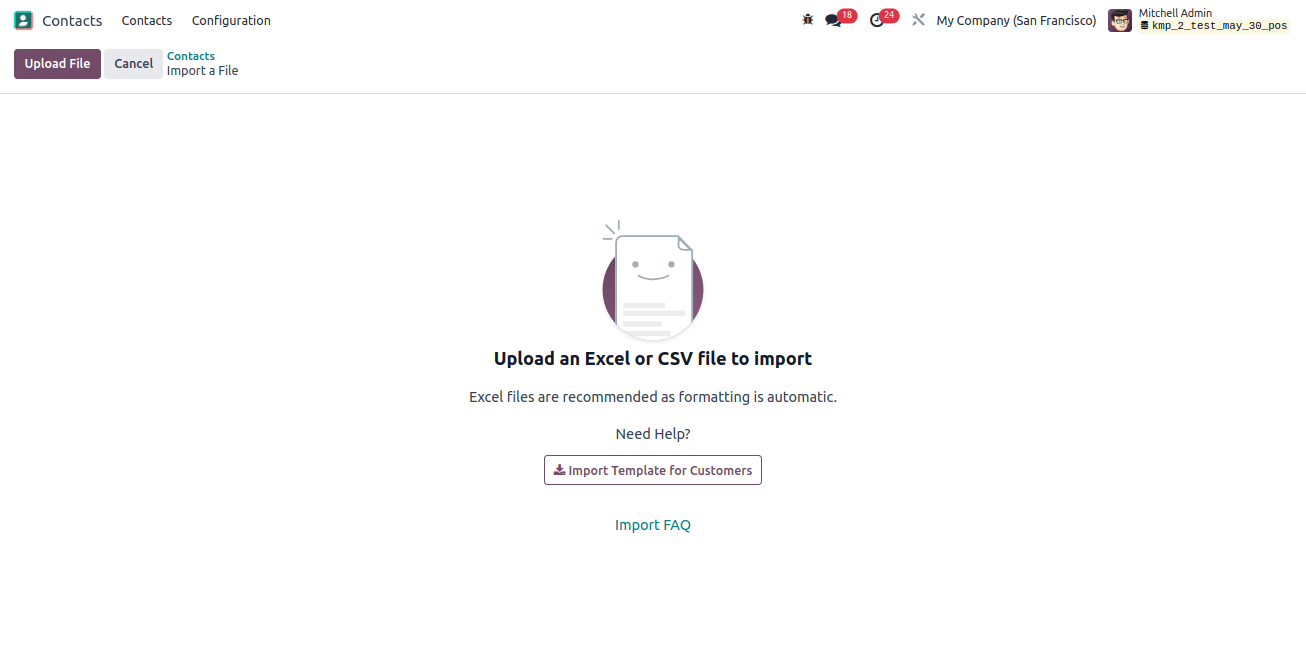
Upon file upload, a page emerges with every element of the recently updated contacts template spreadsheet, divided by File Column, Odoo Field, and Comments.
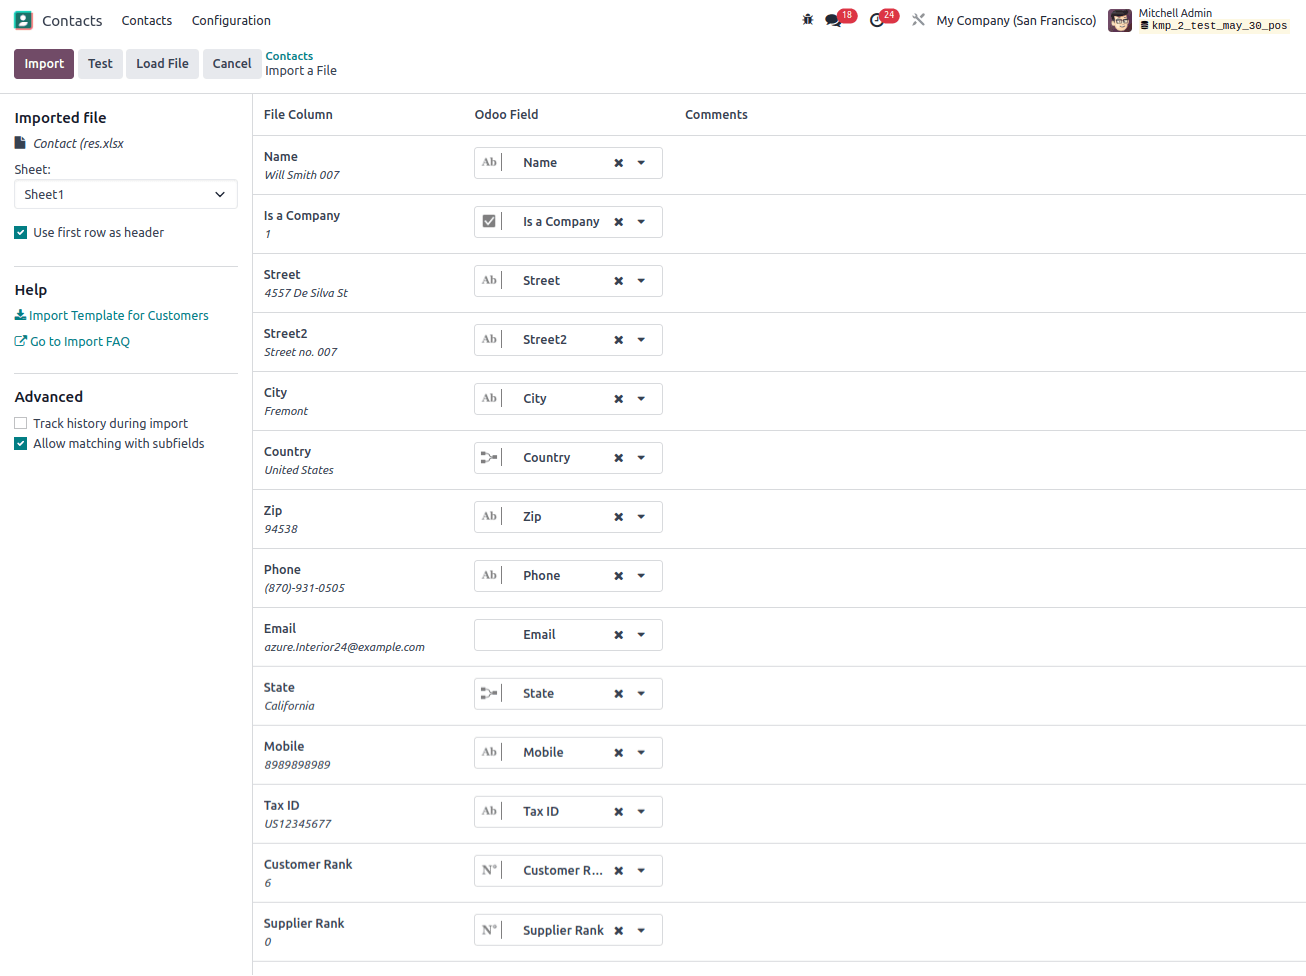
At this stage, the File Column can be manually assigned to an Odoo Field if necessary.
The Test button can be clicked in the top-left corner to verify that all the fields and columns are correctly aligned and that everything is proper.
If everything is deployed correctly, Odoo displays a blue banner at the top of the page informing the user that everything appears to be valid.
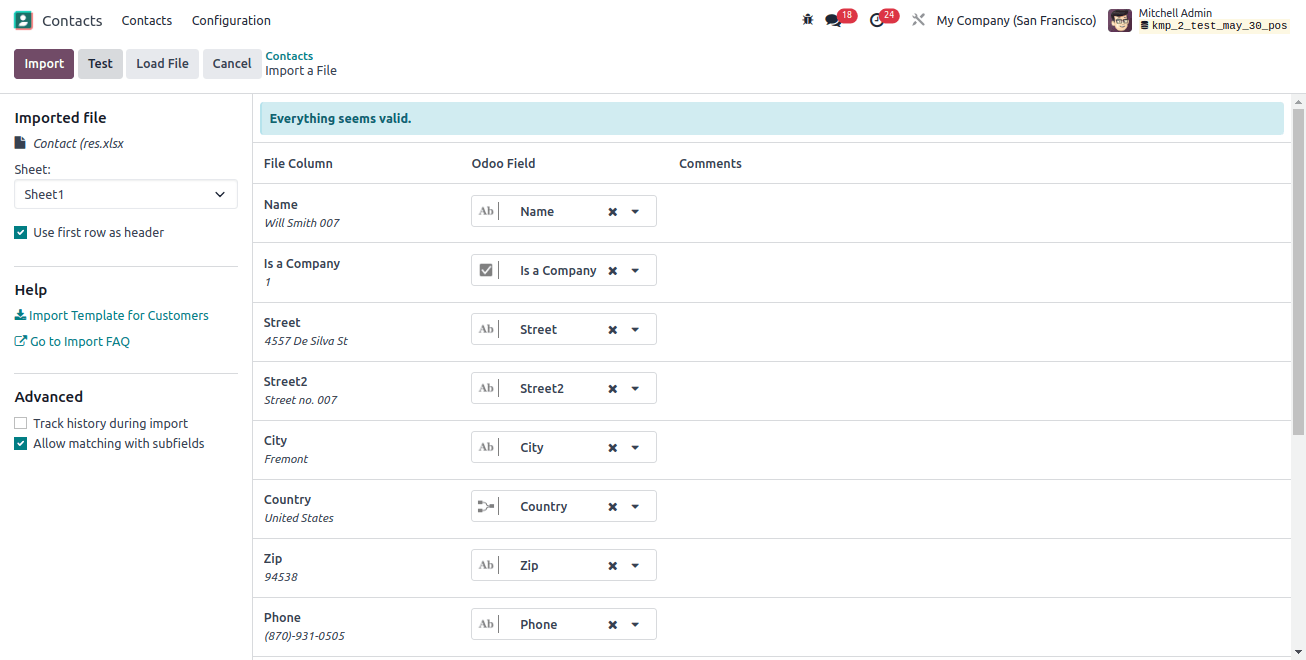
If there are any errors, Odoo flags them with a red banner at the top of the page that explains each issue's location and steps for fixing it.
We can import the records by clicking the Import button after all errors have been corrected.
A pop-up notification in the upper-right corner of the screen notifies the user of the number of contacts that were successfully imported when the records are imported.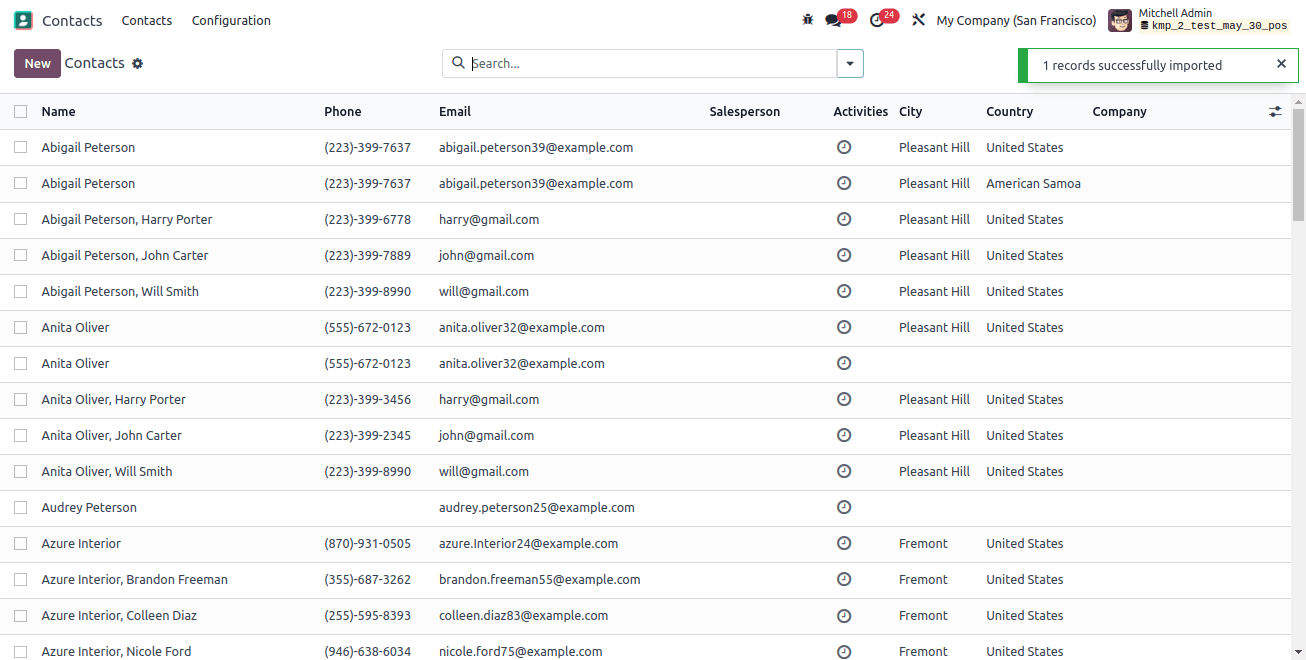
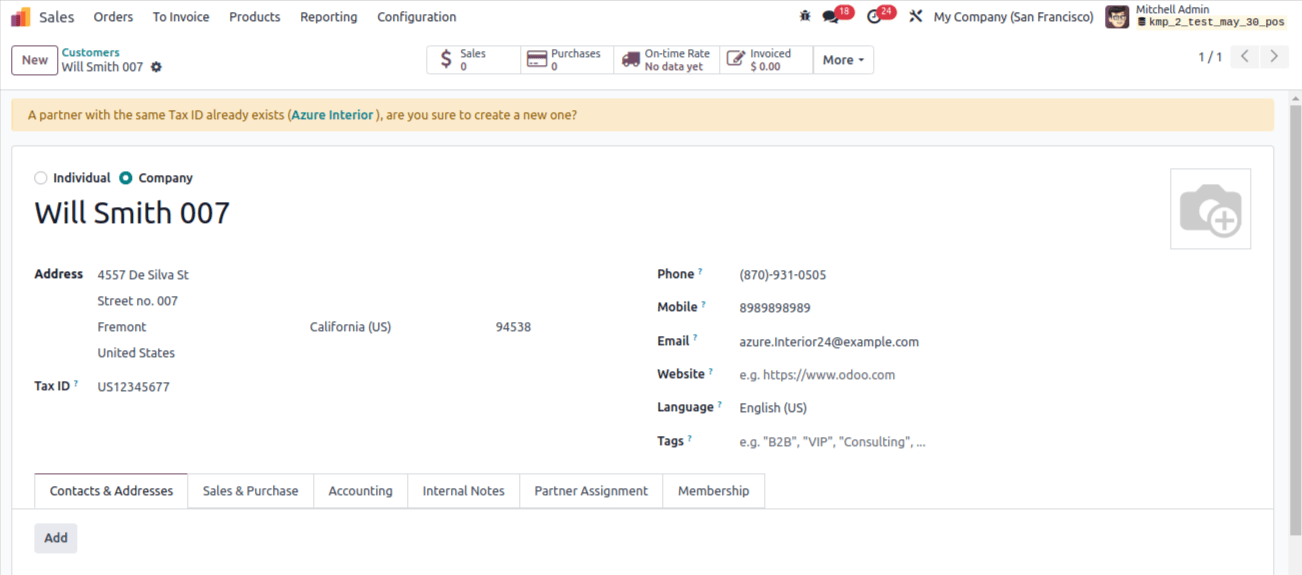
Since we have given the customer rank as 1 and supplier rank as 0, the newly created contact is considered a customer by Odoo and we will be able to view the newly-imported customer and we can access and edit them from the customers page.

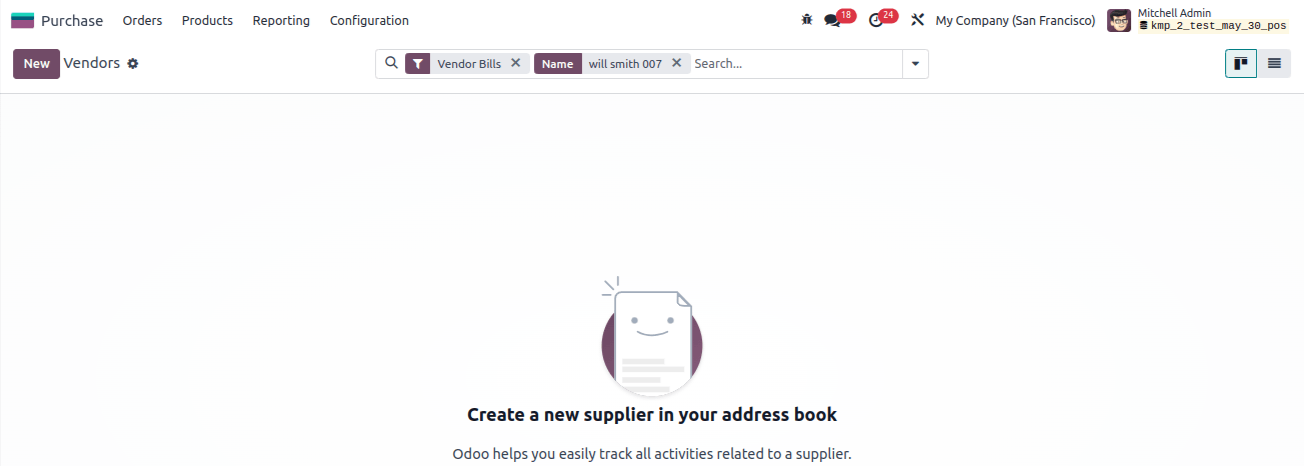
As we have assigned the supplier level of 0 to the newly formed contact, we can observe in the snapshot below that it is not available from the Vendors page.
Thus, we have witnessed the importation of clients and suppliers into Odoo 17.
By using the import feature offered by Odoo 17, we can import the data all at once rather than manually importing bulk data into the Odoo database.
The process may be made even easier by using Odoo Services, which provide professional help and support to increase the efficiency and accuracy of your vendor and customer data imports.
