By importing vendor and customer bills into Odoo, businesses can manage their billing and invoicing processes more precisely and effectively today. Users can quickly and easily upload several invoices and bills at once with Odoo's capability for importing customer and vendor bills. Customers also benefit from time and effort savings, as well as a decrease in errors made while manually inputting data.
Importing customer invoices in Odoo 17
To import a client invoice into Odoo 17, you must first create a template for the data import. We want to export a customer invoice to develop a template. To do it, select the ‘Customers’ menu in the Accounting module. Invoices are visible there.
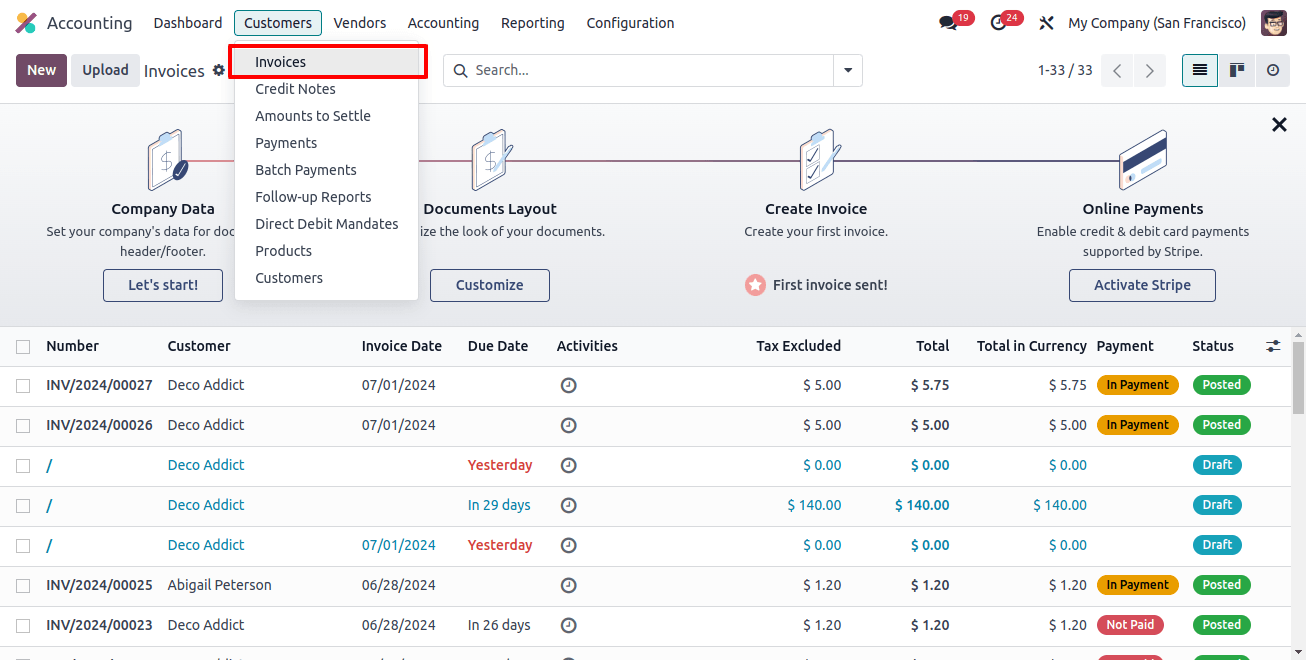
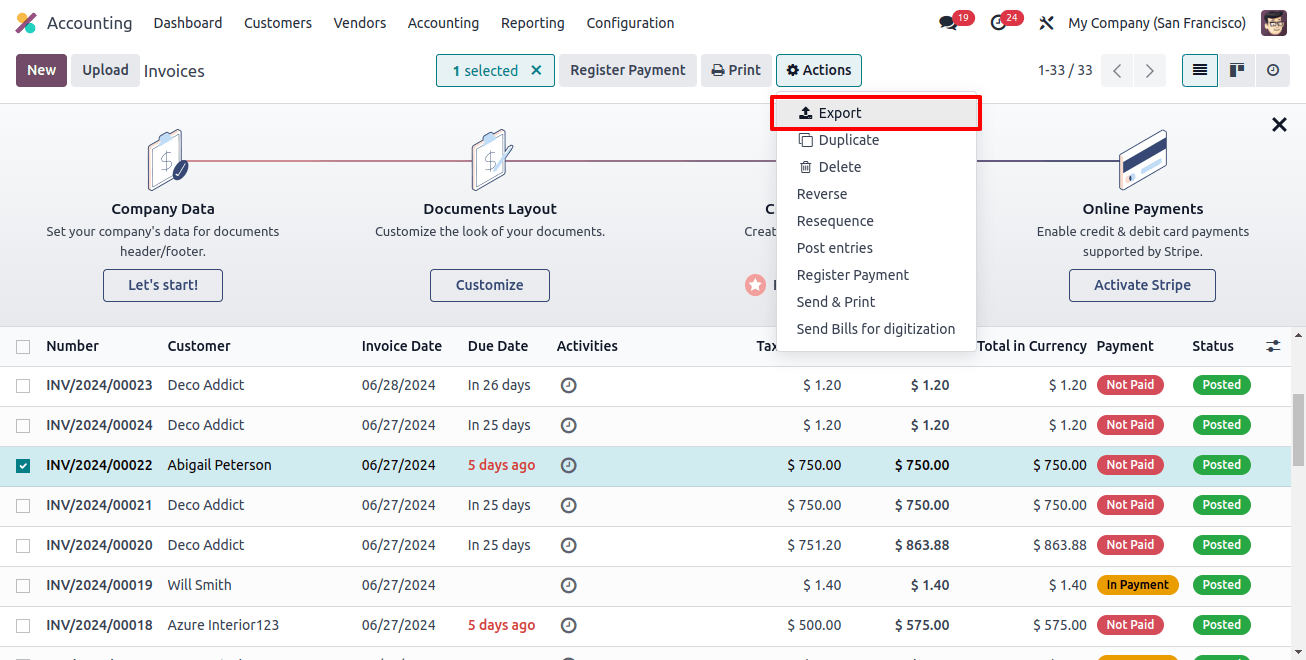
All of the current invoices are available when we click invoices. Select an invoice from there, then press the Action button. Next, select Export from the action button menu.
A popup window emerges with two sections: In this fields to export are shown on the left, and all available fields are shown on the right. By selecting the plus icon, we may add new fields from the list of accessible fields to the export area.
We can use the previously produced template if we wish to export the data more than once by choosing to construct a new one. In the field to export section, include all the fields that are necessary for exporting client invoices.
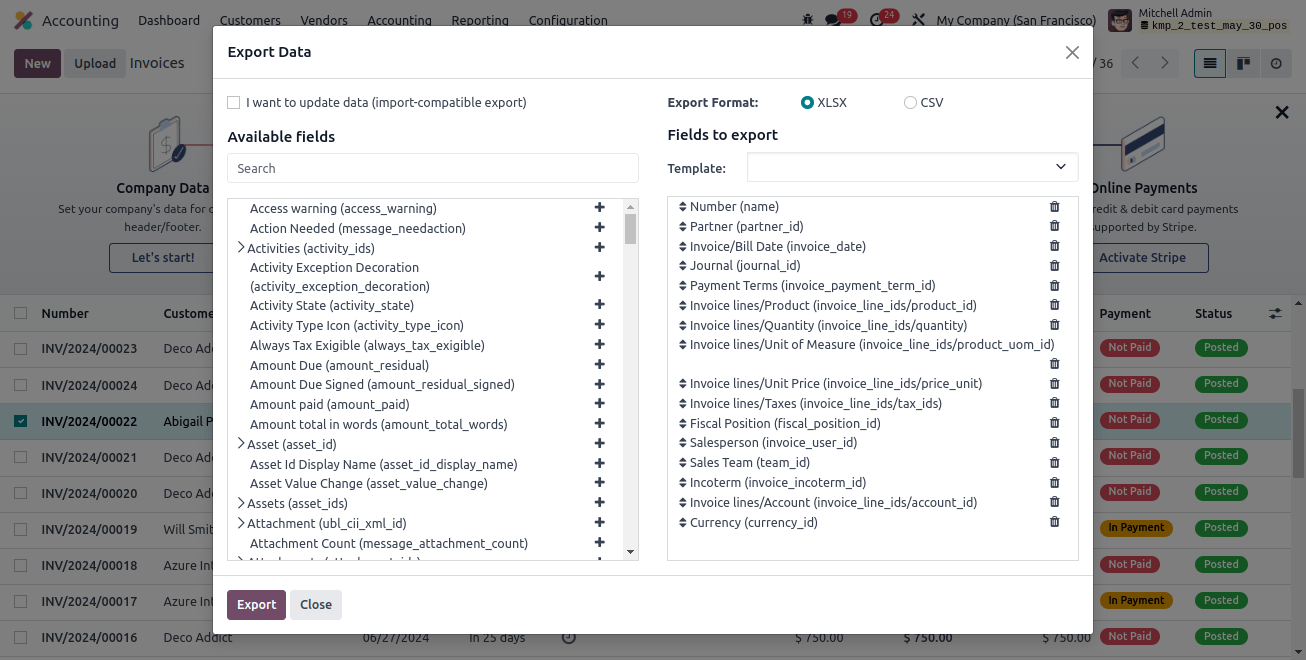
Number: The invoice's unique number is indicated here.
Partner: This term describes a clientele that your company works with.
Day of invoice: The day the bill was issued is referred to as the "bill date."
Journal: The accounting records of the invoice are kept in this record-keeping entity.
Payment terms: To help clients pay invoices accurately and on schedule, clearly outline all terms related to a sale's payment.
Product/invoice line: These are the fields that are used to identify the items in that invoice's sale order.Invoice line/quantity: The quantity of each product listed in the sale order is shown by the invoice line or quantity.
Invoice line/units of measure: Units of measure for each product in the sale order are listed in the invoice line/units of measure field.Invoice line/unit price: This is the unit cost for every item in the sale order that was utilized to generate the invoice.
Invoice lines/Taxes: The taxes that are applied to every item on the client invoice are described in this way.
Fiscal position: Fiscal position is used to describe a collection of guidelines or configurations that specify how accounting entries and taxes should be handled for certain clients or suppliers in light of their financial or tax circumstances.
Salesperson: This is a reference to a certain person who is in charge of overseeing operations connected to sales.Sales team: This is a reference to a certain team of people in charge of overseeing operations connected to sales.
Incoterm: It is used to describe International Commercial Terms, which are conventional trade terms that are predefined and used to split costs and obligations between the buyer and the seller in contracts for international sales.
Invoice line/account: Those are the accounts that are utilized for sales activities.
Currency: used to indicate the money that is recorded or issued on client invoices.
To generate an invoice template, all of these fields must be filled in.
After that, select the Export option from the same popup window, and the data—in both CSV and XLSX formats—will be properly saved to our system.


We exported the data as seen here. The same sheet can be modified by entering the new invoice number, partner name, products to be included in the invoice, pricing information, and any other details we wish to add or edit. The sheet can then be saved.


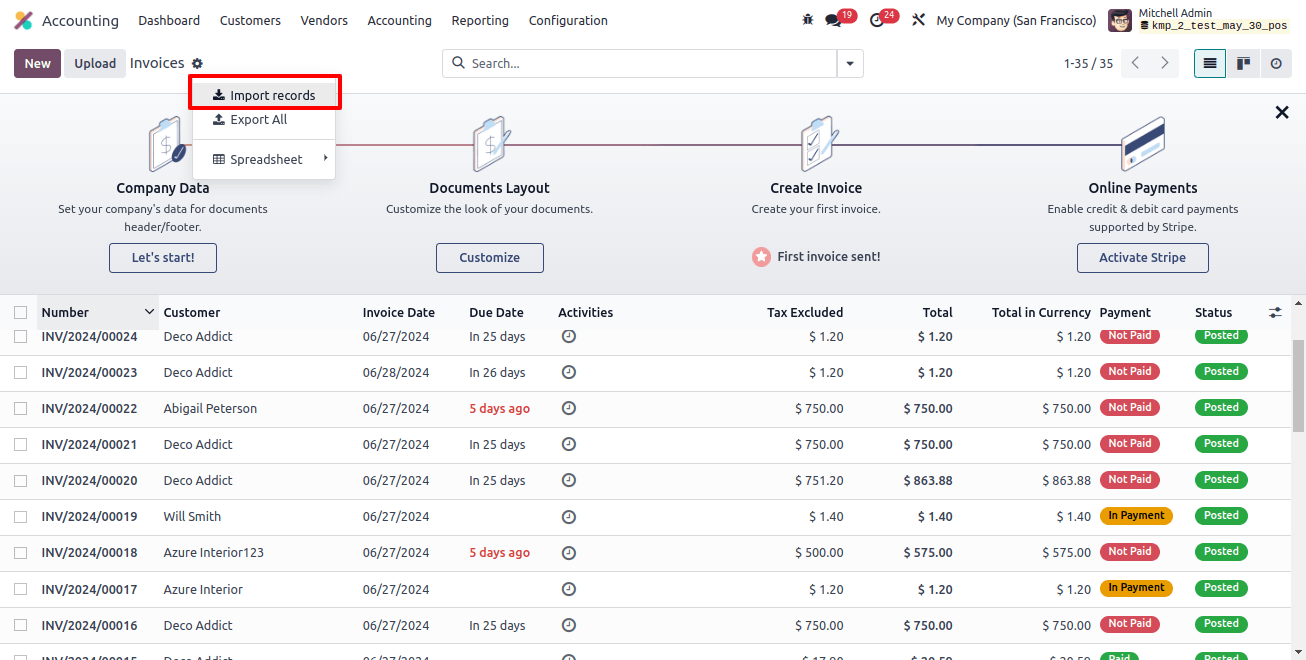
Importing the freshly prepared invoice data into Odoo is the next step. To do this, navigate to the invoices section of the accounting module. Then, select the Import record button located beneath the action button.
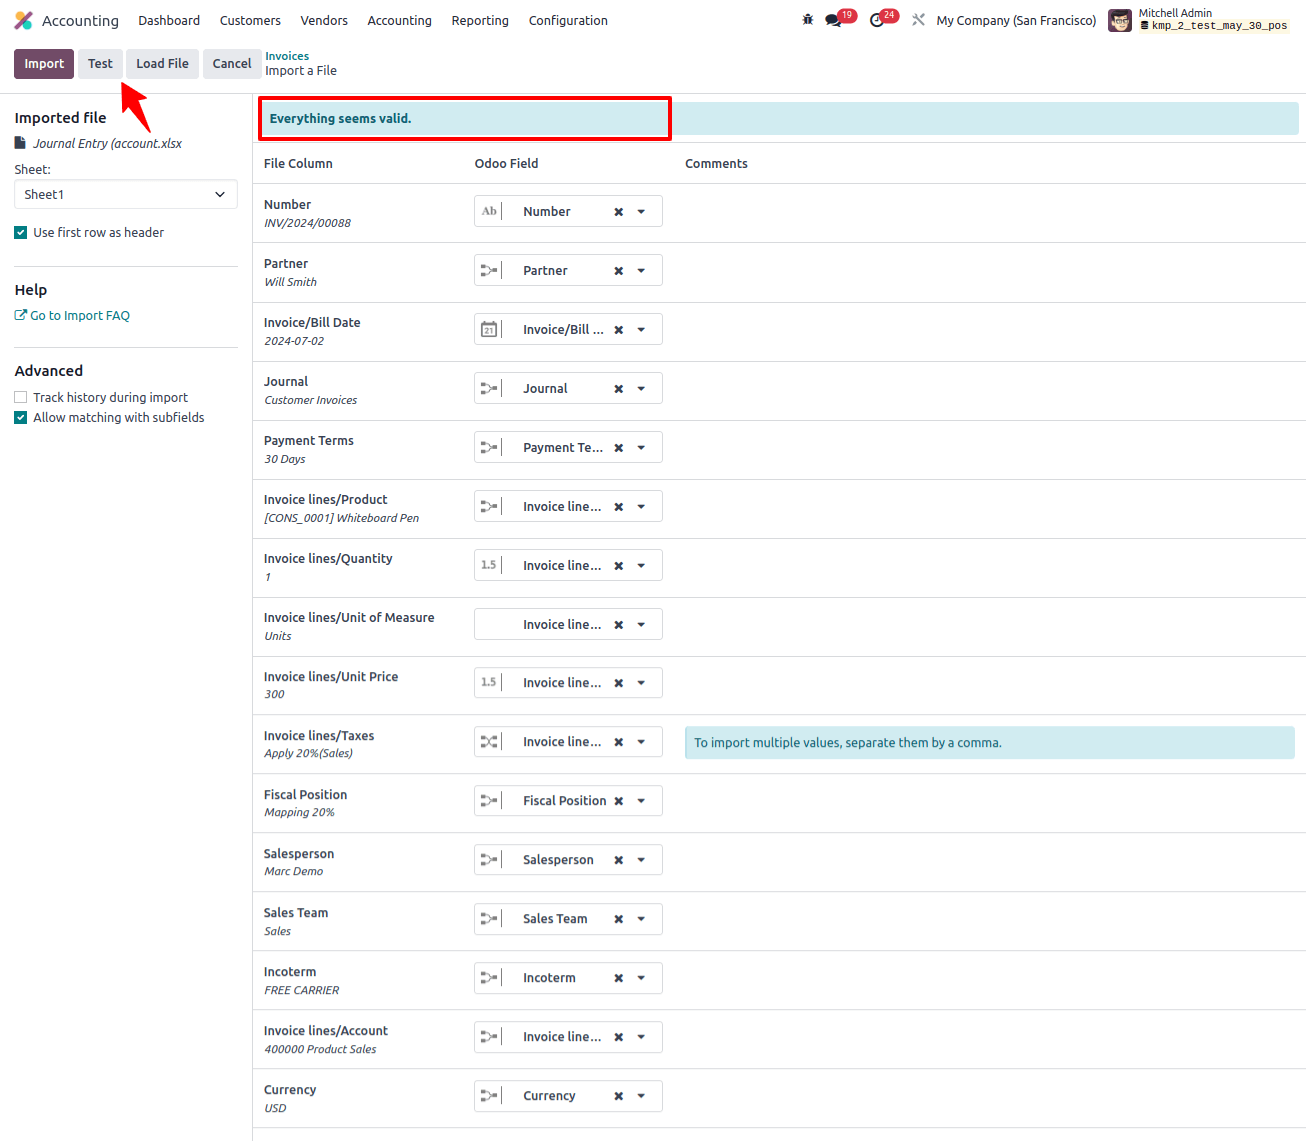
Next, upload the data for the new invoice by selecting the Upload file option in the new window. When you click the Test button in the new window, an alert titled ‘Everything seems valid’ will appear if all the fields and data entered are accurate.
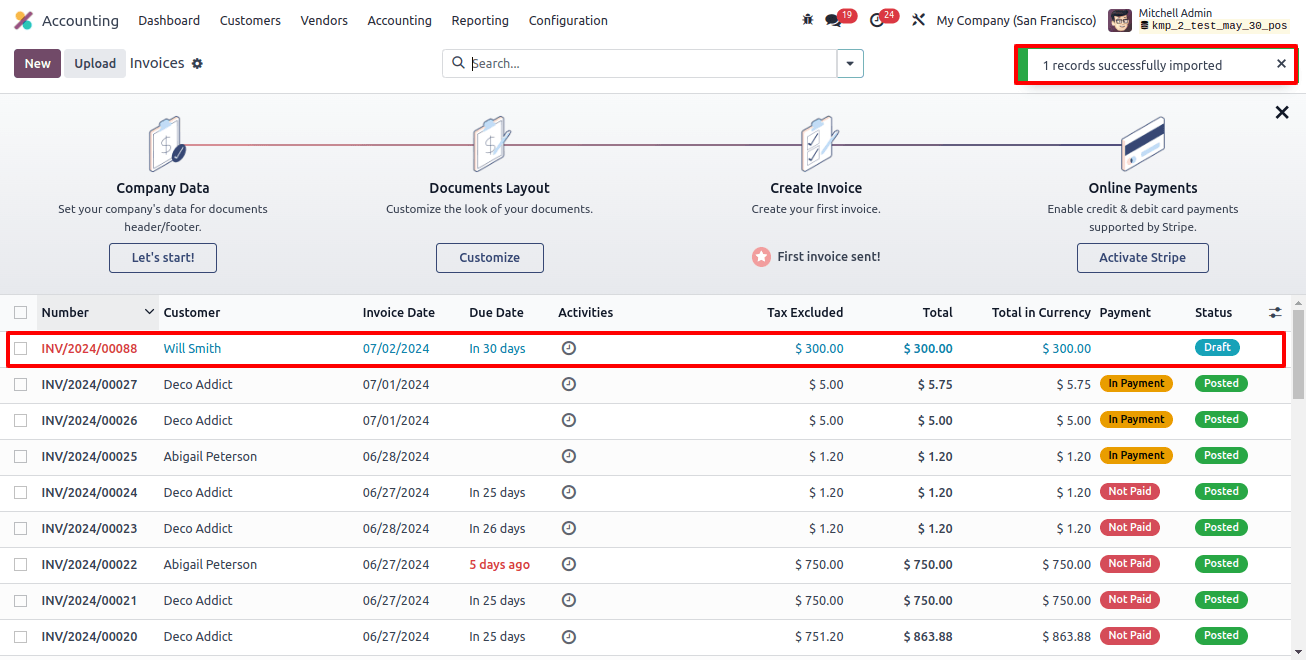
To import the invoice into the Odoo 17 database after testing, select the import button. In the draft stage, the invoices are also imported.
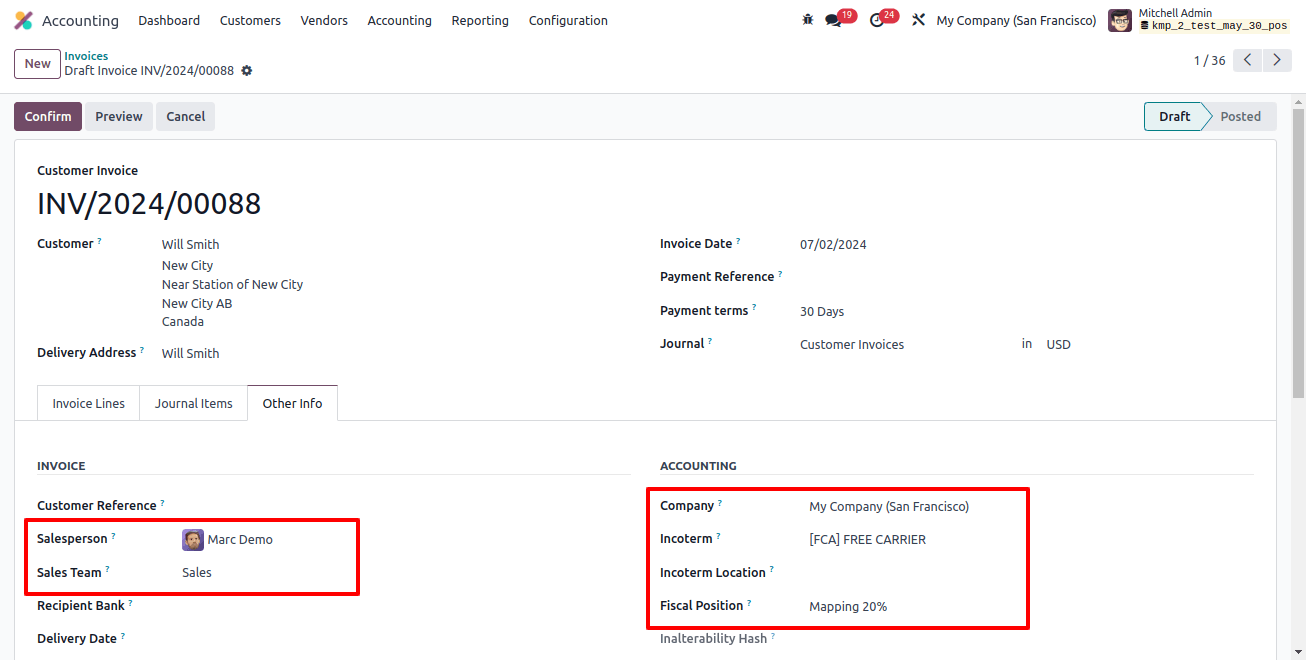
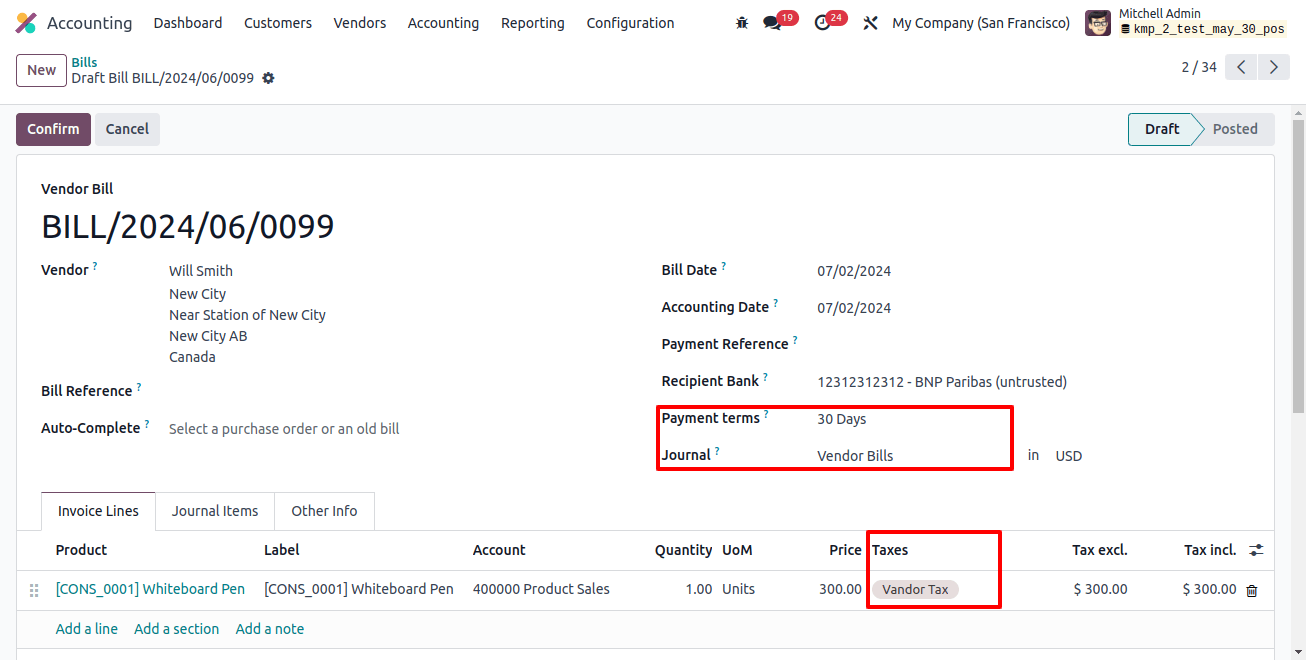
All of the information we entered in the sheet, such as the customer, payment terms, journal, products, quantity, unit price, tax, sales team, salesperson, incoterm, fiscal position, etc. It is accurately imported into the customer invoice when we access its form view
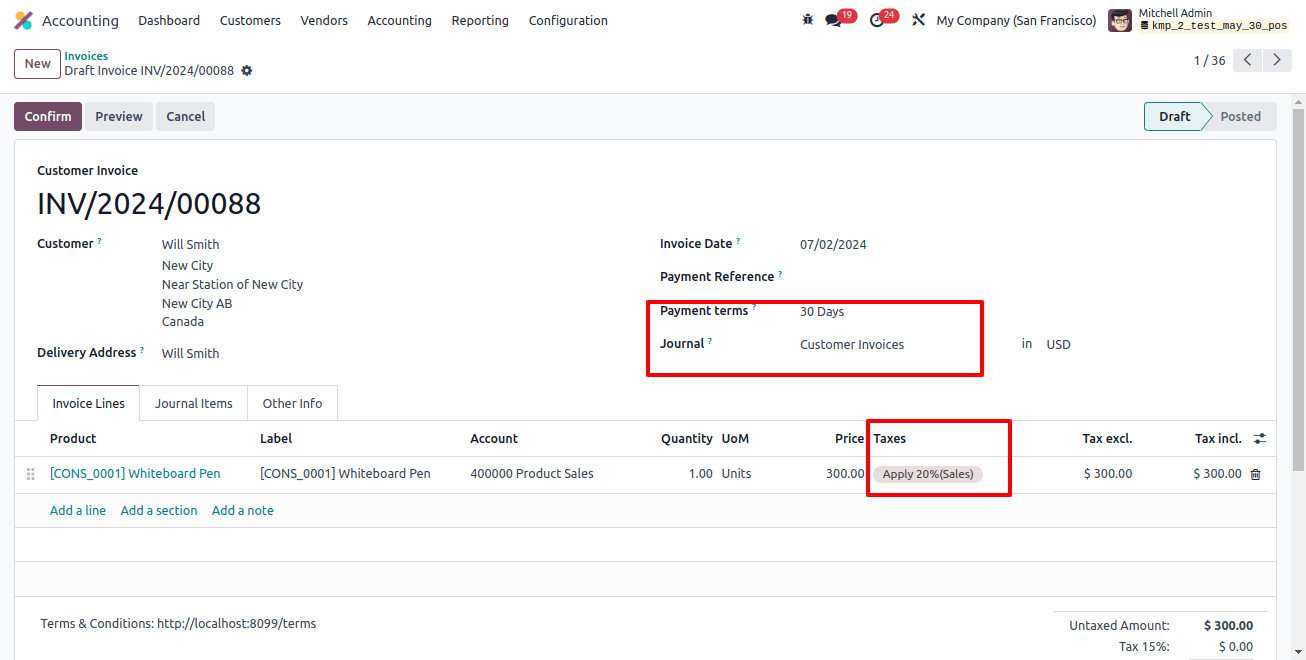
The configured tax that is applied to the invoice in this case is called ‘Apply 20%(Sales).’ When the invoice is loaded into the Odoo 17 database, it will be at the draft stage. After verifying that all of the imported data is accurate, we must later confirm the invoice.
Importing vendor bill in Odoo 17
To import data into Odoo 17, we also need to template when importing bills. The sheet can be prepared by exporting bill data.
Therefore, to create a template, we must first export a vendor bill. To do this, navigate to the ‘Vendors’ option in the Accounting module to view invoices.
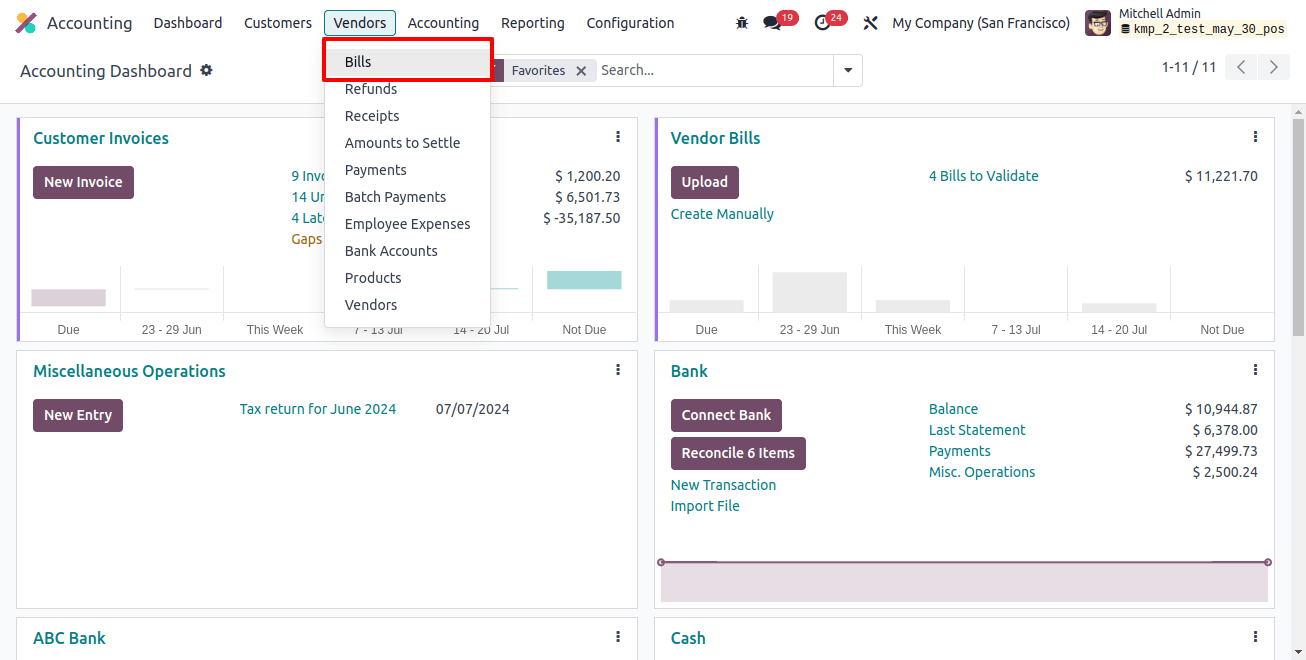
All of the current bills are available in the Odoo 17 database by selecting Bills. After that, select a bill and press the Action button. Next, select Export from the action button’s menu.

A popup window emerges with two sections: Fields to export are shown on the left, and all available fields are shown on the right. By selecting the plus icon, we may add new fields from the list of accessible fields to the export area.
We can use the previously mentioned template if we wish to export the data more than once by choosing to create a new one. In the field to export section, include all the fields that are necessary for exporting client invoices. Also, there are two file-saving options .csv and xlsx. Any format is an option for us to select.
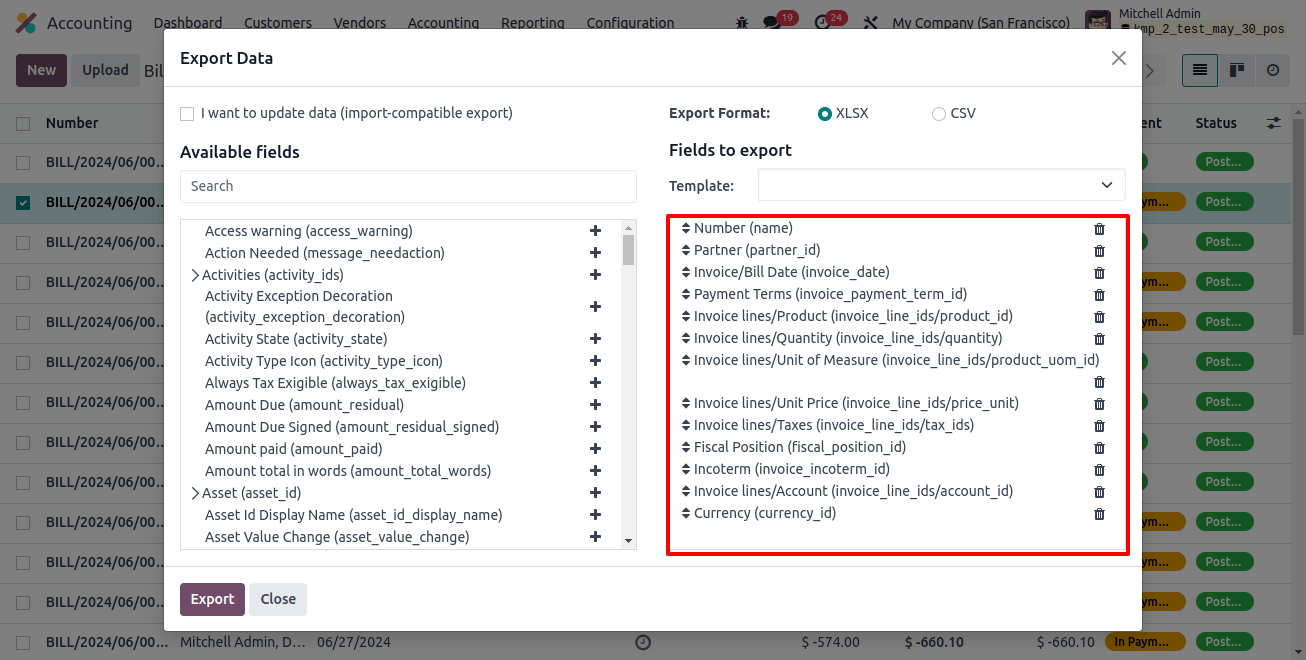
Number: This refers to the vendor bill's unique number.
Partner: Usually refers to a vendor organization that your company works with.
Invoice/bill date: The term "bill date" designates the day the bill was issued.
Payment terms: Relate to the conditions that a company and its suppliers have decided upon regarding the bill payment deadline.
Invoice line/product: These are the fields that are used to identify the goods in that bill's purchase order.
Invoice line/quantity: The units of measure for each product in the purchase order are listed in this area.Invoice line/units of measure: The units of measure for each product in the sale order are listed in this section.
Invoice line/unit price: This is the cost per unit for every item in the purchase order that was utilized to generate the vendor invoice.
Invoice lines/Taxes: The taxes applied to each item on the vendor bill are described in this way.
Fiscal position: It is used to describe a collection of guidelines or configurations that specify how accounting entries and taxes should be handled for certain clients or suppliers in light of their financial or tax circumstances.
Incoterm: It is used to describe International Commercial Terms, which are conventional trade terms that are predefined and utilized to split costs and obligations between the buyer and the seller in contracts for international sales.Invoice line/accounts: A particular general ledger account linked to the order line of a bill.
Currency: The taxes applied to each item on the vendor bill are described in this way.
To generate a bill template, all of these fields must be filled in.
Then, in the same popup window, select the Export button, and the data will be successfully saved to our system.


We exported the data as seen here. By entering the new bill number, partner name, products we wish to include in our bill, pricing information, and any other details we want to edit or add to the new bill, we may make changes to the same page and save it.


Importing the freshly generated bill data into Odoo is the next step. Go to Bill in the accounting module to do it. Click the Import record button located beneath the action button.
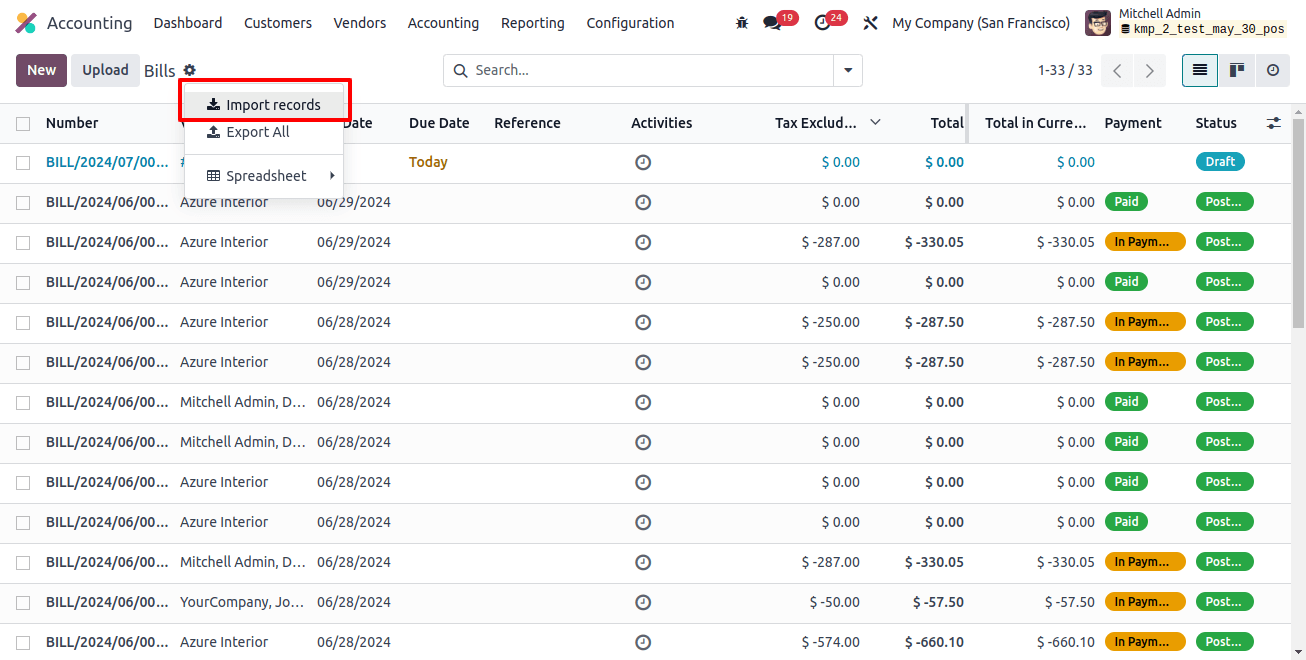
Next, upload the data for the new bill by selecting the Upload file option in the new window. Click the Test button in the newly opened window. If all the fields and data are correct, a message stating that "Everything seems valid" will appear.
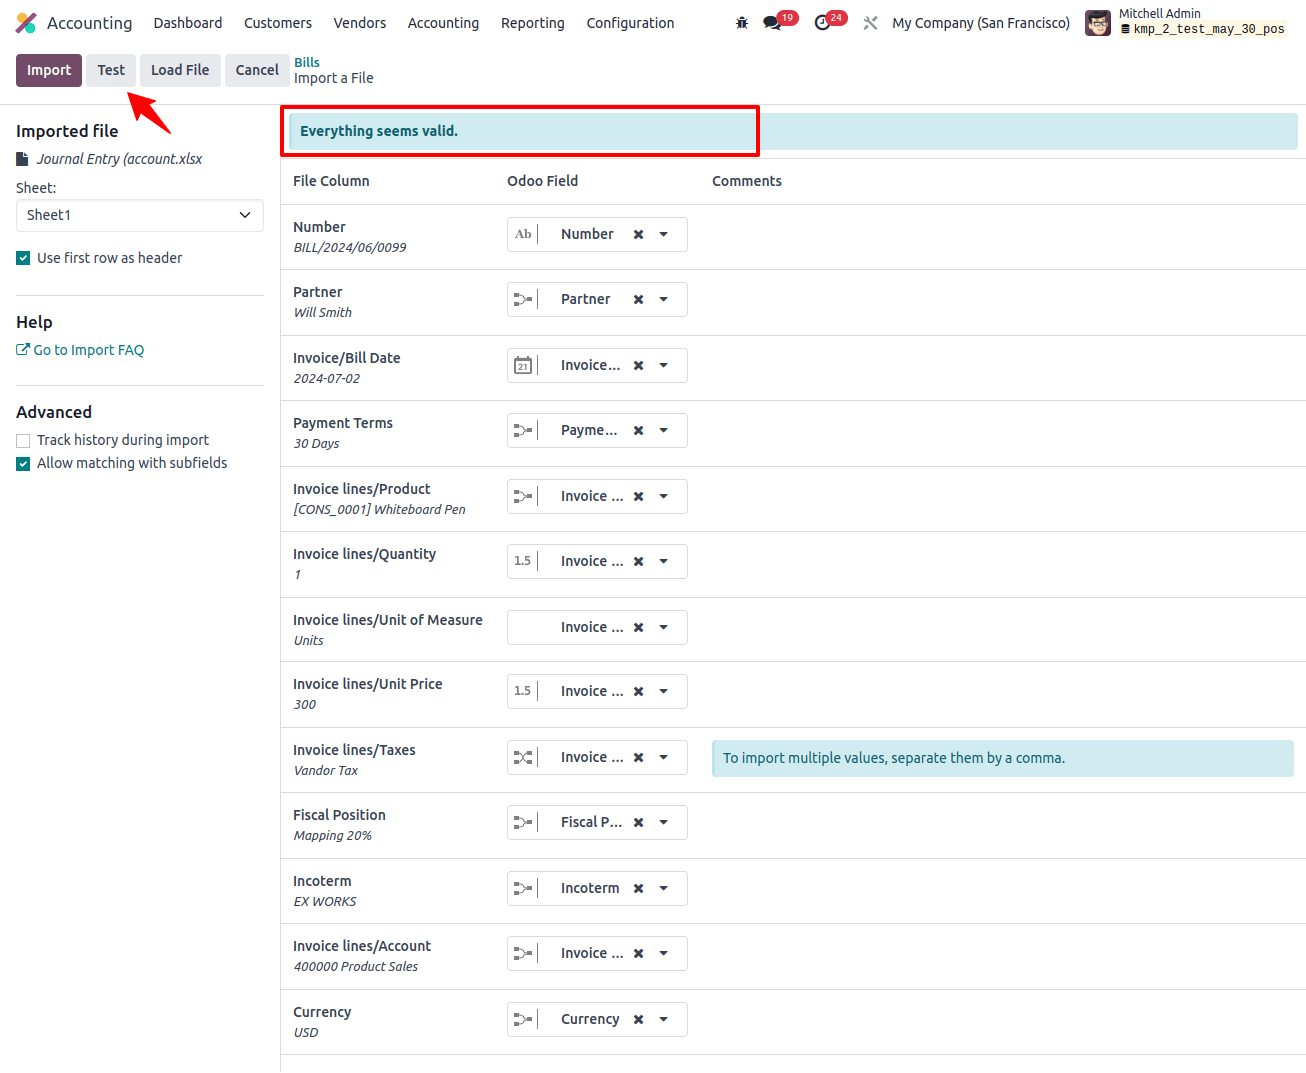
Next, select Import by clicking the icon next to Test. After the new bill has been successfully imported, a notice stating that it is still in draft form will show up.
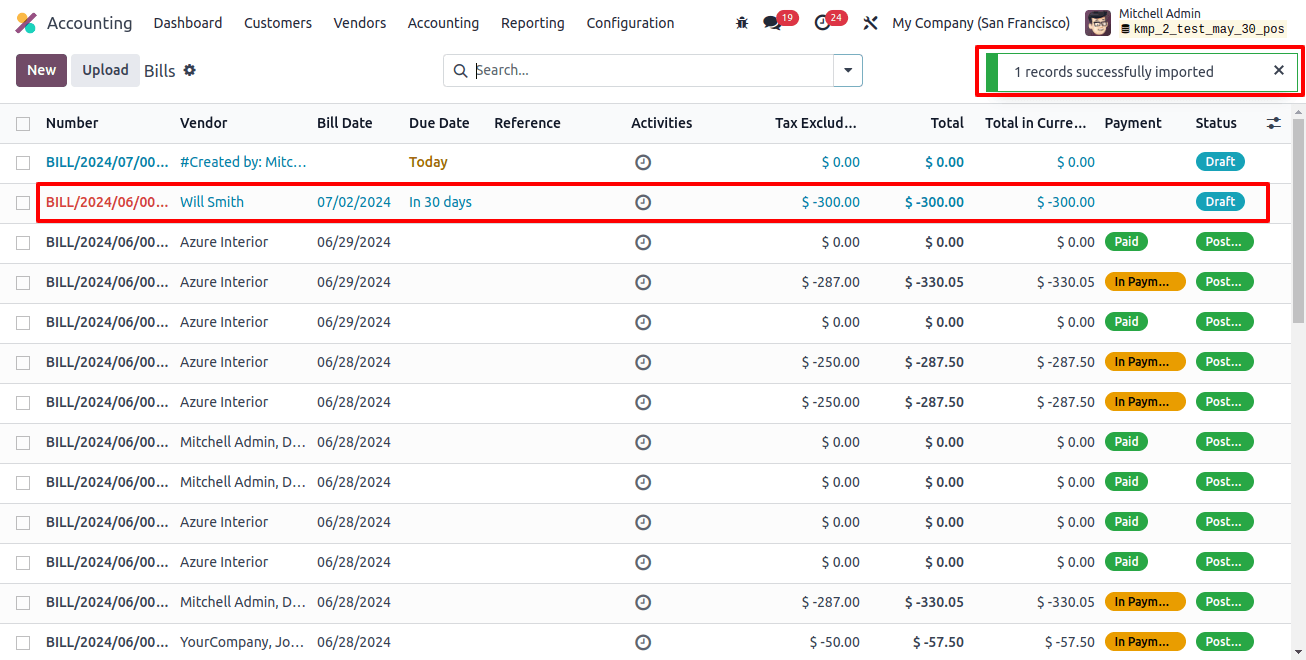
We may view all the information regarding the product we supplied as well as additional information when we open the vendor bill.
We’ve covered how to import vendor and customer bills into Odoo 17 in this blog. This Odoo feature contributes to increasing productivity in company activities by improving efficiency, accuracy, time-saving, etc.
To sum up, importing vendor and customer bills into Odoo 17 is an essential step for effective financial management. Clear instructions have been provided in this step-by-step tutorial to streamline the import process, guarantee correctness, and save time.
This process can be made much easier by making use of Odoo Services, which provide professional help and support to optimize the effectiveness and dependability of your financial operations.
Related Post:
