The term "tax management" describes the organized, strategic planning, and supervision of an organization's handling of its tax-related responsibilities. It involves using a conscious and proactive strategy to assure tax compliance, reduce tax payments, and maximize financial resources.
Effective tax administration is critical for businesses to meet their legal requirements, maintain financial transparency, and make informed decisions that improve their overall financial health.
Any business or organization's point of sale and accounting module needs to include taxation and tax reporting, emphasizing the importance of these topics from several angles.
How to Configure Taxes in Odoo 17 POS?
Configuring Taxes in Odoo POS
Through its Configuration menu, the Odoo17 PoS module makes tax computation simpler by giving users access to the Taxes platform, where they can manage purchase and sales taxes.
Go to the "Configuration" menu in the Point of Sale Module and select the "Settings" window to enable this feature. As seen in the screenshot below, scroll down to the "Accounting" area and select the "Flexible Taxes" option.
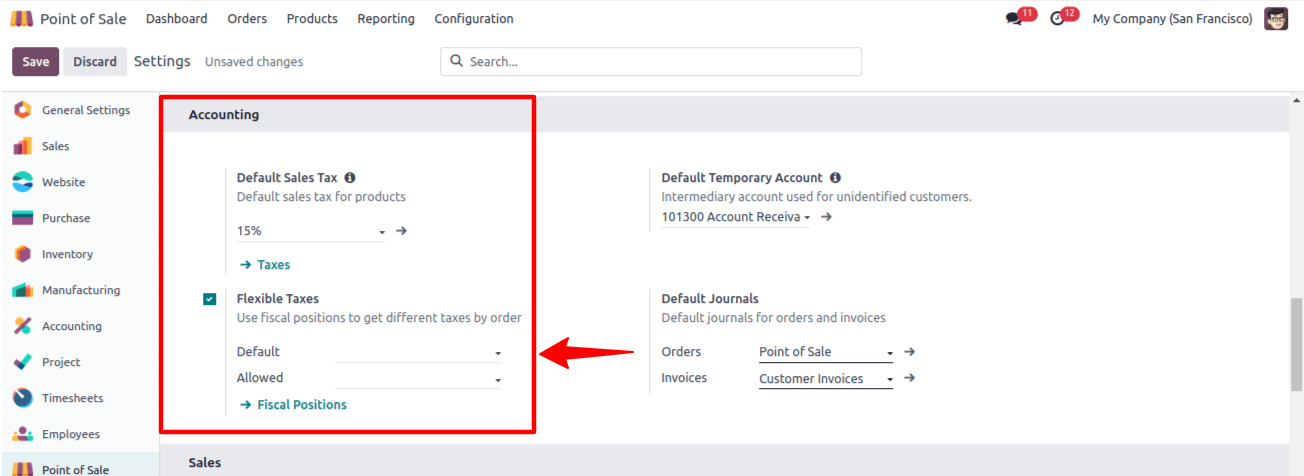
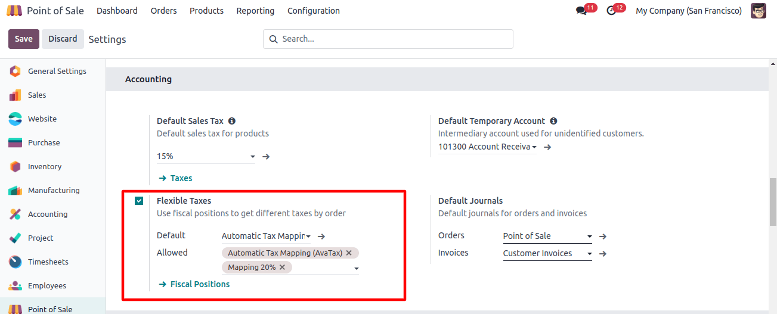
Next, fill in the 'Default' section with a default fiscal position that will apply to all sales within the selected Point of Sale. In the "Allowed" box, more fiscal positions can be added for choosing.
Tax Defaults
For proper accounting and reporting, Odoo's tax setup workflow offers tools to activate sales taxes, create and manage default taxes, and customize tax options.
In Accounting Firm mode, these parameters control which taxes are applied automatically when a new product is created or a new line is added to an invoice.
To alter the default taxes, open the Configuration Settings window, navigate to the Accounting section, select the appropriate taxes for the default sales and purchase tax, and save the changes. You can also choose a default tax in the Default Sales Tax field.

Click the Taxes link to add a new tax. To make sure that the applicable taxes are enabled for your company, you must then activate sales taxes from the list view.

Only a small number of nation-specific sales taxes are activated by default in Odoo, despite the majority being preconfigured. Go to the specific tax setting form and toggle the button beneath the Active column for t.he applicable taxes to activate extra taxes.
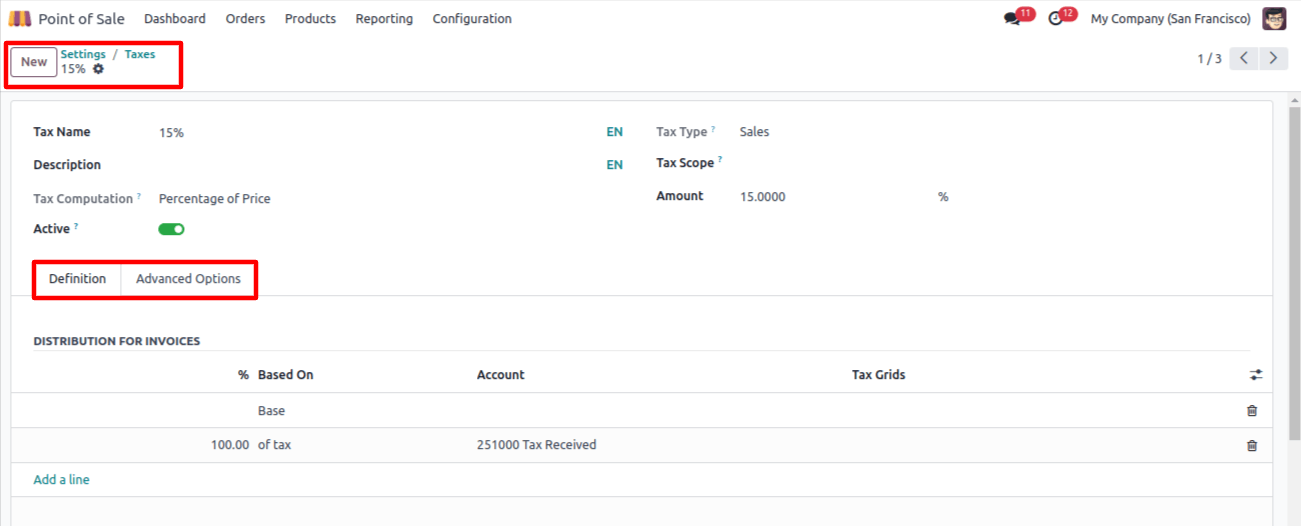
In the form view's designated fields, provide the Tax Name and a Description. For administrative users, the tax designation is indicated in the description found on sales orders, invoices, and product forms.
Tax computation entails combining taxes, some of which may be sub-taxes. Precise tax sequencing is essential because the sequence in which applications are made can affect how much tax is computed.
* The percentage of price taxes is calculated by multiplying the sales price by the tax percentage.
* Fixed taxes stay constant in the default currency.
* The Total Amount serves as the taxable basis for calculating tax as a percentage
* Two bits of Python code are used to specify tax: the first one determines the tax amount, and the second one specifies the tax application.
Whether in papers about sales or purchases, the Tax Type establishes the tax application and where it appears. Tax utilization is limited to either commodities or services by the Tax Scope.
Note: Users can update or add new taxes in Odoo to have more precise control over tax setup. To limit tax applications as necessary, users can also designate tax types (such as Sales, Purchase, None) and tax scopes (such as Goods and Services).
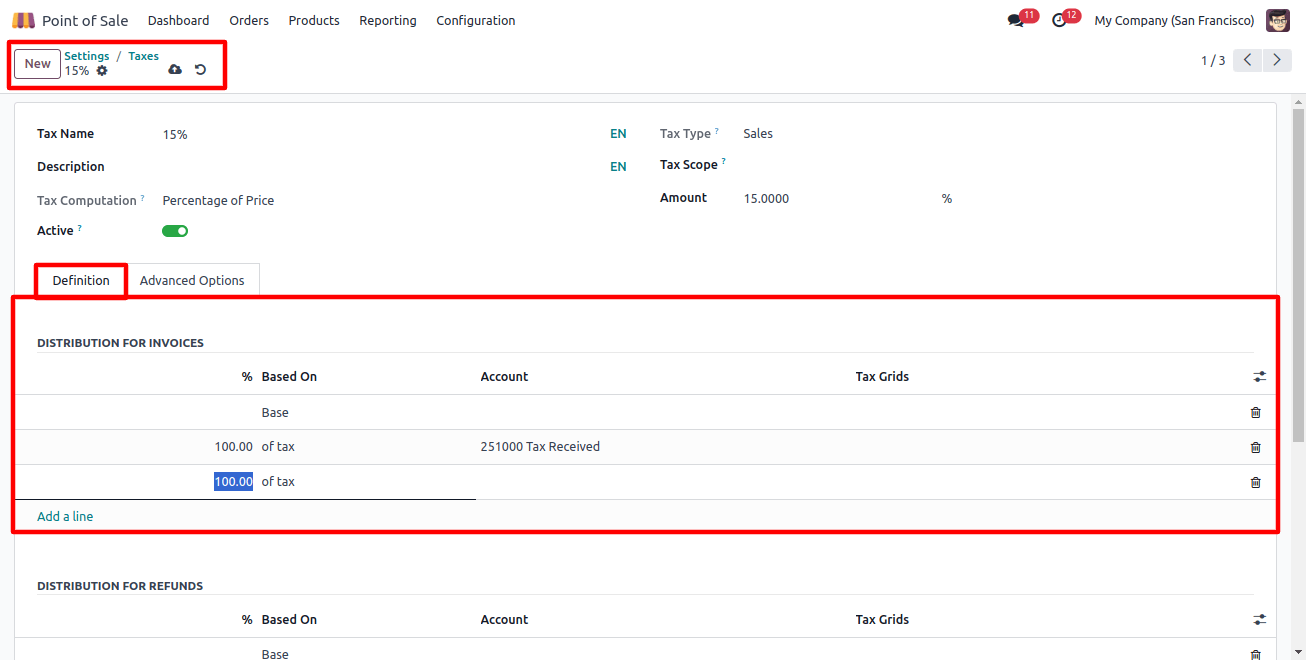
Definitions Tab
Based on the base, tax percentage, account, and tax grids, the Definition tab enables precise tax amount distribution to defined accounts and tax grids.
Advanced Options Tab
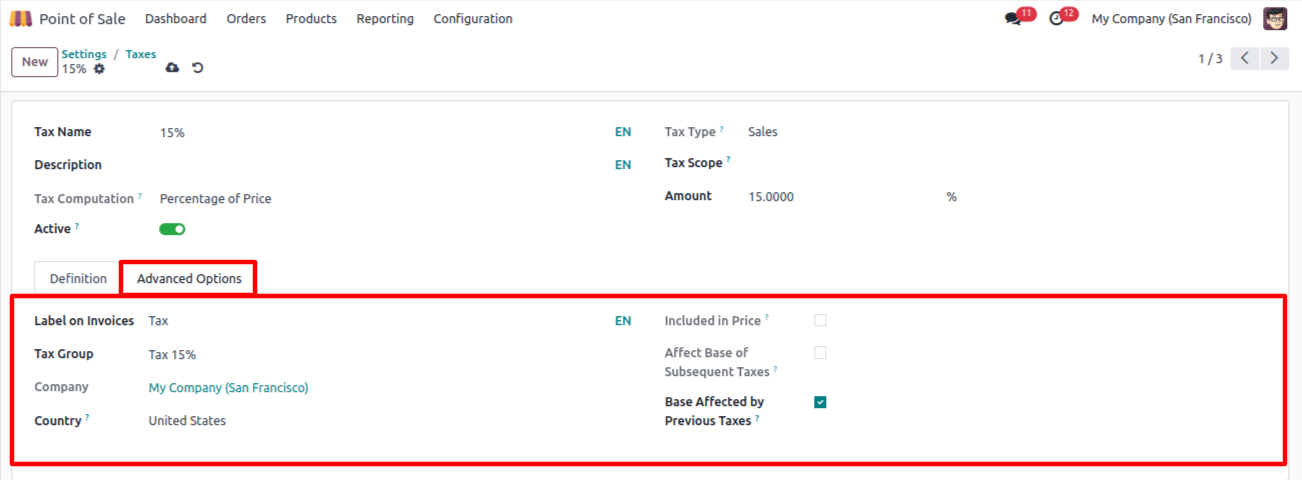
The advanced options tabs show the tax label on each line item of the invoice, allow you to choose the tax group, include taxes in the price and analytic cost, change the base for upcoming taxes, and refer to additional taxes not included in the regular government taxes, such import/export charges, luxury taxes, and environmental taxes.
Businesses may guarantee proper tax calculation, regulatory compliance, and smooth accounting and reporting procedures by adhering to this thorough tax configuration method in Odoo.
Tracking the Tax on a POS Sale
By selecting the New Session or Open Session button from the POS Dashboard window, as indicated below, we may initiate a new POS order from a shop session and examine the tax application inside sales orders.

I've started a new store session and chosen the necessary items to show how to order sales and apply taxes by the tax setting.
As seen below, the shop dashboard window's left side displays the total quantity of the products.
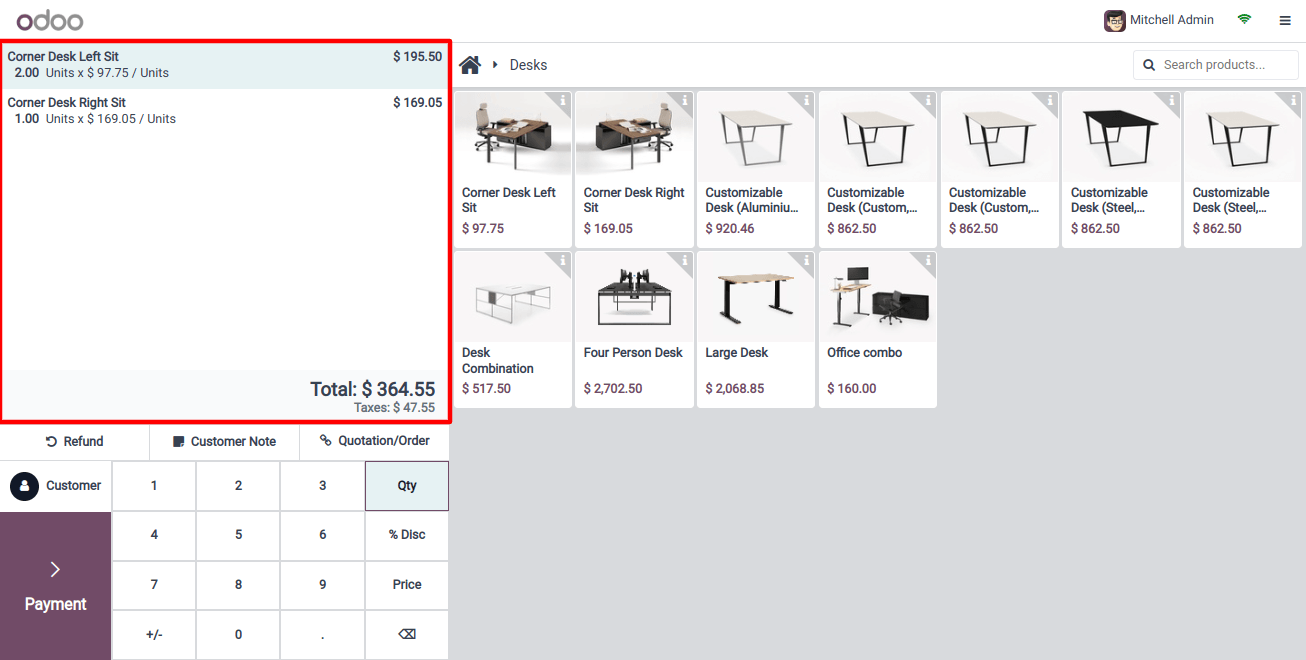
Next, select the payment methods and use the 'Payment' button to continue with the payment process.
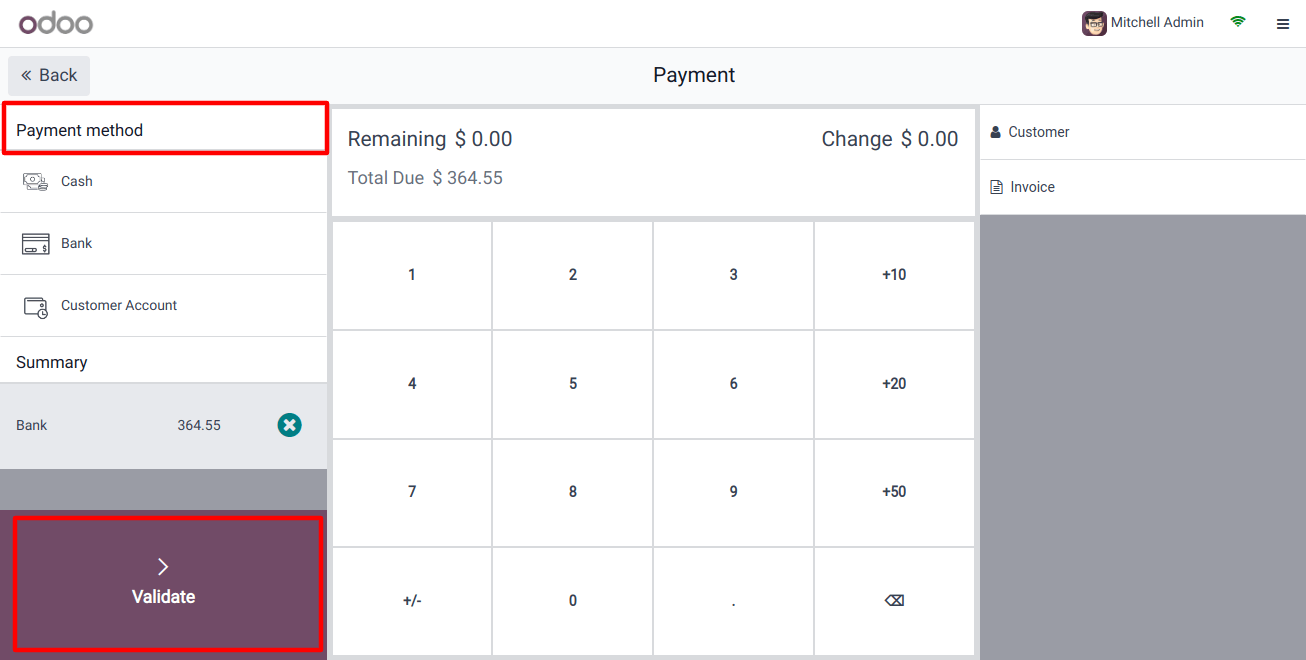
To verify the payment after choosing your payment method, click the Validate button.
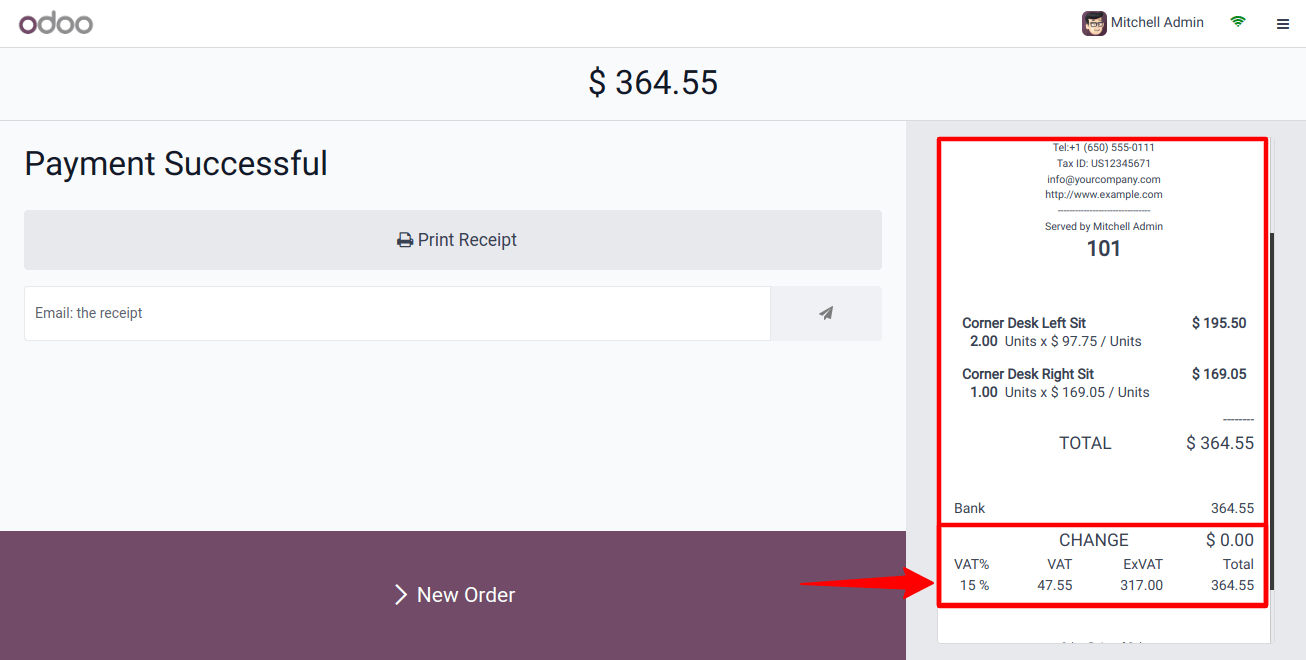
This will produce the sales invoice, as shown in the screenshot below, where we can see the applicable tax rate for each product as well as the 15% tax percentage.
Choosing Adjustable Taxes
The fiscal positions function helps businesses automatically select the appropriate taxes and accounts for each transaction based on the location and type of supplier and customer company. This helps to ensure efficient tax application and record-keeping.
From the Configuration Settings window, we can activate the Flexible Taxes by selecting the Accounting tab, as illustrated below.
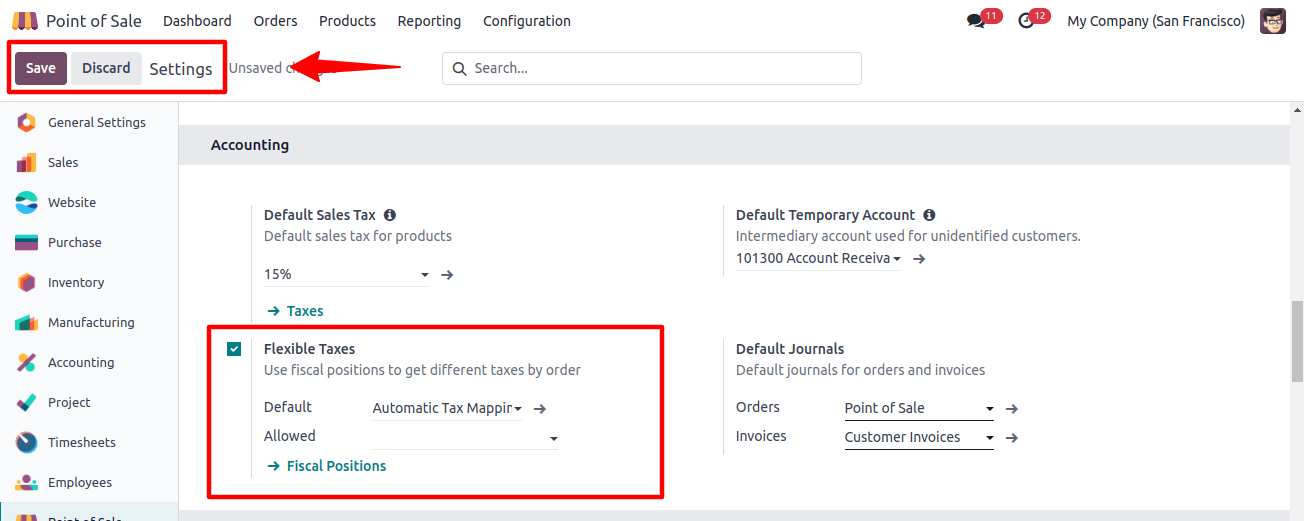
Enable fiscal positions to map taxes on items and set a default position for tax mapping so that you can map taxes according to your own needs. Allow manual modifications to the fiscal positions that are set in PoS. To view the preconfigured fiscal positions that are available in your POS database, click the Fiscal Positions link.

Those who use the New button can easily fill in the blanks and design the future of their firm by creating a new Fiscal Position. Complete the fields inside the form window, such as;
* Fiscal Status: The Fiscal Status's Name
* Use the Tax-cloud API: Tax-cloud tracks exemptions and how they are applied in different states, and it offers real-time sales tax rates for all US states, localities, and special jurisdictions.
* Utilize the AvaTax API: Sale orders and invoices can incorporate the Avatax fiscal situation through the Avatax interface.
* Company: An auto-generated company name will be provided.
* Detect Automatically: When the nation option and matching VAT requirements are satisfied, this function enables automatic tax and mapping applications.
* Foreign Tax ID: The country or region in which your company is based.
* Country: List the nations that fall under the purview of this tax mapping.
To guarantee an easy transaction, the customer's VAT number is needed on their contact form. Additionally, the fiscal position is specifically customized for the selected nation or set of nations, which improves process accuracy and efficiency.
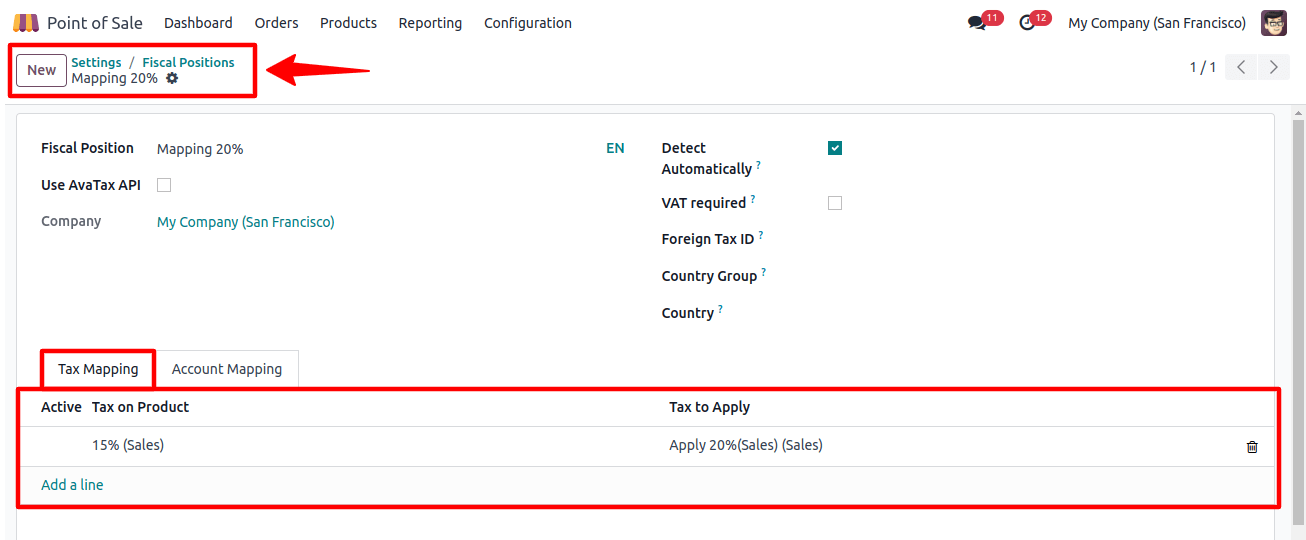
Within the Tax Mapping and Account Mapping tab areas, the fiscal position can be used to establish a tax on the product, view the tax mapping, and choose the product's taxes for mapping.
In this case, I have applied the product tax to the 15% sales tax products at the tax rate of "Apply 20%(Sales)".
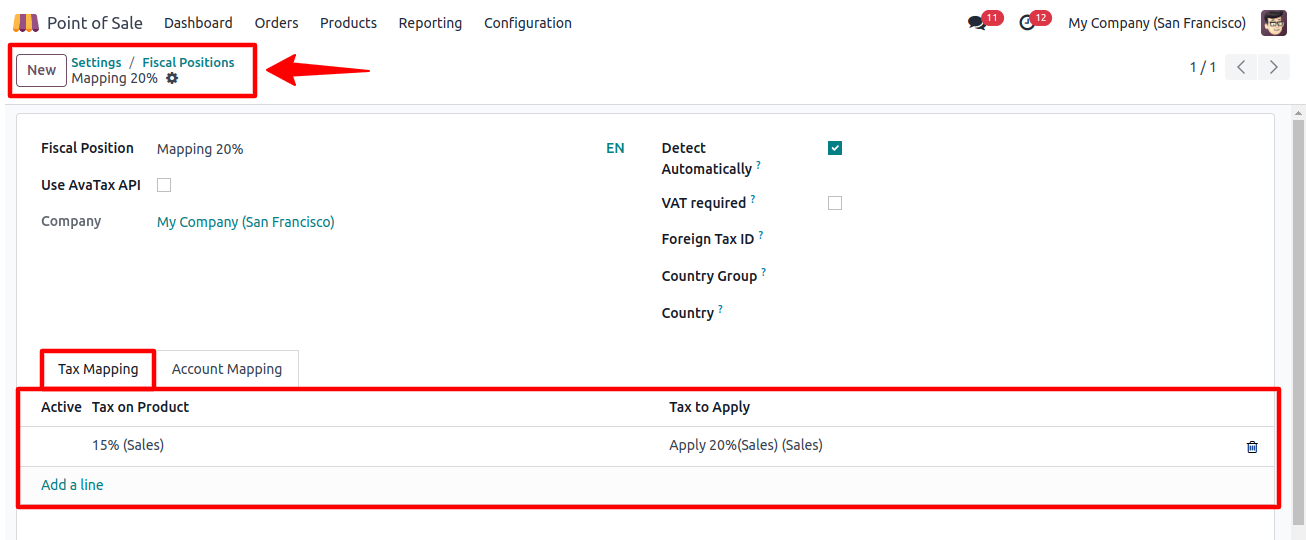
Customers can select which product taxes to map by setting a specific tax for the product, which will display the tax mapping.
The fiscal position's specifications stipulate that goods currently subject to a 15% tax rate will now be subject to a 20% tax rate.
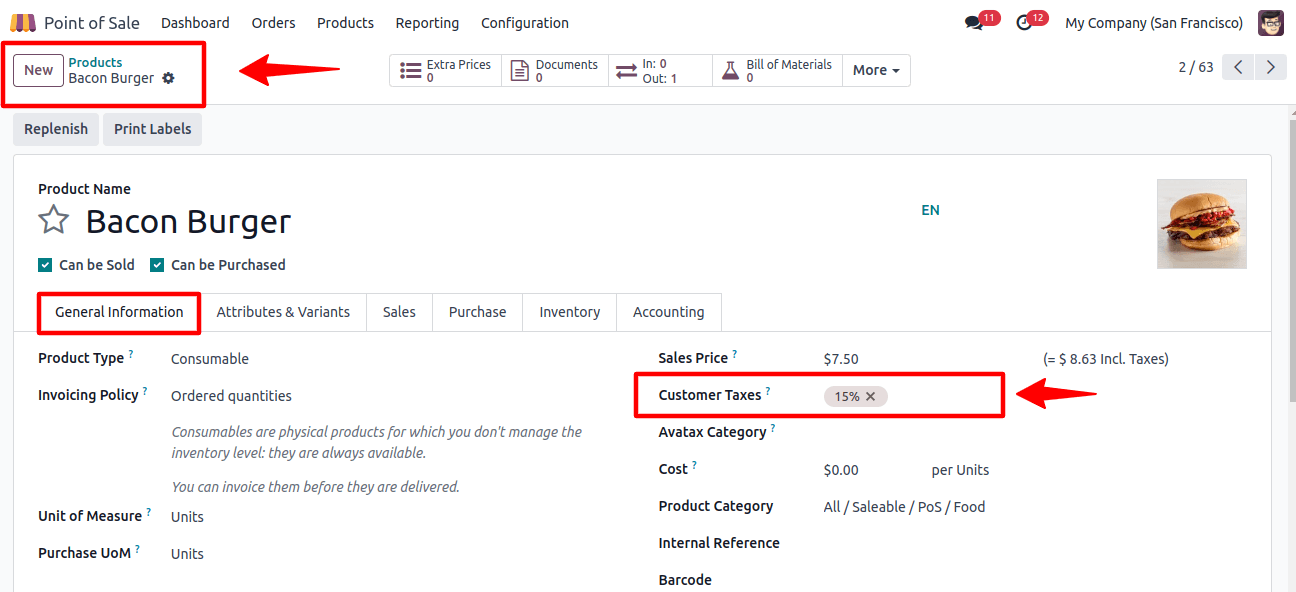
Next, select or design a product with a 15% sales tax to illustrate the process.
As seen below, users may now view the Default and additional Allowed Fiscal positions after setting the fiscal position to the PoS Settings box.
After that, we may check the product's tax map and create an order via the Point of sale session. Proceed to a sales meeting and select the desired item.
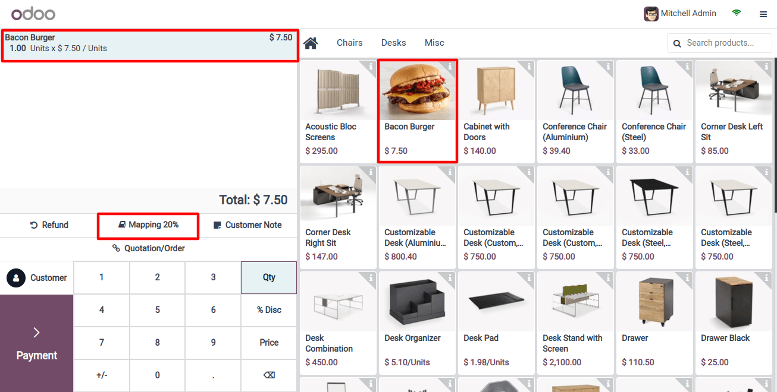
Users may now easily map out taxes thanks to a new button called "Mapping 20%" that has been added to the revised UI.
When users select this button, the default financial position provided in the configuration settings is displayed.
Furthermore, as illustrated below, the interface offers access to other financial positions allowed in the Point of Sale (PoS) system.
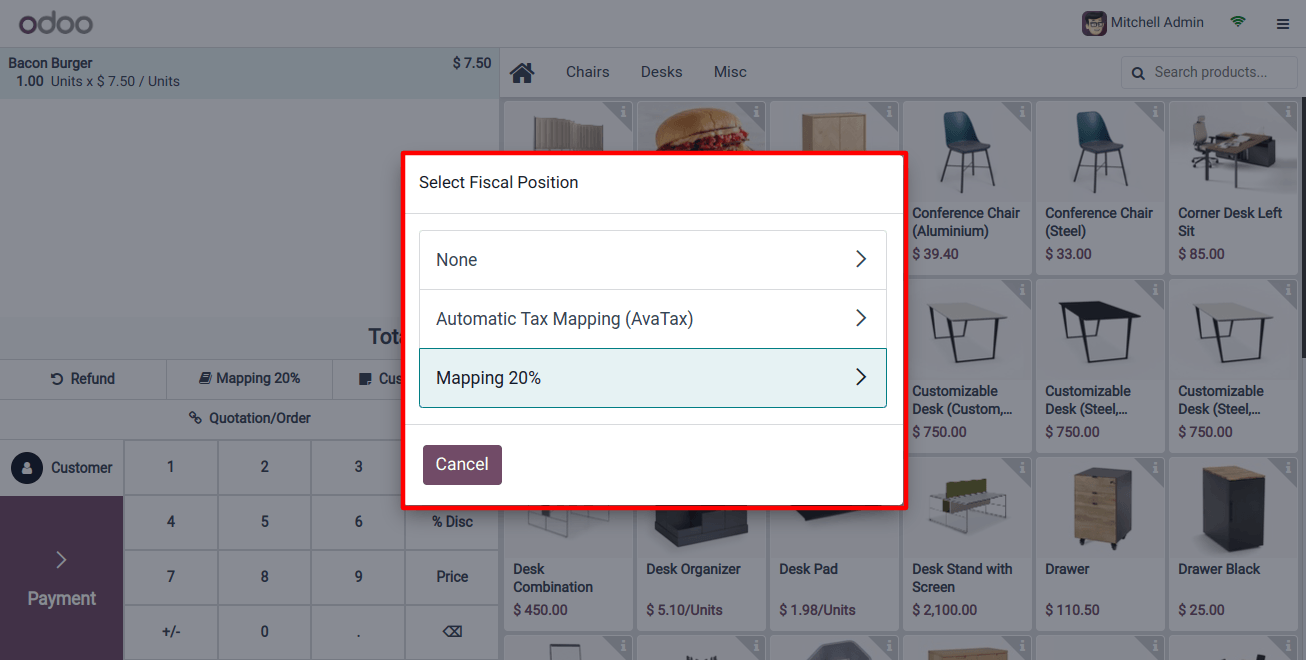
Users can easily alter product taxes by clicking on the fiscal position button, which provides access to a list of configured fiscal positions. Complete the POS sales order and payment processes at the end.
Odoo's fiscal situations and tax mapping simplify financial processes to guarantee accurate calculations and regulatory compliance.
Conclusion
By using the technologies that enable customization of tax settings, businesses can enhance efficiency and adapt to evolving tax regulations.
To sum up, setting up taxes in Odoo 17 POS is an essential step in making sure that financial records are accurate and that tax laws are followed.
Businesses may effectively set up their tax parameters and improve the overall performance of their point-of-sale system by following this step-by-step guidance.
By offering professional guidance and guaranteeing the best possible functionality of your Odoo 17 POS system, using professional Odoo Services will expedite this process even further.

