Manage all your projects small to big, from start to finish using Odoo 17. It allows you to assign tasks to your team, set deadlines, and track progress all in one place.
You can see key milestones to make sure everything stays on target. It helps you keep your projects organized and your team hit their goals.
Step to Setting Up Milestones in Odoo 17
Odoo 17 allows you to turn on milestones for your projects. Milestones are like checkpoints that help you see how the project is going.
Let's see how to turn them on:
- Go to your project settings.
- Look for "Milestones" and turn it on.

After you enable milestones, the user can create a new project, define project stages, and add tasks with related milestones.
Now you can go to the project dashboard and create a new project. Create a new project window and give it a name, activate the timesheets, billing options as shown in the bellow image.

Once you edit the project name and enable the required options, press the Create Project button and add the project tasks as needed.
Below is the image of the Demo project stages and tasks we created.

Open the tasks Kanban views to set the project's milestones. It will redirect you to the task configuration page.
- Project details: It will show you the project name and the person it's assigned to.
- Milestones: You can add a sales order product linked to a milestone here or create a new milestone.
Once the milestone is complete, you can deliver the related services.
- Customer: Add customer name here for billing as per the time spent on the project.
- Timeline: Add the allocated time and a deadline for the project.
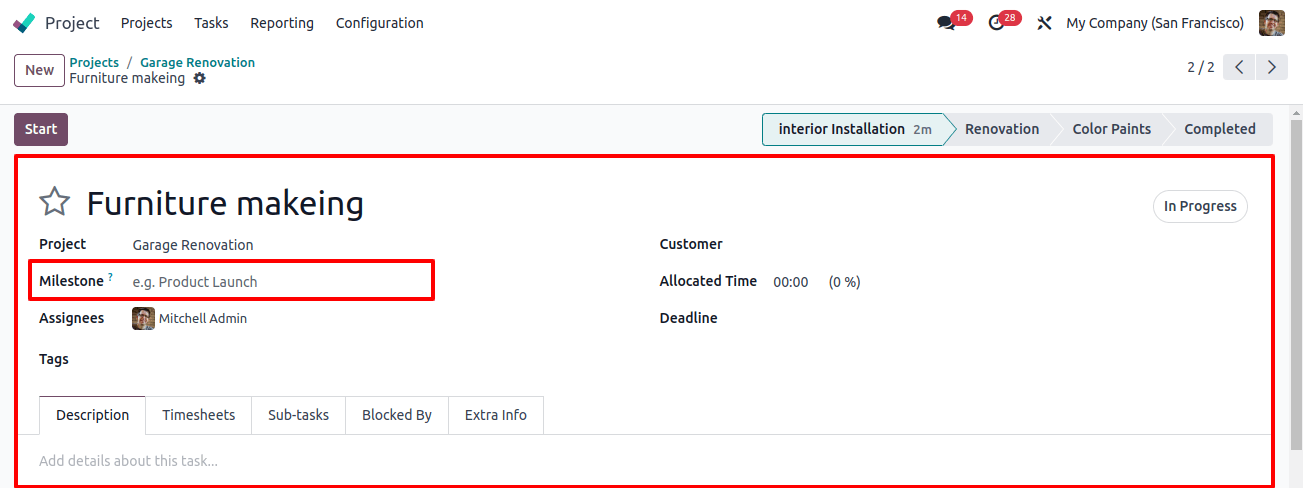
Tasks can be linked to milestones. Once the task is complete, that's part of a milestone, it will automatically deliver services to the customer. It will save you time and make the process smooth.
How to Bill Based On Milestones
If you're selling a service and your bill by milestone, like completing a certain stage of the project, Odoo 17 by default delivers the service once the milestone is complete. It will save you time and also keep things on track.
How to create a service you can bill by milestone.
- Go to the "Sales" module and then "Products."
- Click "Create" to add a new product.
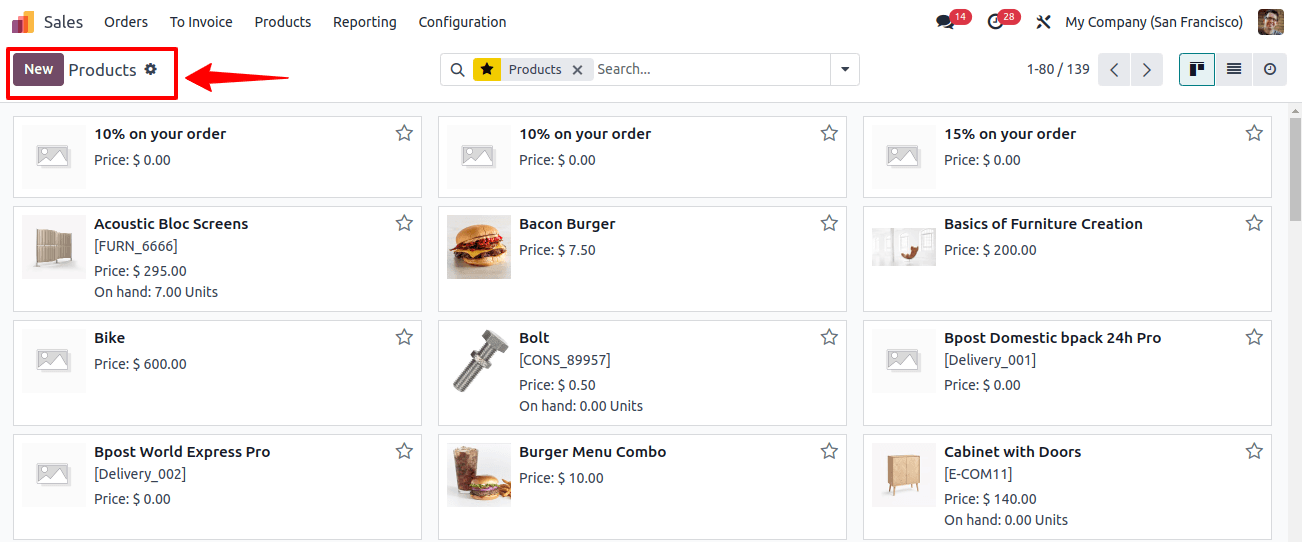
Once you click "Create." Provide details for your new service. Add the basic product details like product type and product name.
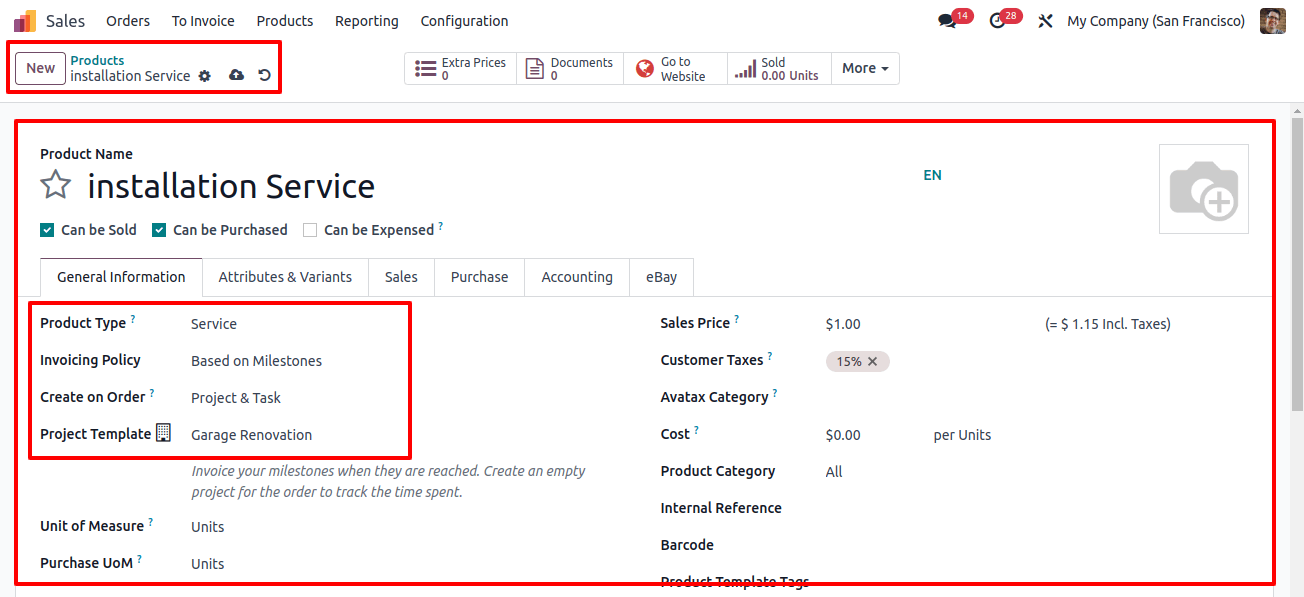
- Go to the setting called "Invoicing Policy." Select "Based on Milestones" for this service.
- Once you create a sales order with this service, go into the section called "Create on Order." Now choose "Project and Task."
- By default, it will create a task in Odoo 17 once you confirm the sales order. It keeps your tasks and services organized.
- It will also allow you to use a project template or workspace template to use as a starting point for the project.
- Save the product by adding the service price and other details.
Let's create a sales quote with this service:
- Go to "Orders" and then "Quotations" in Odoo 17.
- Fill in the details for the quote, like the customer's name, payment terms, etc.
- Add the new service you created to the quote. See it under "Products."
- For filling in any other quote details and then click "Confirm" to send the quote to your customer.
Now you can easily create a quote that includes your new service and automatically creates a project or task when the quote is confirmed.
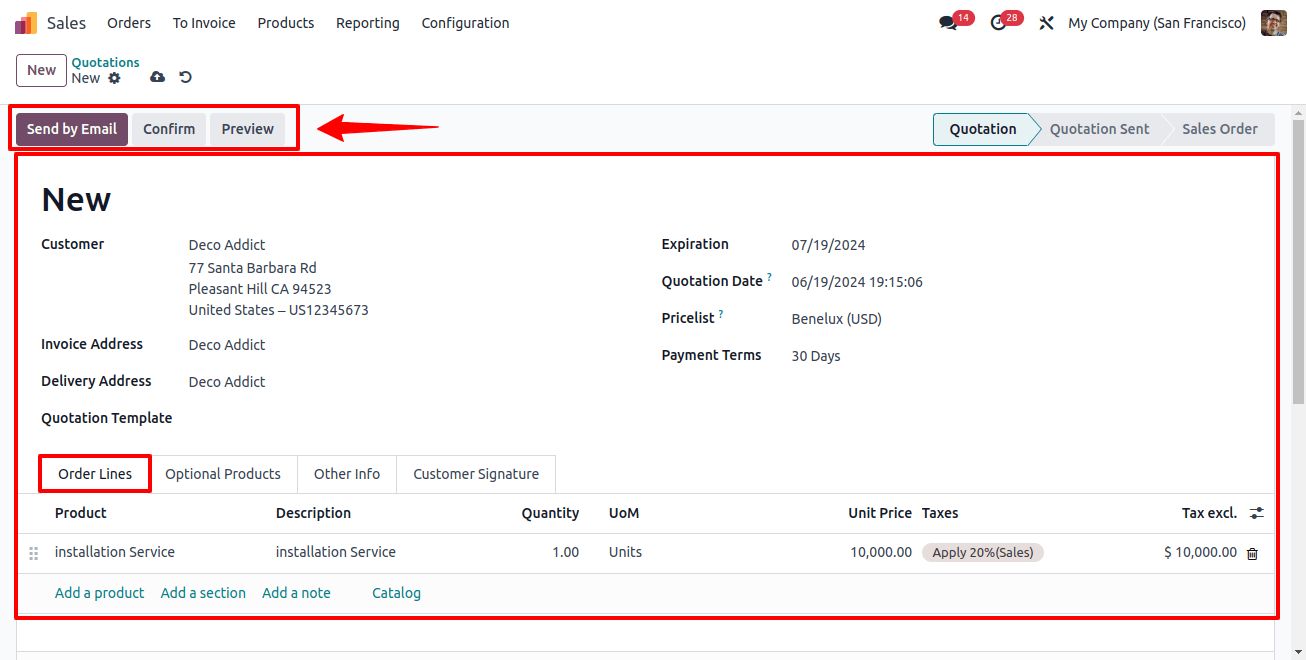
Once you convert a quotation into a sale order, you can adjust delivery quantities once the required milestone is finished.
The form has Smart buttons for Projects, Milestones, and Tasks. As shown in the below images, the milestone smart button allows you to add milestones.
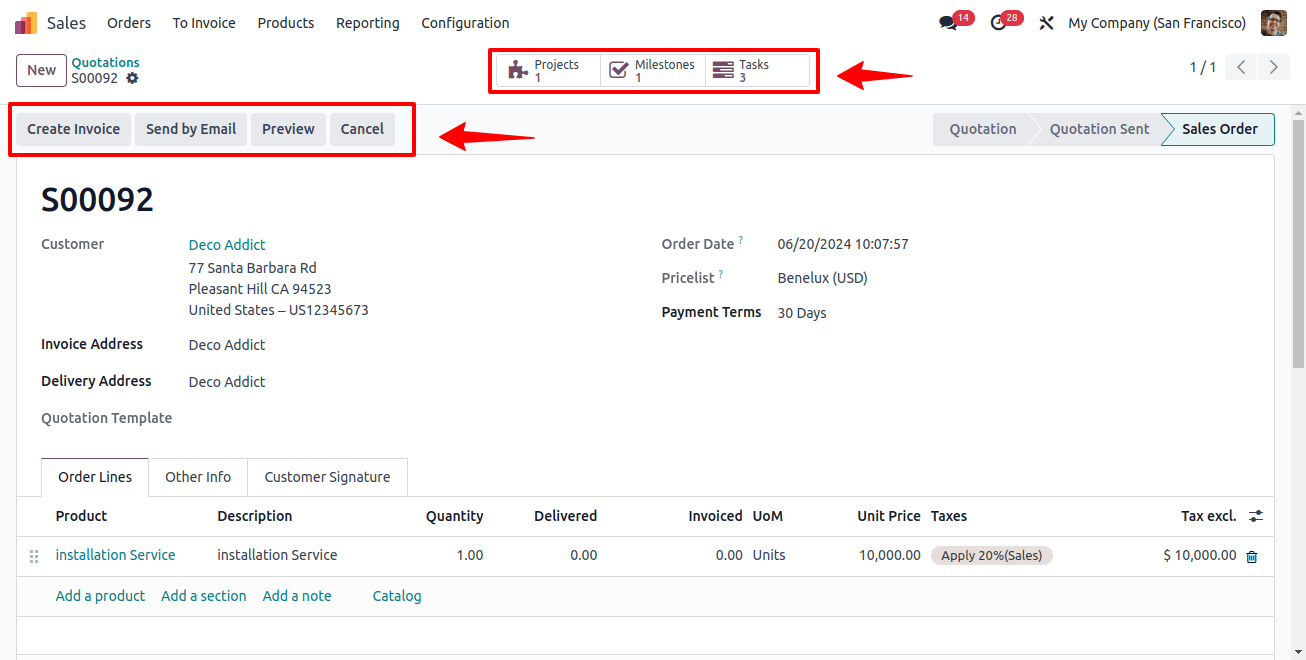
You can see all your project milestones in one place!
Click on the "Milestone" button to open a dashboard that shows all the milestones for this task or project.
You can easily add a new milestone directly from the window.

Let's get back to your project. It will show you a new task listed under the "House renovation" project.
It's an automatically created task when you confirm the sales quote.
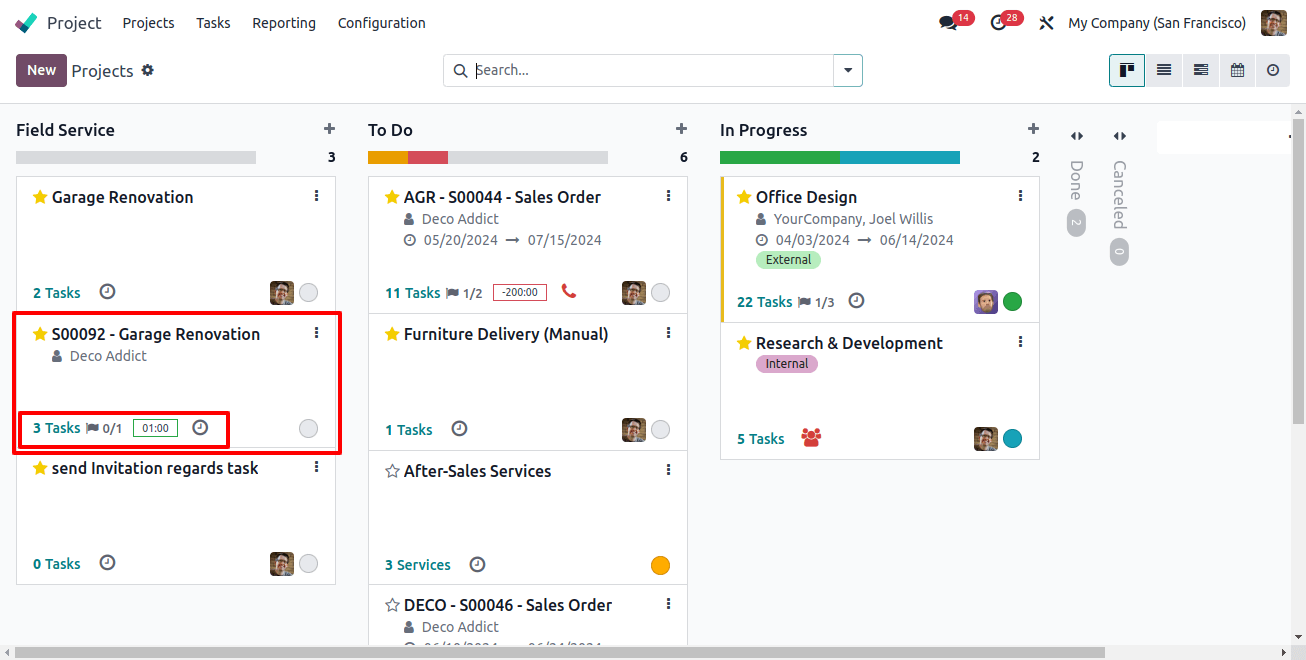
Once you start working on the task, it will show you how much time is left to complete it. You can also track your hours by using the timer button.
Once your project is finished, you can mark it complete and it will be added to your timesheet.
This helps you keep track of your progress and how long tasks take.
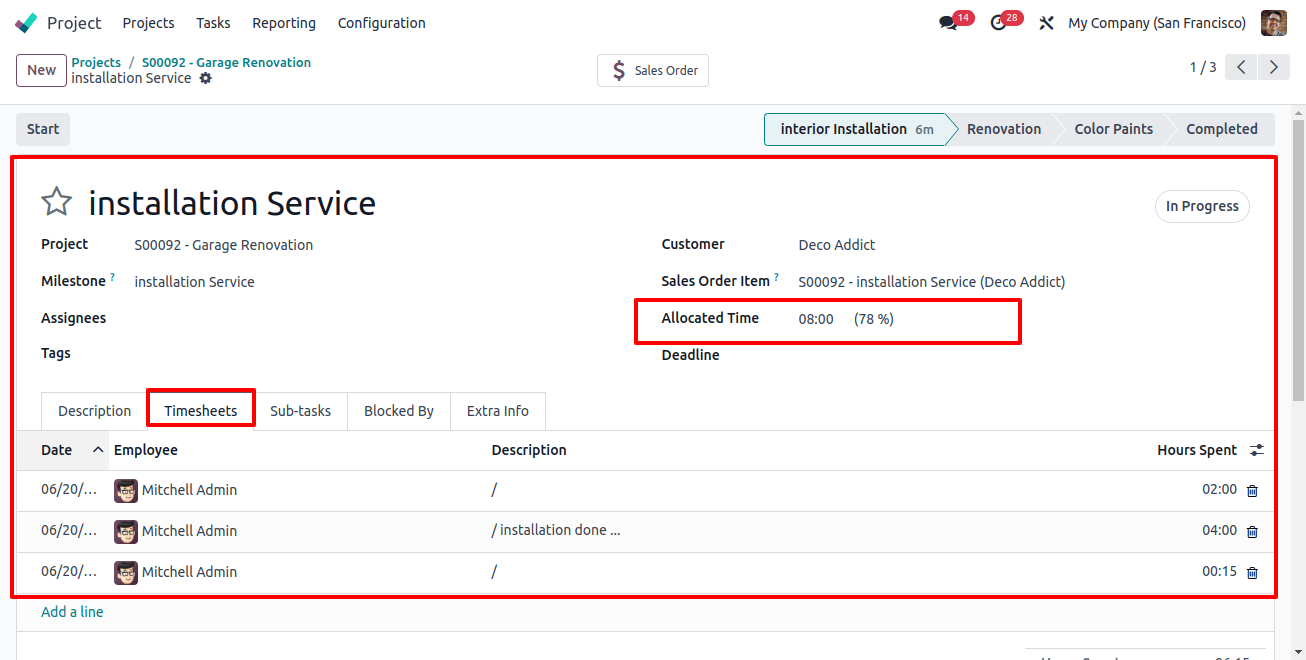
You can manually add the timesheet details and hours spent on the task using the 'Add a line' button given inside the Timesheets tab.
You can view the project from the Project Updates menu once the task has been updated to the done stage.
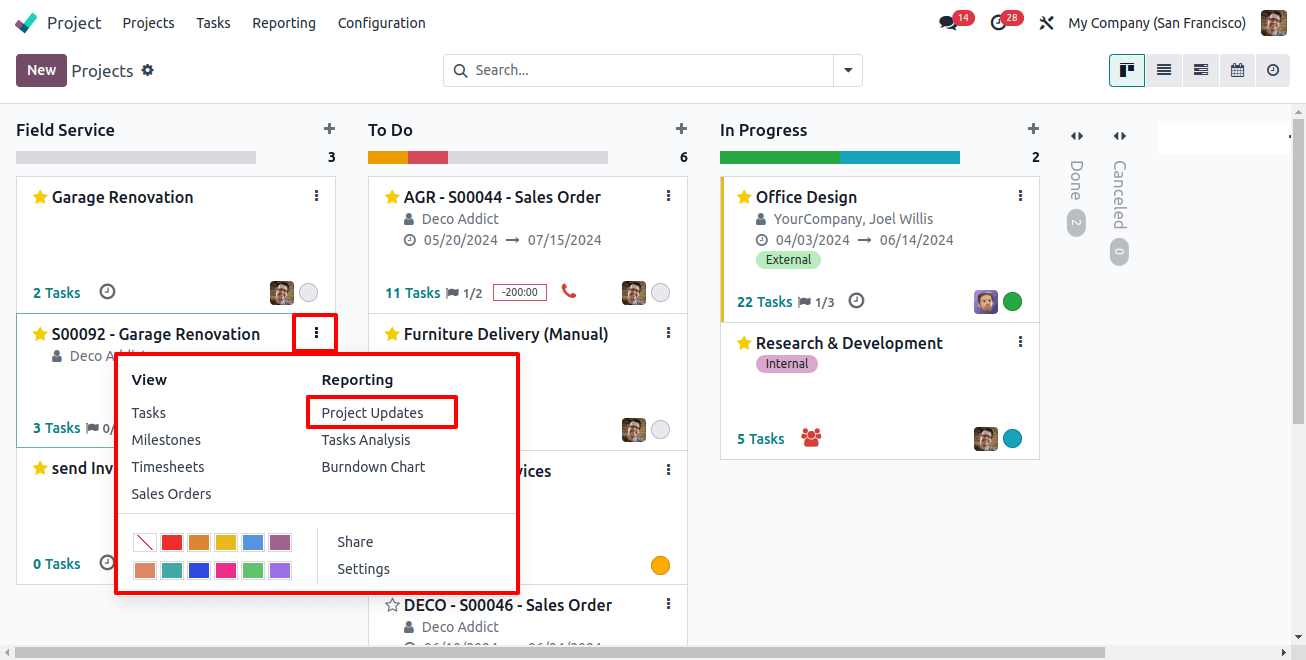
See everything about your project in one place! Just click the button in the corner (it might look like a dashboard or chart) and you'll see an overview of things like sales, profits, budget, milestones, and more. This makes it easy to see how your project is doing at a glance.
The window is the center point showing all relevant project information, enhancing visibility, and providing informed decision-making.
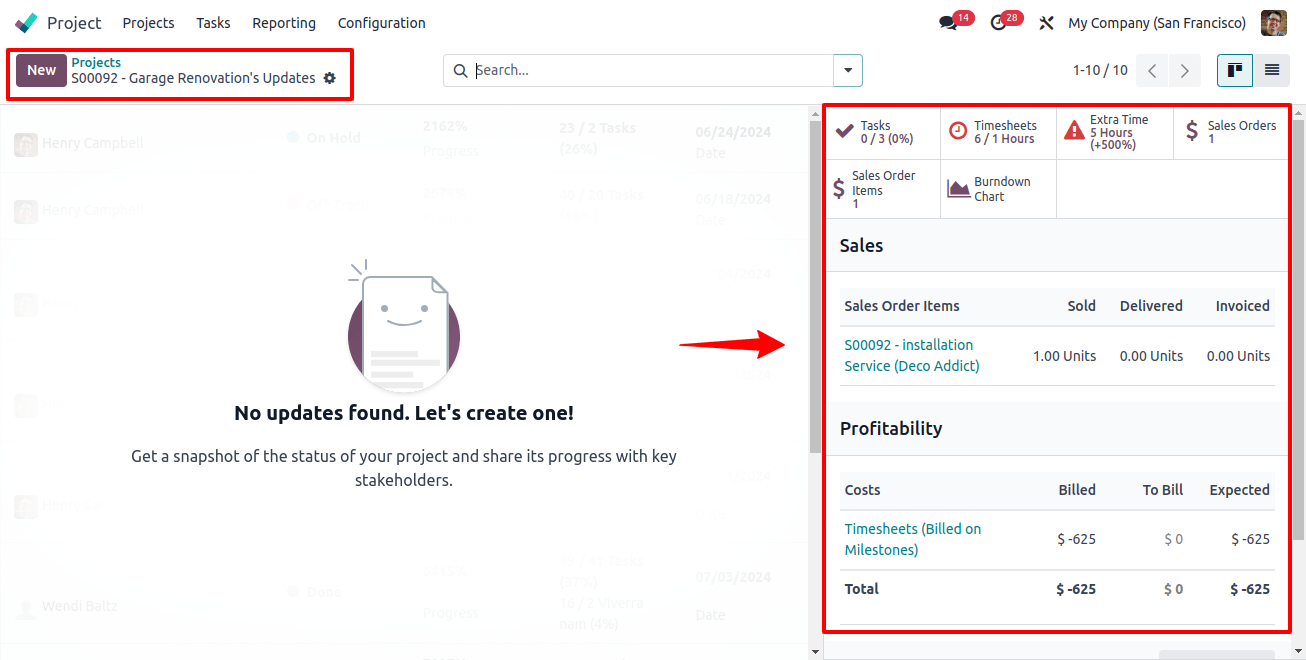
Update project details with a click! Click the "New" button to add new updates on your project's progress, sales, or anything else you want to track. It will open a project update editing form as shown below.
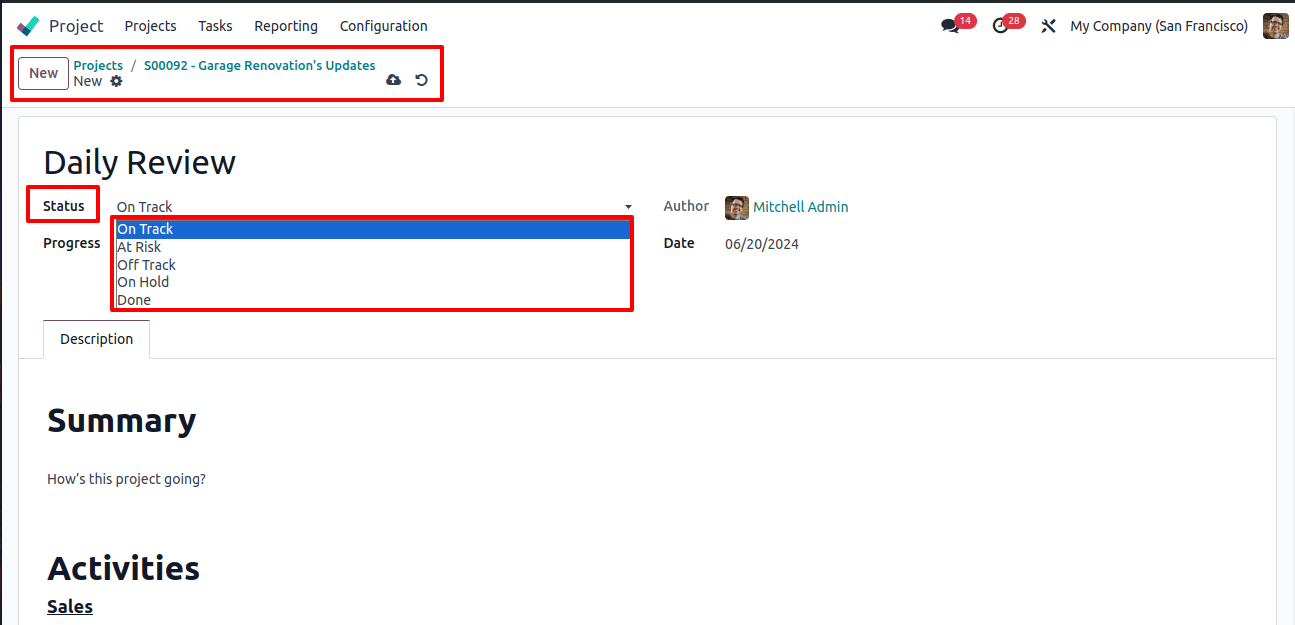
Project updates provide you with the capability to input the current status of the project, which you can modify as per requirement.
Check the status display alongside the project's title, it will show you the latest project update. If the status has not been assigned, you have access to define it based on the project's advancement.
Get clarification through status access by 'On Track', 'At Risk', 'Off Track', and 'On Hold' each of these shows the different state of the project. Hence, all these features help you understand the current project state.
The project status feature also provides you with a strong communication of progress with stakeholders and delivers a clear overview of the project's condition.
Activities Section
Generally, the activities menu has submenus, like sales, profitability, Sold, and Milestones.
Sales: It gives you information on services, their sales effective hours spent, planned hours, and remaining work. Here you can also check profitability and milestones.
Sold: It allows users to view the number of services sold, effective hours spent, planned hours, and remaining work.
Project Updates Review
It provides you with a detailed rundown of the project's development by showing a weekly report, a situation assessment, and the number of tasks involved. You can see all these in the project update's status option.
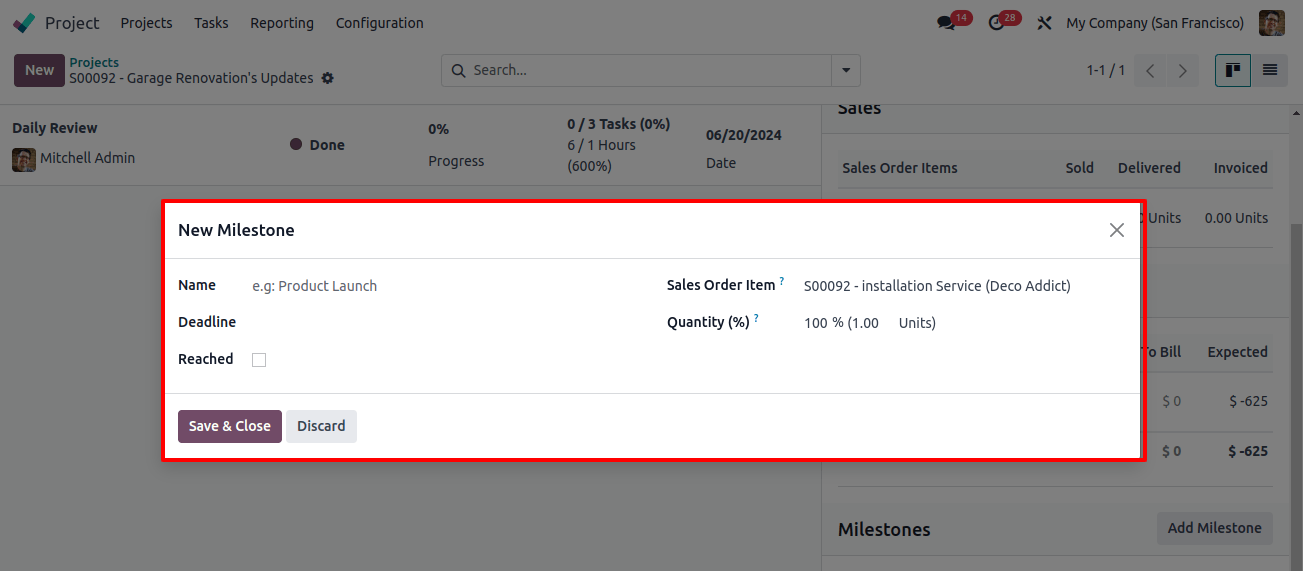
For a budget profitability estimate, the Project Updates page enables users to add and track various project milestones using the 'Add Milestone' button.

Once you click on the app milestone button, it will open a new pop-up window. Here you can provide the milestone name, deadline, sales, order item, and quantity, press the save and close button to save the project milestone.

As you configure the milestones, it allows you to monitor project progress and track milestone achievements directly from the Project Dashboard window.
Following is the milestone example shown in the below screenshot.
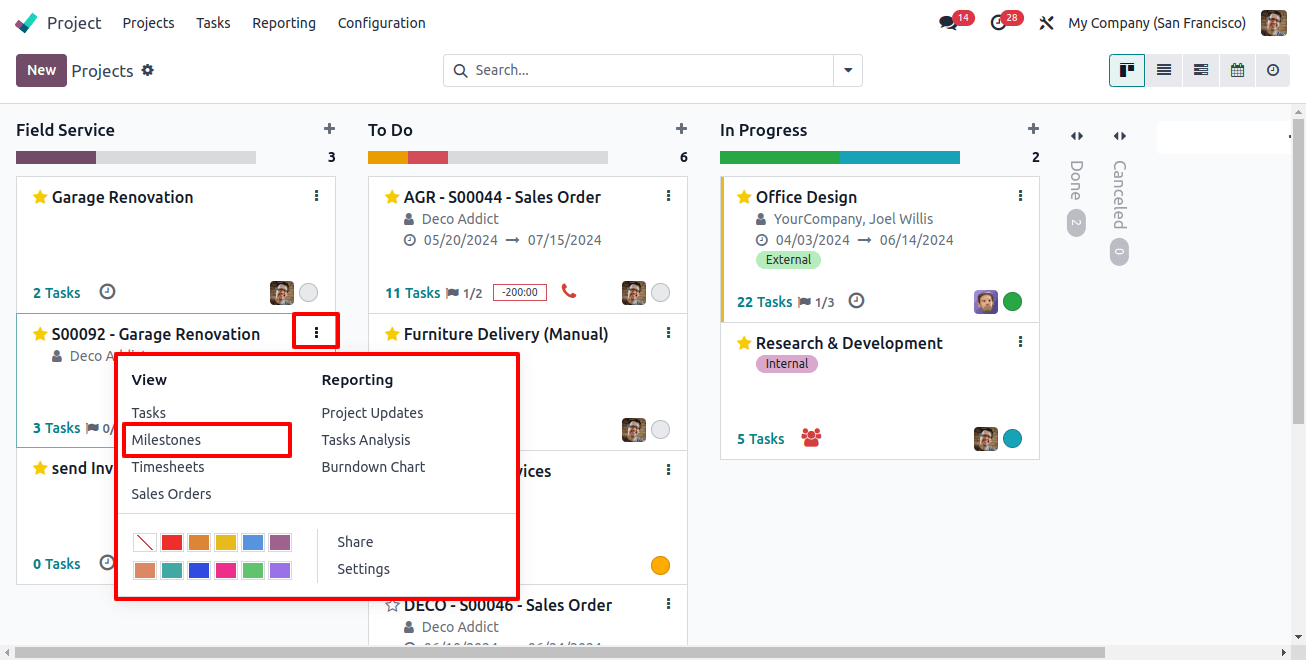
See all your project milestones in one place! In your project view, there might be a menu called "Kanban" (which can show things like cards or lists). Click on "Milestones" within that menu to see a list of all the milestones for this project.
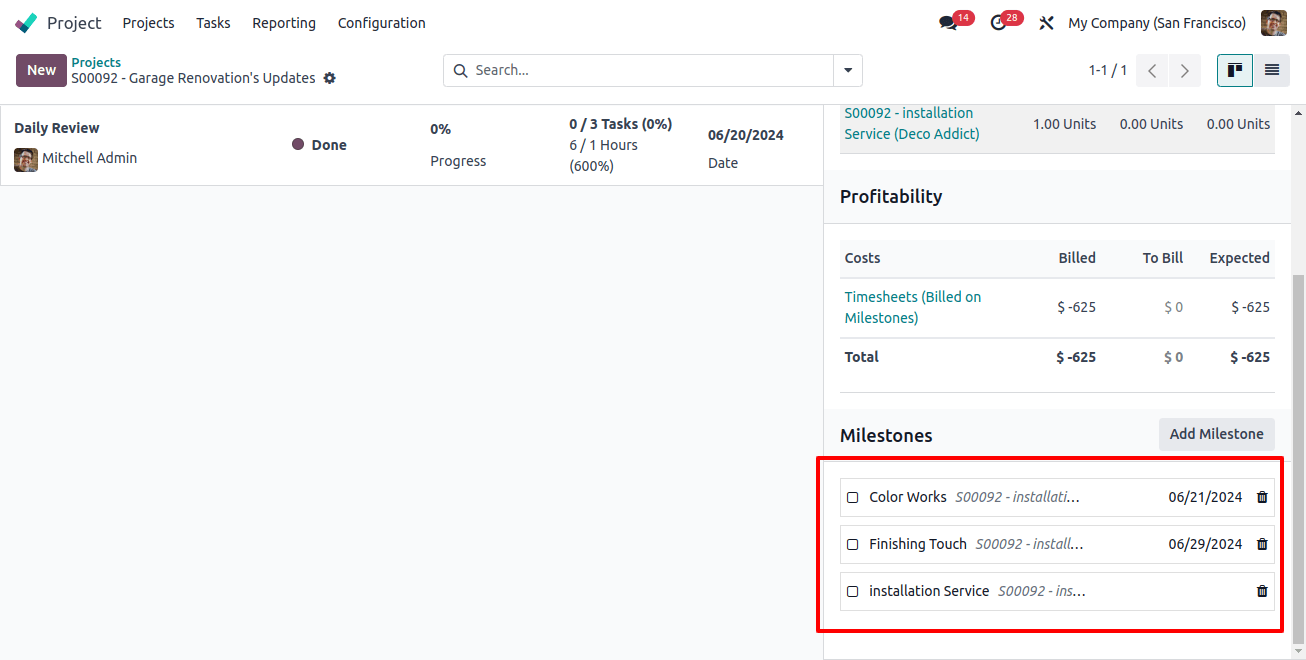
From the Milestones dashboard, you can view the detailed list of the existing milestone names, deadlines, and reached status as shown below.
Related Post: Odoo Project Management Tips to Maximizing Your Productivity
Users can easily view sales orders, tasks, and manage milestones from the dashboard based on the project progress, and add new milestones directly from the window.
In conclusion, Odoo 17 makes it easy to bill your customers based on project milestones. Hence, you can get paid as you complete different parts of the project.
It's beneficial for large and expensive projects, and also it helps with:
Cash flow: You get paid as you work, so you don't have to wait until project completion to get paid.
Transparency: Your clients can see exactly what they are paying for at each stage of the project.
Happy clients: Milestone billing keeps things clear and organized for your clients, which automatically builds trust.
Overall, using Milestone in Odoo management makes your project management easy to use and more efficient for both you and your clients.

