In today’s rapid evolution of technology, business software continues to explore and gain new heights, Odoo 17 stands out as a dynamic solution for enterprises seeking integrated applications.
Enhanced Survey Module is one of the top features of Odoo 17. It’s a strong tool designed to gather insights, feedback, and data from multiple sources efficiently.
It assists you to conduct employee satisfaction surveys, customer review forms, or market research surveys, the Odoo 17 Survey Module offers a great suite of features to meet your requirements.
Here is the Top Odoo 17 Survey Module.
1. User-Friendly Interface: Odoo 17’s Survey Module provides an intuitive interface with a drag-and-drop survey builder, giving an effortless creation and customization of surveys.
2. Diverse Question Types: Odoo 17’s Survey Module supports multiple question types such as Rating Scale, Multiple Choice, Matrix, Text Input, and Date, followed by diverse data collection requirements.
3. Conditional Logic: It also provides an advanced conditional logic to adapt surveys based on answers given, ensuring a personalized user experience and data collection relevance.
4. Real-Time Analytics and Reporting: It provides great analytics with real-time insights using visual reports, offering easy interpretation and active decision-making.
5. Integration with Other Modules: Odoo 17’s ecosystem provides a seamless integration to link survey responses with Marketing, CRM, & HR modules, improving data usage across operations.
6. Multilingual Support: Odoo 17’s survey module supports multiple languages to create a survey that connects to global audiences, ensuring strong communication and effective engagement.
7. Mobile-Friendly Design: Odoo 17’s survey modules are mobile-friendly as they are fully responsive on mobile devices. It allows individuals to provide reviews or feedback as per their convenience through smart devices.
Use the Odoo 17 Survey Module in Practical Application
1. Customer Feedback Surveys: Odoo 17’s Survey Module enables you to create targeted surveys for collecting customer reviews on products and services, making improvements and enhancing loyalty.
2. Employee Engagement Surveys: It allows you to gather reviews or feedback from workplace satisfaction and company culture with the Survey Module, creating a positive environment and rewarding talent.
3. Market Research: It allows you to conduct market research to understand customer requirements and market trends, creating effective business strategies.
4. Event Feedback: Odoo 17’s Survey Module lets you collect attendee review on event logistics and and content, enhancing future event planning and quality.
Now in this blog, we’ll explore the top features, benefits, and practical applications of the Odoo 17 Survey Module and how it can transform your data collection and analysis processes.
Go to the Survey Module in Odoo 17
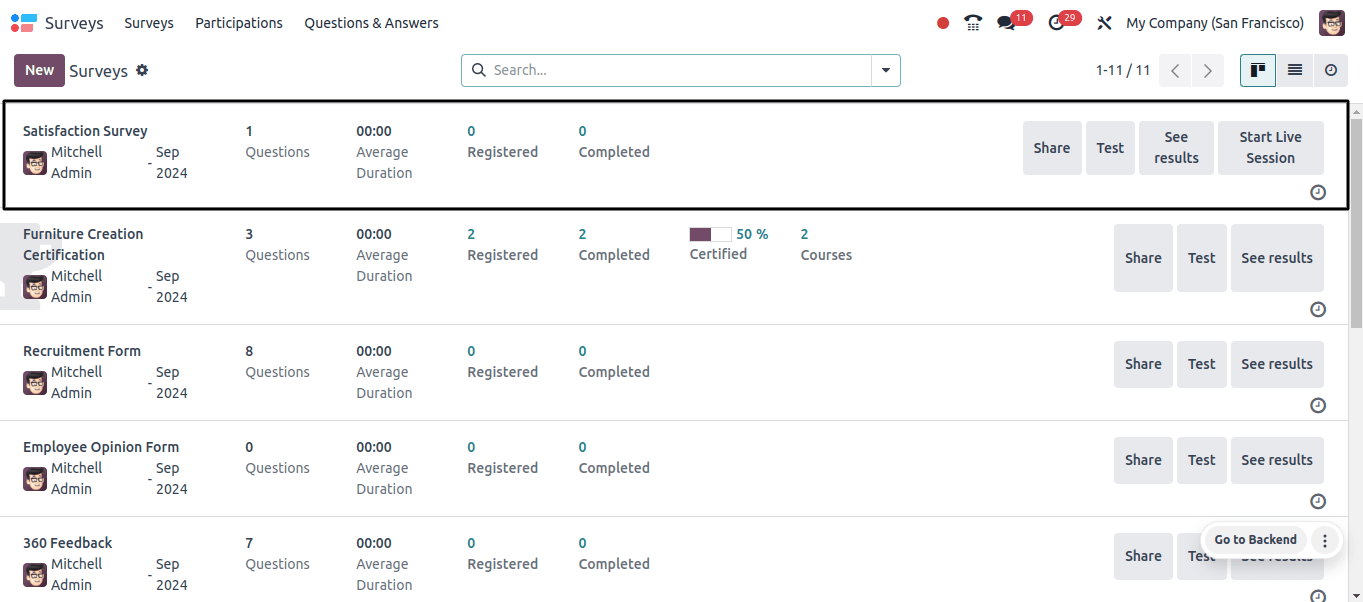
When you open the Survey Module, you will see a dashboard similar to the one below:
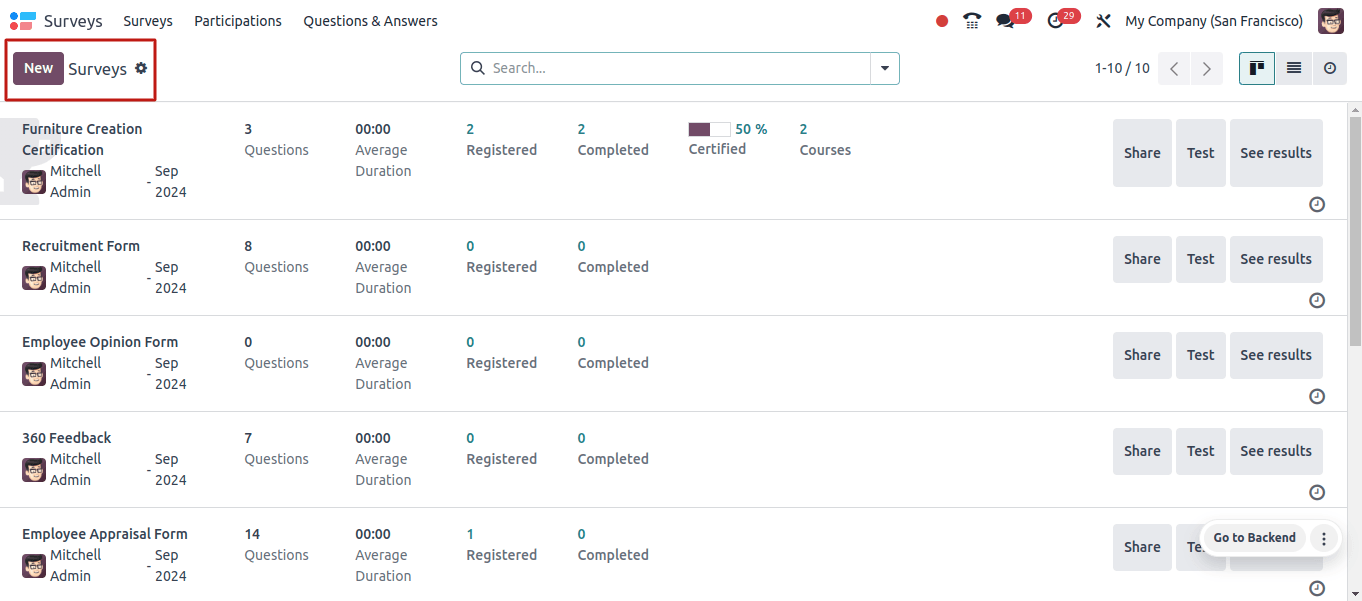
The main page offers access to a number of pre-designed questionnaires. You can arrange and categorize these surveys using the Filters, Group By, and Favorites sections found in the advanced search box at the top of the page.
The share, test, see results, and see live session buttons can be used to share documents, test them, view survey results, ans start a new live session.
Kanban and List Views: The Survey Module in Odoo 17 organizes surveys using Kanban views, which can be seen in the list and activity views. Each survey card includes important information such as the survey’s name, number of responses, certification status, and success percentage.
The three-dotted menu in the upper right corner of each card provides quick access to options such as ‘Edit Survey,’ ‘Share,’ ‘Delete,’ and ‘Color’. A clock icon on each survey card also helps schedule more survey-related activities.

Create a new survey.
Creating a survey in Odoo 17 is simple. The ‘New’ button can be used to initiate the process. This takes you to a page where you can specify the type of survey you want to create, like this:
Survey: For regular feedback forms.
Live Sessions: Used for real-time interactions, particularly in online learning environments.
Assessment: Designed for tests or certificates.
Custom: For specific or unusual survey requirements.
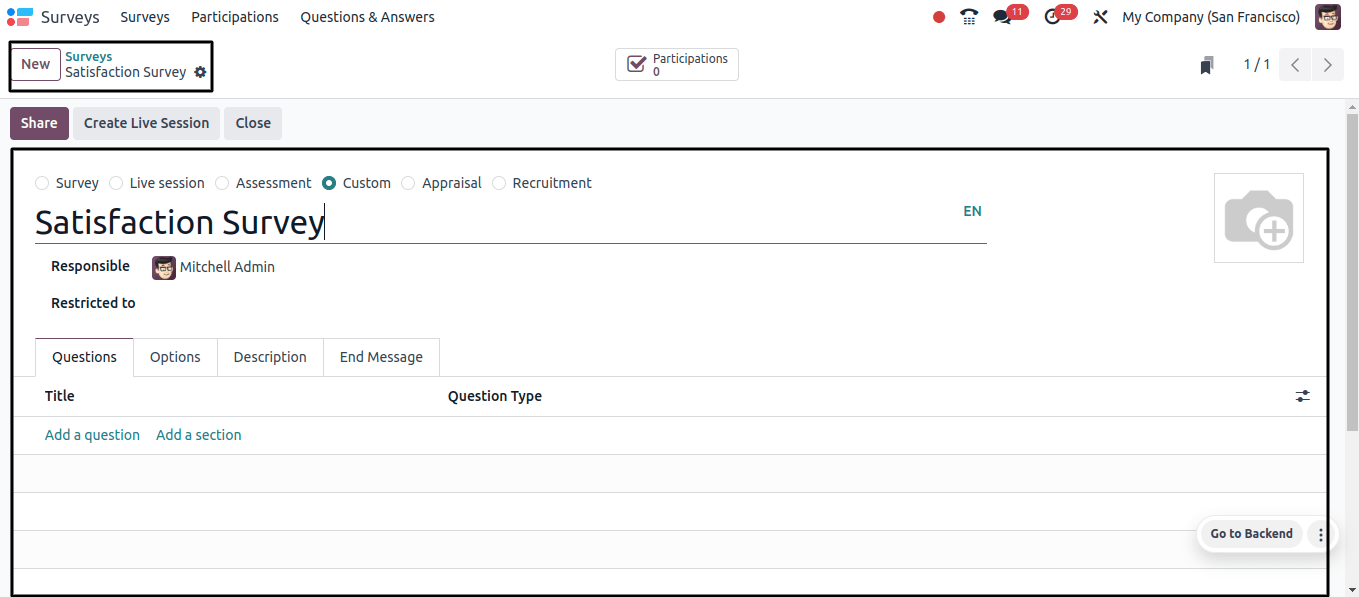
On the survey creation page, as shown in the image above, you will begin by entering basic information such as the survey’s name or title. According to your preferences, the responsible user is automatically allocated.
Below the basic information, there are various tabs for configuring your survey, including Questions, options, Descriptions, End Messages, and Adding Questions.
Questions Tab
Under the Questions tab, you can begin adding survey questions. Clicking ‘Add a question’ takes you to a page where you can select from a variety of question types, including many choices, Text boxes, Date/ Date time field, Matrix, and so forth, as the image below shows.
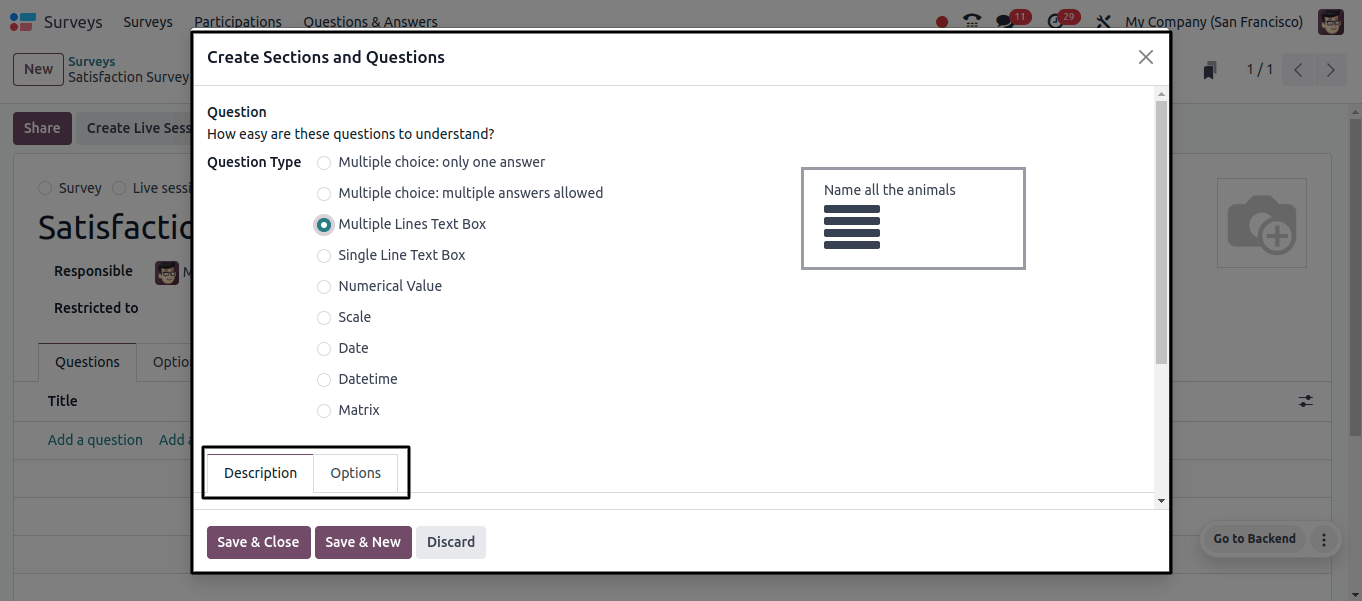
You can also add more answer specifics to the Answers, Description, and Options tab sections as needed. After creating a question, you can save it by selecting ‘Save & Close’ or immediately and another question by clicking ‘Save & New.’
Options Tab
In the Options menu, you can fine-time various survey settings:

Define the pagination like one page per question, segment, or all questions on one page.
Configure the display progress as number or percentage.
Set the randomization settings for question display in the Question Selection box.
Allow respondents to go back by selecting the Allow Roaming option.
Define the access modes under PARTICIPANTS, for example, ‘Anyone with a link’.
To specify whether participants must log in before beginning the survey, turn on or off the Require Login option.
Descriptions Tab
In the Description tab, give a brief overview of the survey and any instructions that participants must follow. This helps to set expectations and guide respondents through the process.
End Message Tab
The End Message tab is where you write the message that participants will view after completing the survey. This might be a thank-you note or extra information about what occurs next.

Once you’ve created your survey, click the save button to add it to your collection. The survey has several possibilities, such as sharing, establishing, live sessions, testing, printing for offline use, and closing for future revisions. It can be shared through email, social media, or other ways.
Sharing and Managing Responses
The Share button allows you to disseminate the survey to recipients. Please provide the survey name, URL, recipients, and any further information. You can also set a deadline and allow participants to become certified.
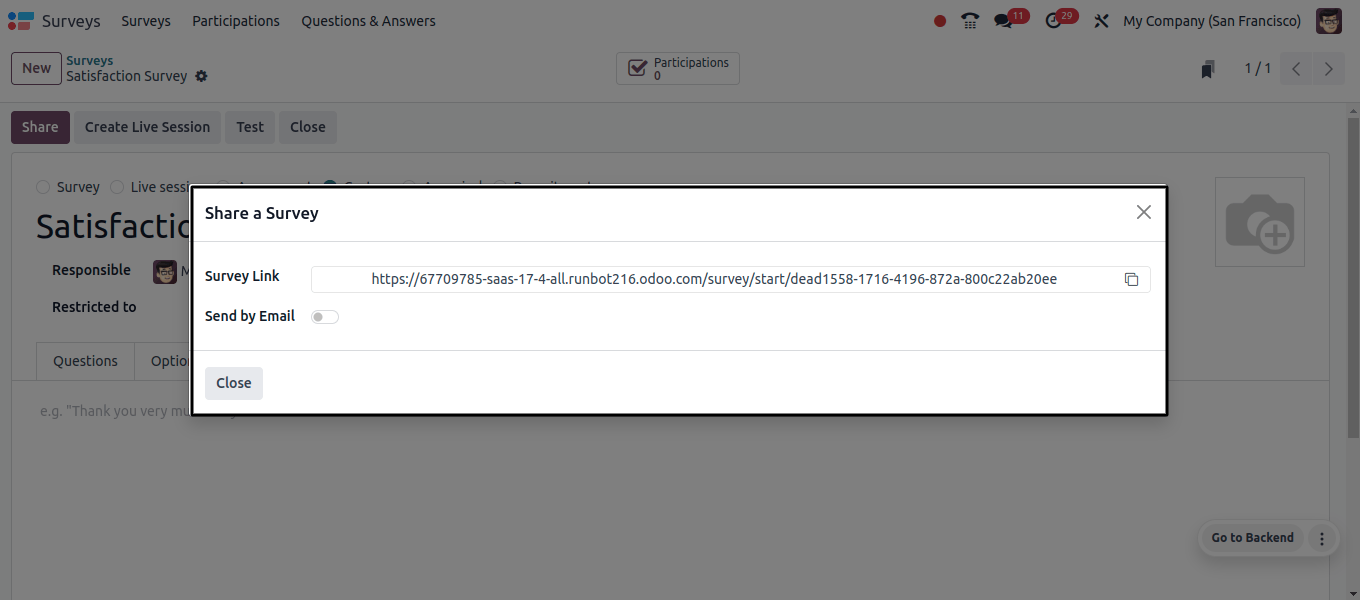
Once shared, results can be tracked and evaluated using the smart button on the survey page, which shows each participant’s involvement with the survey, including their responses and scores.
Viewing Survey Results
The ‘See result’ button located near the corresponding survey column on the dashboard allows you to view the survey results in real time.
The results are generally displayed in graphical representation such as Pie charts, which display success rates and other relevant information.
Participation Menu
Odoo 17 keeps extensive records of all participants’ responses. The participation option in the Survey Module’s main menu bar allows you to view and modify these records, providing information about the survey’s reach and engagement.
The dashboard for participants will include information such as the date the survey was created, the survey name, the contact’s email address, the number of attempts, the deadline, the quiz passed, the score, and the status. So, click the dropdown menu provided under a survey title to view detailed survey participant information, as shown below.
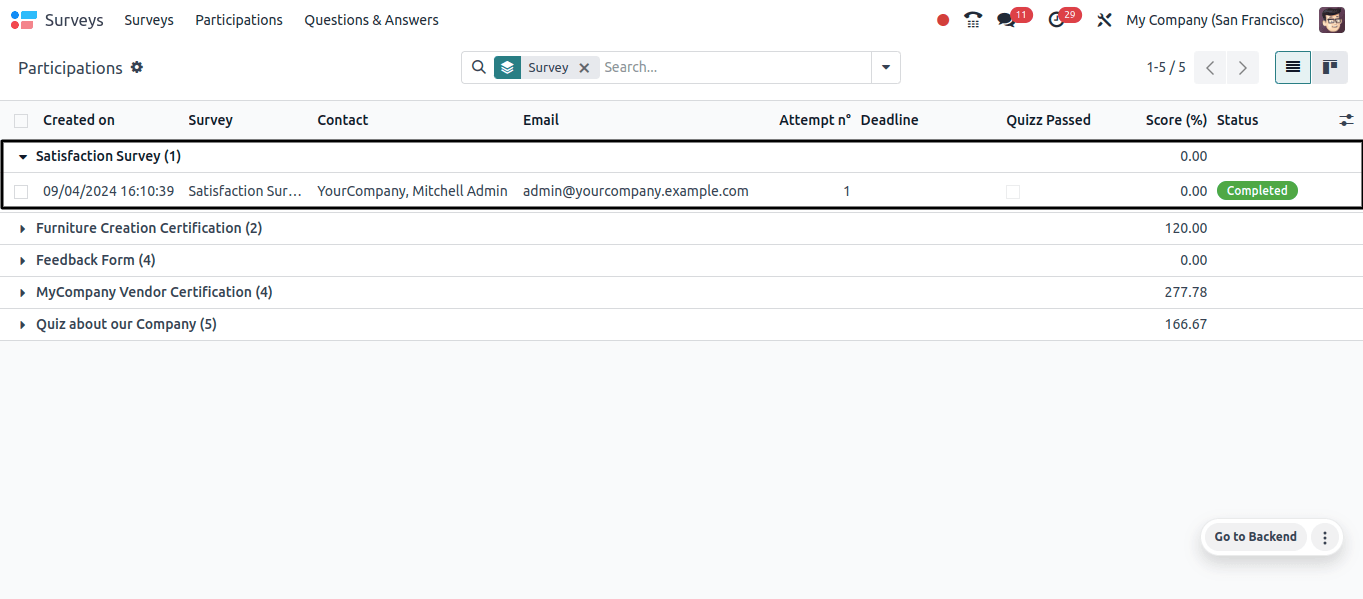
We may sort the surveys and get personalized survey reviews using various parameters accessible in the Odoo platform’s Advanced search box. Users can use the knowledge Module interface to create spreadsheets, dashboards, and blogs, as well as export survey results, by selecting the Action menu on the left side of the screen.
Questions & Answers Menu
The Questions and Answers menu in Odoo 17’s Survey Module is a separate section for managing survey content. It allows you to create, organize, and personalize your survey’s questions and answer alternatives. This menu contains three sub-menu options: Questions, suggested values, and detailed answers.
Questions Menu
The module’s Questions dashboard window displays a collection of Odoo 17 survey questions, as well as the results of several polls. The title, survey, and question type are displayed in the list, and users can select and edit single questions for further information.
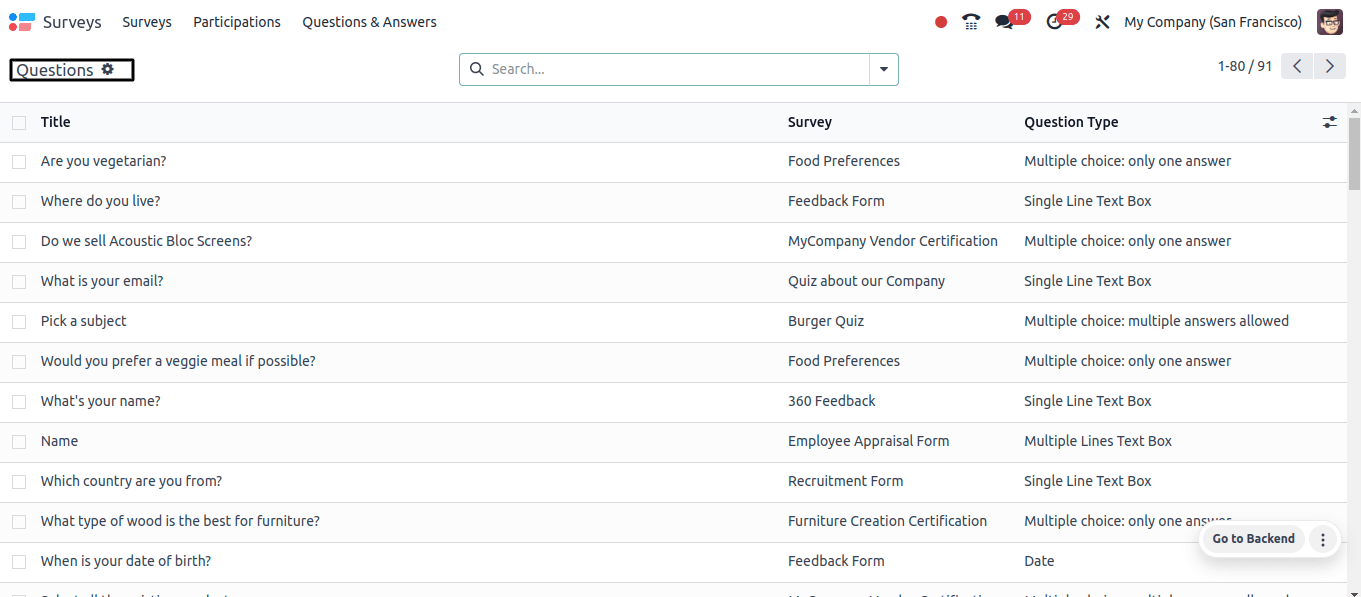
The survey’s question order ensures a logical flow, guiding respondents through the process while building on previous questions.
Suggested Values Menu
Participants can acquire ideas for the best response during survey preparation by selecting the suggested values menu item from the Questions & Answers menu.

Preview questions to ensure clarity and compatibility with survey objectives. Organize response data into a single menu for easier analysis and understanding.
Detailed Answers Menu
Odoo 17’s Detailed Answers option presents participant responses to various surveys. As seen below, it includes the survey’s name, user input, question, created on, answer type, and further information. Users can choose a question from the list to learn more about the respondents’ responses.
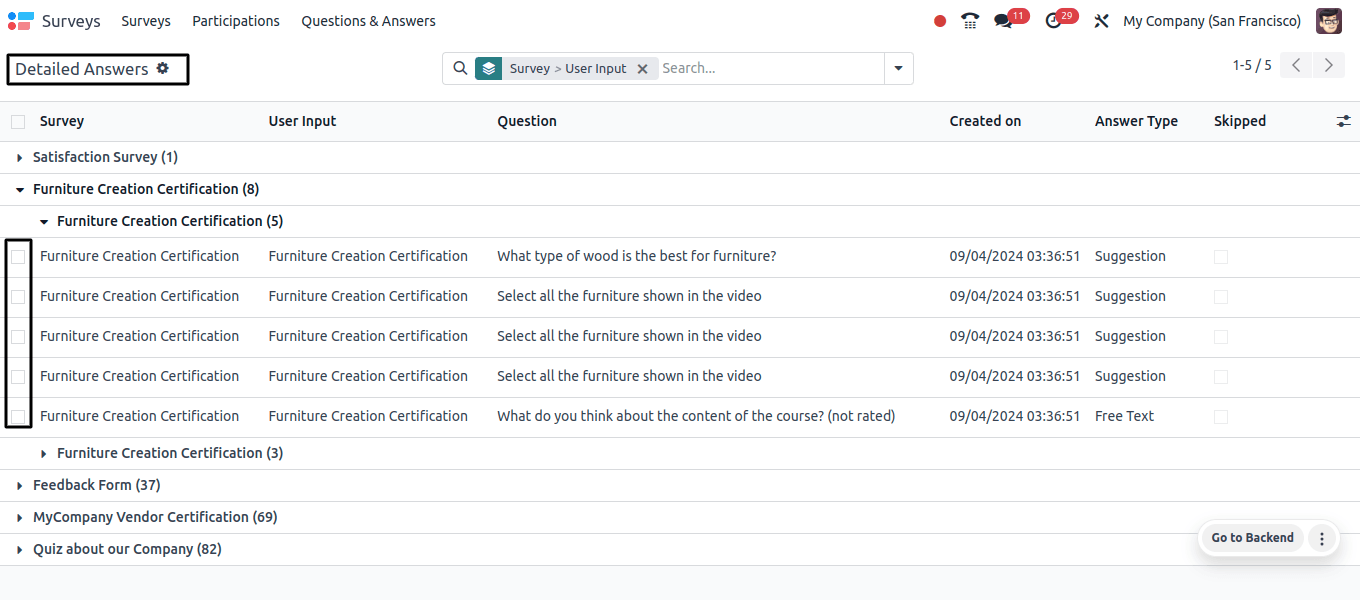
It also provides a question library that may be reused in future surveys, maintaining consistency across various surveys or allowing for the rapid deployment of new surveys with standard questions. Questions can be organized and guided more effectively by categorizing them into distinct topics or themes.
Learn about Odoo 17’s Survey Module, your go-to tool for designing, delivering, and analyzing surveys. This module contains everything you require, whether you’re seeking for market intelligence, staff vibes, or consumer feedback.

