In today’s fast technology-driven world, running a successful business requires a reliable and user-friendly POS. Odoo 17, the most recent edition of the well-known open-source ERP, includes a robust POS module that can help you enhance your retail operations.
In this blog post, we will go over how to configure your retail shop with Odoo 17 POS.
Let’s take a look at what Odoo 17 POS has to offer before we get started with the configuration process. Odoo’s POS module is meant to provide retailers with a seamless and integrated experience.
Overview of Inventory Management
Product Administration: Managing your product catalog is made easier with detailed information such as pricing, stock levels, and images.
Sales Processing: Efficiently conduct sales transactions, whether it’s a simple cash sale or a specific invoice for business clients.
Real-time inventory management helps to eliminate shortages and excess inventories
Client database for customized support and targeted advertising.
Detailed reporting and analytics on sales patterns and inventory turnover.
Supports many payment methods with ease, giving clients greater flexibility.
Starting with the Odoo 17 POS Module
Make sure you’re running the most recent version of Odoo 17. Depending on your company’s requirements, you can choose the community or enterprise version.
Access the Odoo dashboard and turn on the POS module. Go to the ‘Apps’ menu, search for ‘Point of Sale’, and install the module. Opening the POS module will lead you to the ‘Dashboard’ window, as shown in the screenshot below.

You can start a new POS session by clicking the ‘New Session’ button in the shop Kanban view. This can also be done from the ‘Settings’ window in the ‘Configuration’ menu.
The ‘New Shop’ option can be used to build a new retail shop based on your requirements. You can also alter the shop owner by using the adjacent space.
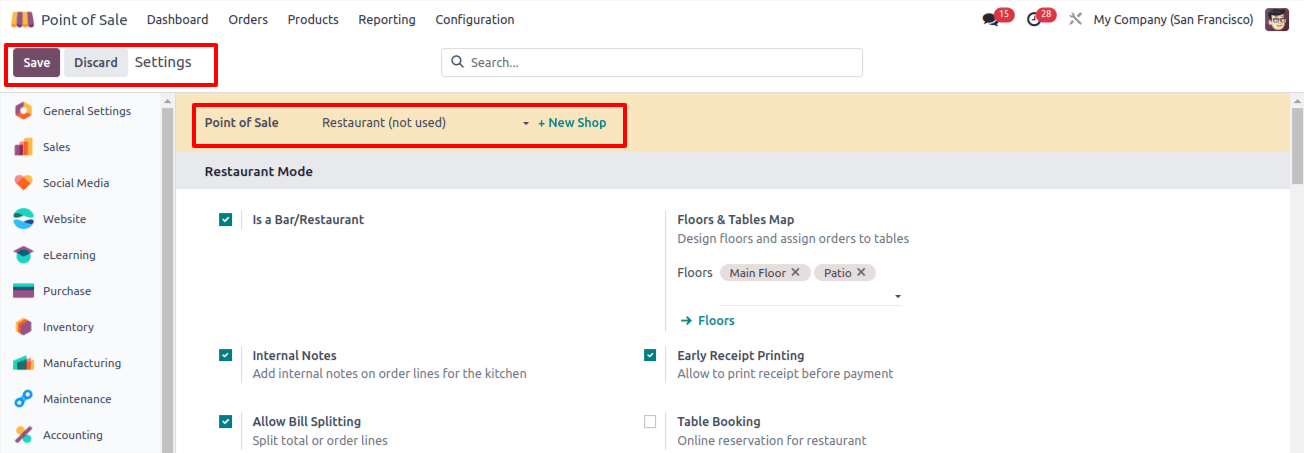
Clicking the ‘New Shop’ option will launch a setup wizard in which you may enter the POS/ Shop name and activate Bsr/Restaurant mode, as seen below.
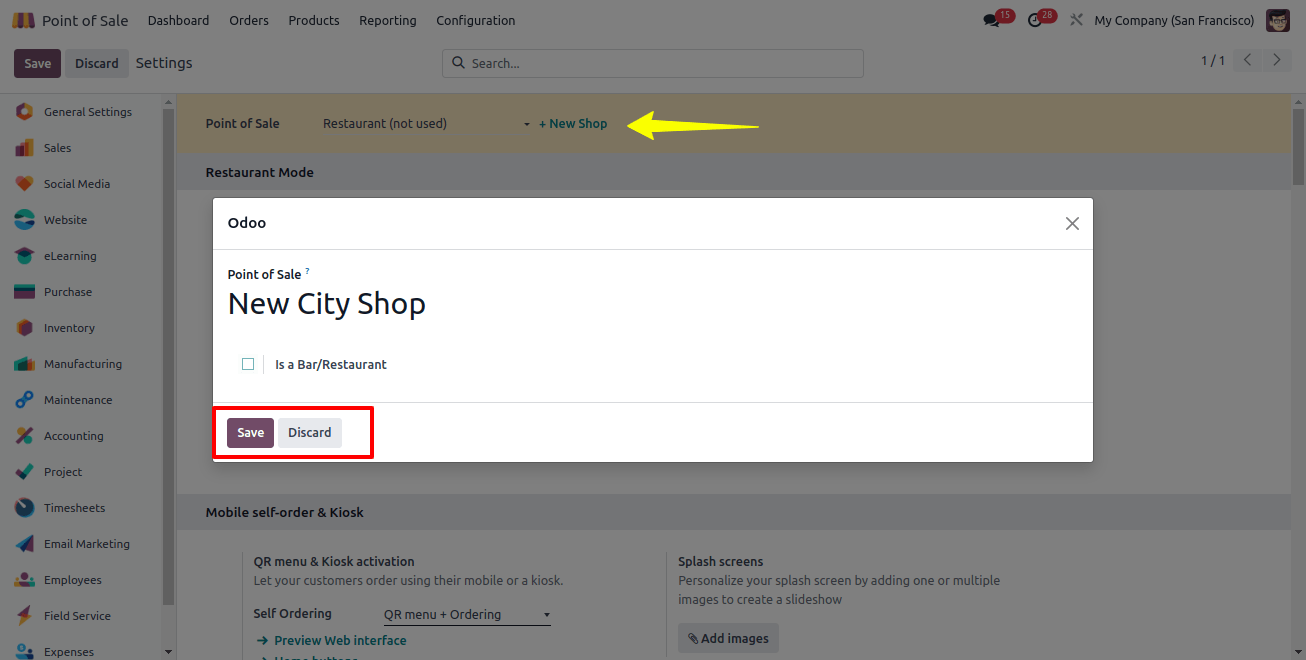
There is no need to activate the ‘Is a Bar/Restaurant’ button because we are only developing a retail shop.
After naming the store, save the data by clicking the ‘Save’ button on the settings page, then return to the ‘POS’ window in the ‘Dashboard’ menu to see the updated shop data.
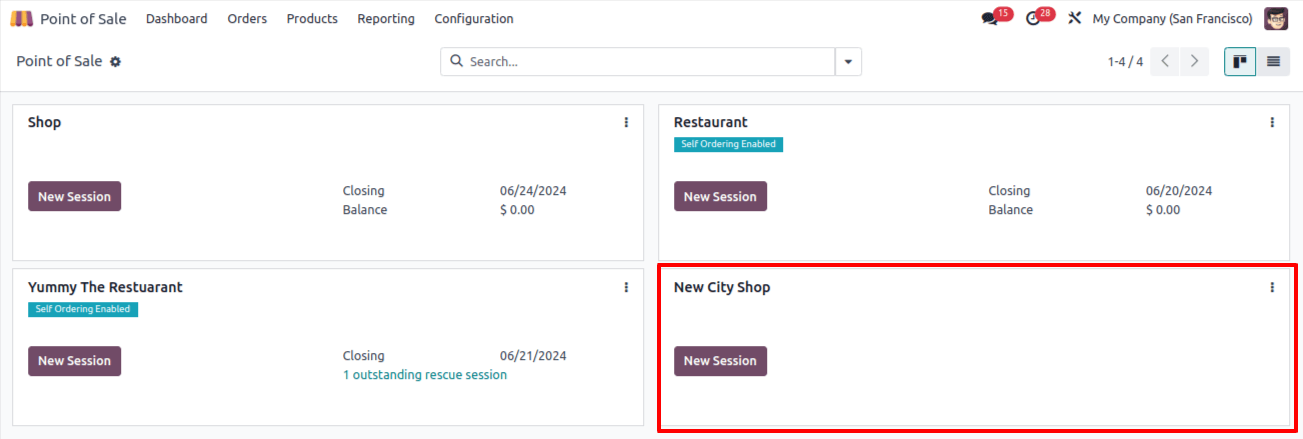
When you click the ‘New Session’ button, your restaurant session will begin. However, before we can begin PoS sales in the newly created shop session, we must first define a few key configuration elements. Let’s look at the setting options now.
Steps to Setup Retail Store in Odoo 17 POS
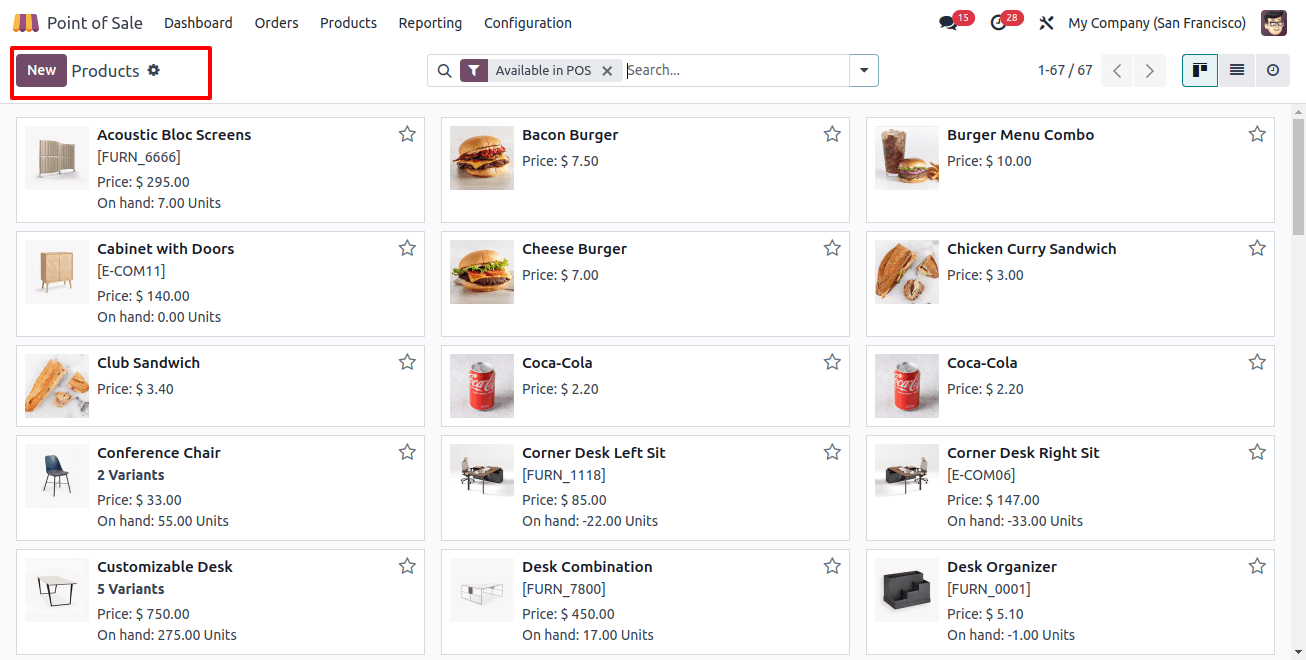
1. Setting Up Products
Include important information such as the product’s name, description, category, and cost. You can also submit images to improve the visual appearance.
This approach is comparable to how products are configured in Odoo’s sales and other applications.
Navigate to the ‘Products’ menu, select the ‘Product’ window, and select or create the customized products needed for this restaurant.
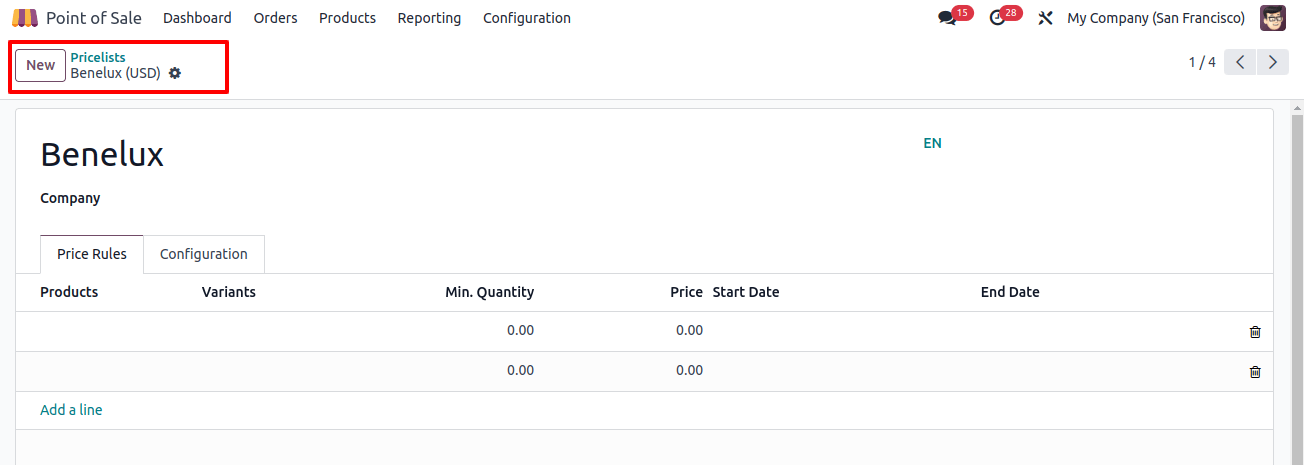
2. Configuring Price Lists
Include important information such as the product’s name, description, category, and cost. You can also submit images to improve the visual appearance. This approach is comparable to how products are configured in Odoo’s sales and other applications.
Navigate to the ‘Products’ menu, select the ‘Product’ window, and select or create the customized products needed for this restaurant.
3. Product Variants
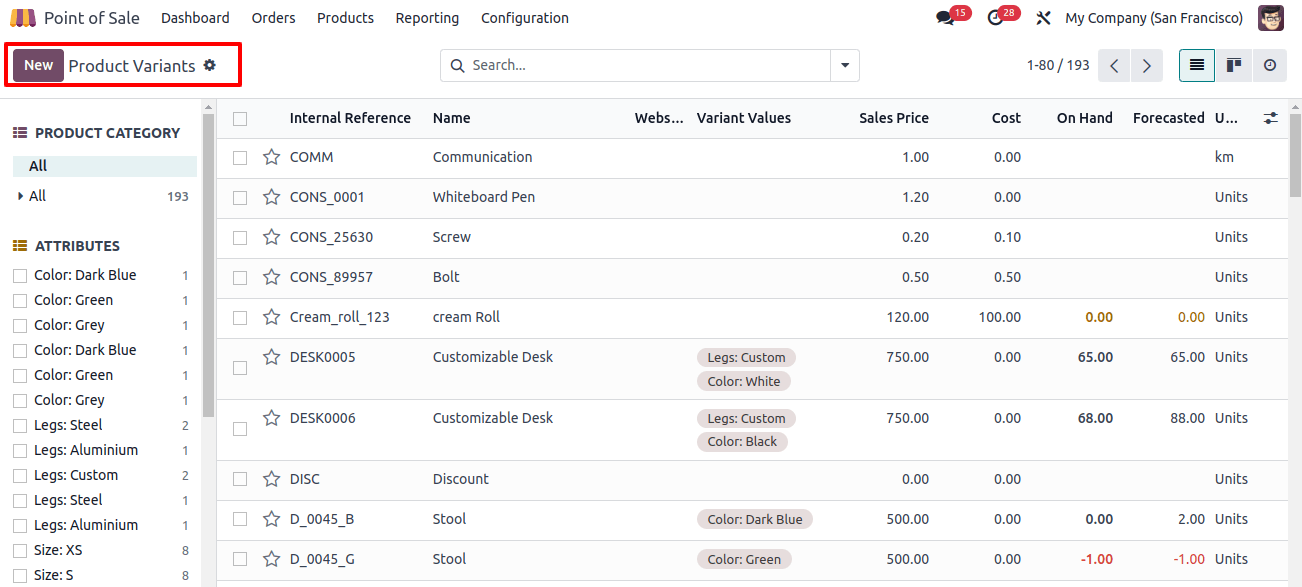
Product variation is important for businesses to meet the diverse needs of their consumers, streamline processes, and adapt to changing market conditions.
These actions not only increase revenue and satisfy customers, but also contribute to the overall success of the businesses. You can create multiple products of a single product using the ‘Product Variants’ box located under the ‘Product’ menu.
4. Product Combos
Bundled items, also known as product combinations, are important for sales businesses because they give several benefits that increase earnings, satisfy customers, and help the business achieve its goal.
Odoo introduces a new feature for creating product combinations via the ‘Product Combos’ session inside the ‘Products’ menu.

5. Setting Up Payment Methods
Integrate your favorite payment options into Odoo 17 POS. You can customize the system to make payments easier, whether you use cash, credit cards, or mobile payments. You can easily select the patent ways from the ‘Payments’ area of the ‘Settings’ page, as shown below.
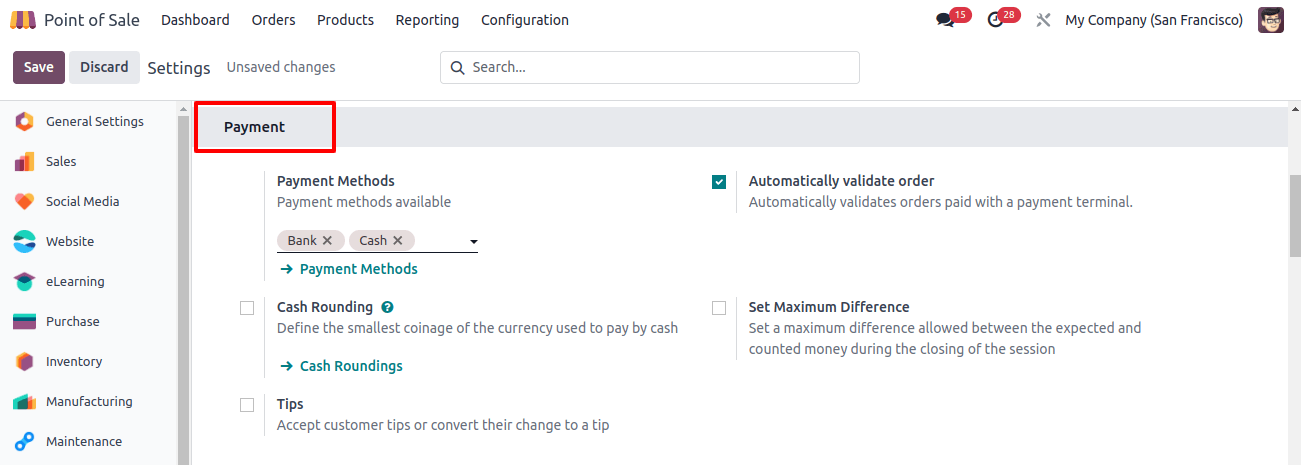
You may also set custom payment methods by clicking the ‘Payment Methods’ link under the box.
6. Cash Rounding
The application includes a ‘Cash Rounding’ tool that allows users to specify the smallest denomination for cash payments, as well as the set maximum difference between the features, which sets the maximum allowed gap between expected and actual cash.
The Coins/dollars function allows users to control the game’s opening and closing, as well as select their preferred coins and dollars.
7. Customizing Receipts
Make your sales receipts stand out by including your company’s logo, contact information, and other relevant information. This improves brand visibility and professionalism. This can be done in the ‘Bills & Receipts’ field of the configuration ‘Settings’ box, as shown below.
8. Defining Sales Taxes
Configuring sales tax rules ensures compliance with area tax legislation. Odoo allows you to set up tax codes and rules for individual products or locations from both the system back end and the ‘Accounting’ page of the ‘Settings’ window, as shown below.
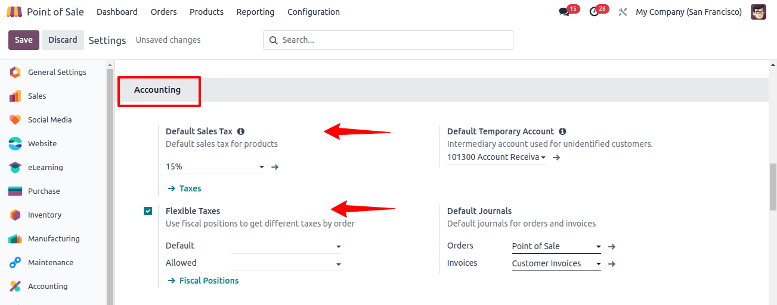
This Accounting tab field allows you to configure the Default Sales Tax, Flexible Taxes, and Fiscal Positions based on the sales requirements.
9. Choose Payment Terminals
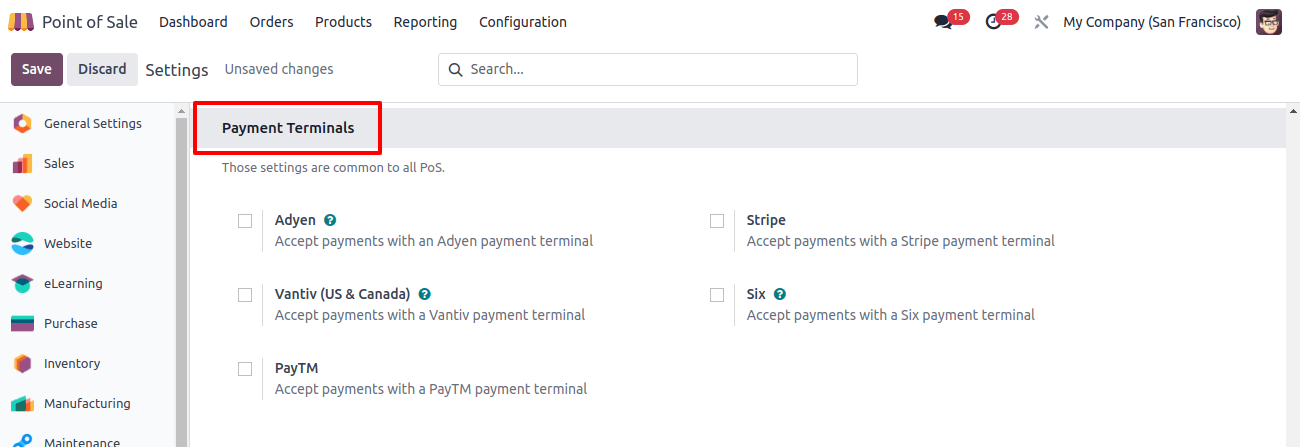
The introduction of payment terminals into your POS system allows for the acceptance of a wide range of payment methods, including debit or credit cards.
This integration helps to improve payment efficiency for organizations like Adyen, Vantiv, Paytm, Stripe, and Six. Access to these services is available via the POS module’s ‘Settings’ panel.
10. Configuring Hardware
Configure your retail shop’s hardware, such as bar-code scanners, receipt printers, and cash drawers, to work flawlessly with Odoo 17 POS. Odoo supports a variety of hardware connectors to increase efficiency.
Before fully implementing the technology, undertake extensive testing to uncover any problems. Ensure that all of your staff have undergone sufficient training so that they can confidently use the Odoo 17 POS system.
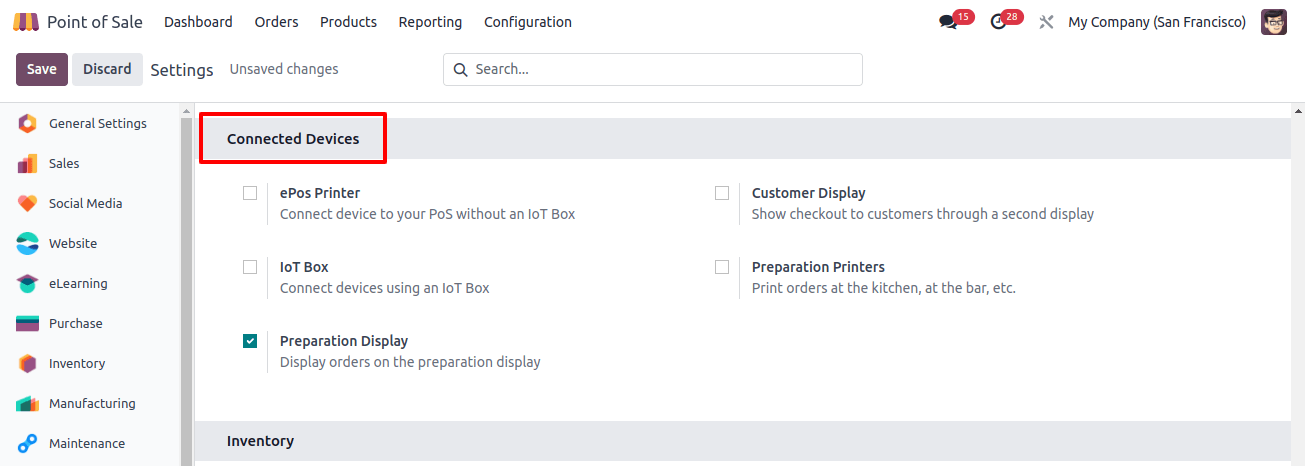
A second display allows the users to show clients the checkout process while connecting a device to POS with or without an IoT Box, which can be enabled from the ‘Connected Devices’ tab of the ‘Settings’ page.
11. Employee Access and Permissions
Manage employee access by creating user accounts with the relevant permissions. Define responsibilities and constraints to ensure that each staff member has the right permissions while maintaining security.
Opening the Retail Store and Managing Orders
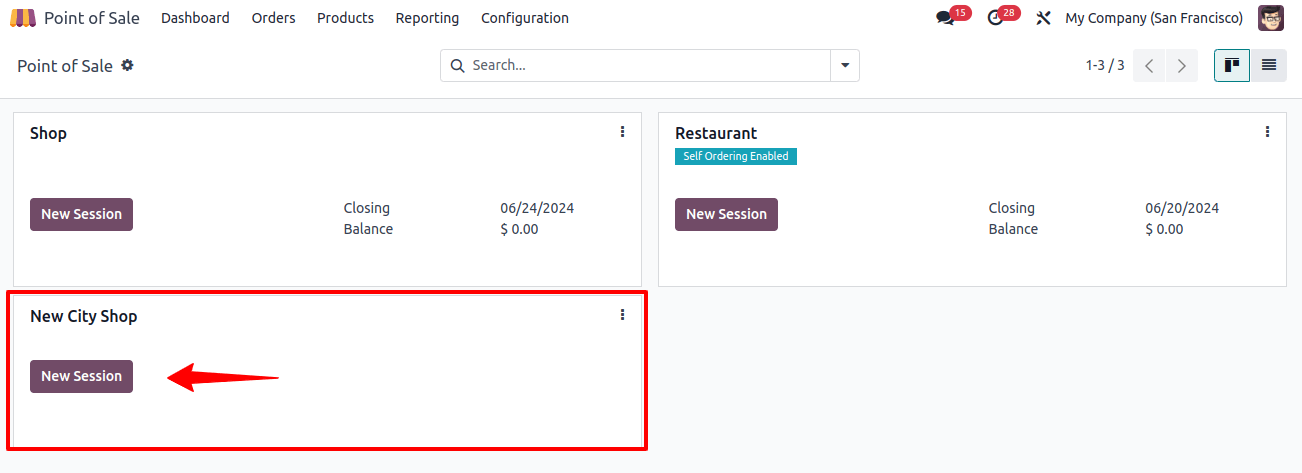
Now, navigate to the ‘Dashboard’ window and select the ‘New Session’ button located in the Kanban view of the specific retail store to initiate a new sales session and sales management to handle orders within your POS application.
After starting a new POS session, you will see the store interface. So, prepare to dig into the smooth order experience, which displays products with their names, pricing, and enticing photos, as shown in the image below.
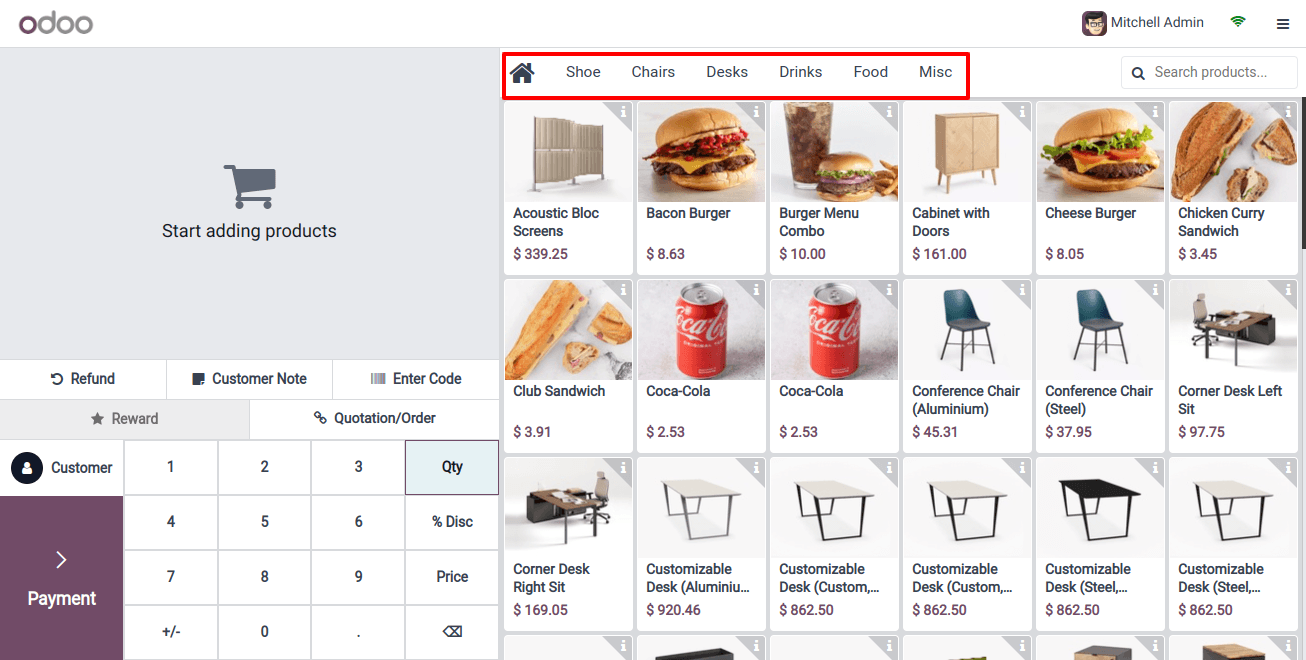
Choose from several product categories, including Chairs, Desks, Drinks, Foods, and other Miscellaneous things, as shown in the image above.
Ordering Items
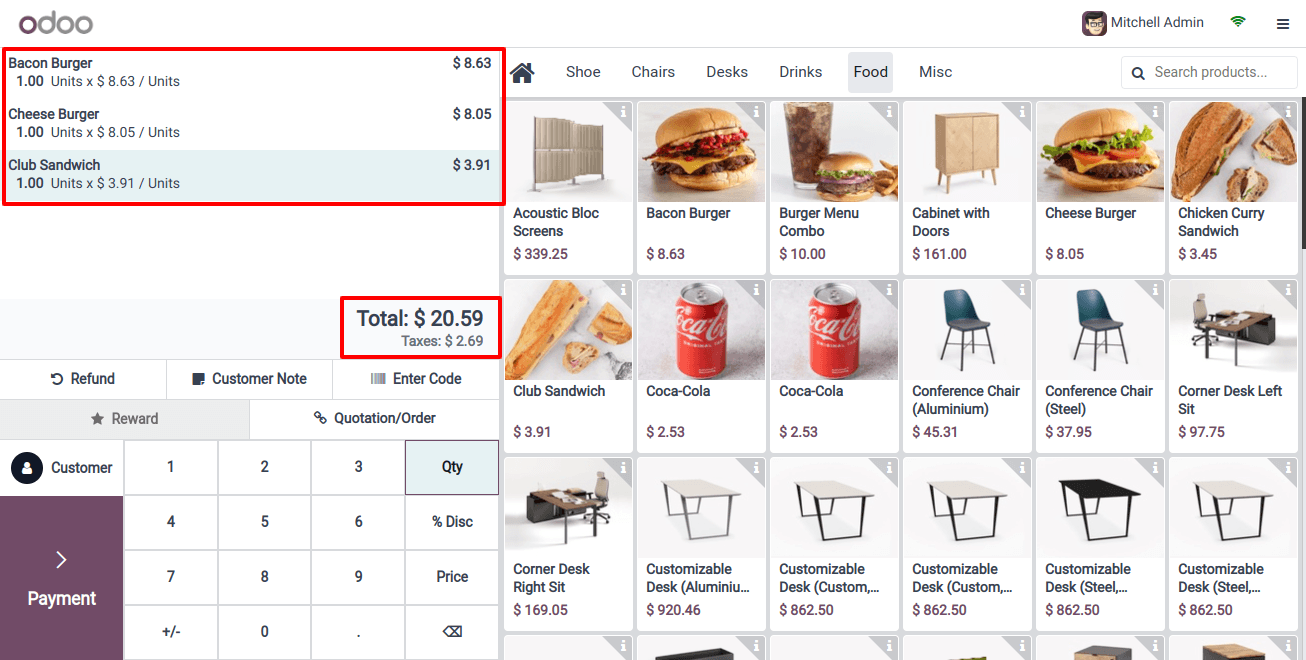
Once you’ve created your order, take a look at the left side, where the magic happens: order details, unit prices, quantities, and the total are all displayed. Not only that, but the order summary provides information about subtotal and taxes.
Feel the power as you select customer notes for customized instructions and refunds for boss-level returns. You will also receive the order summary, subtotal, and taxes for a POS sales order.
Payments and Invoices
To pay with cash, a bank account, or a customer account, click the ‘Payment’ button to go to the payment page.
To validate the payment, create an invoice by clicking the ‘Invoice’ button on the right side of the screen, as shown below.
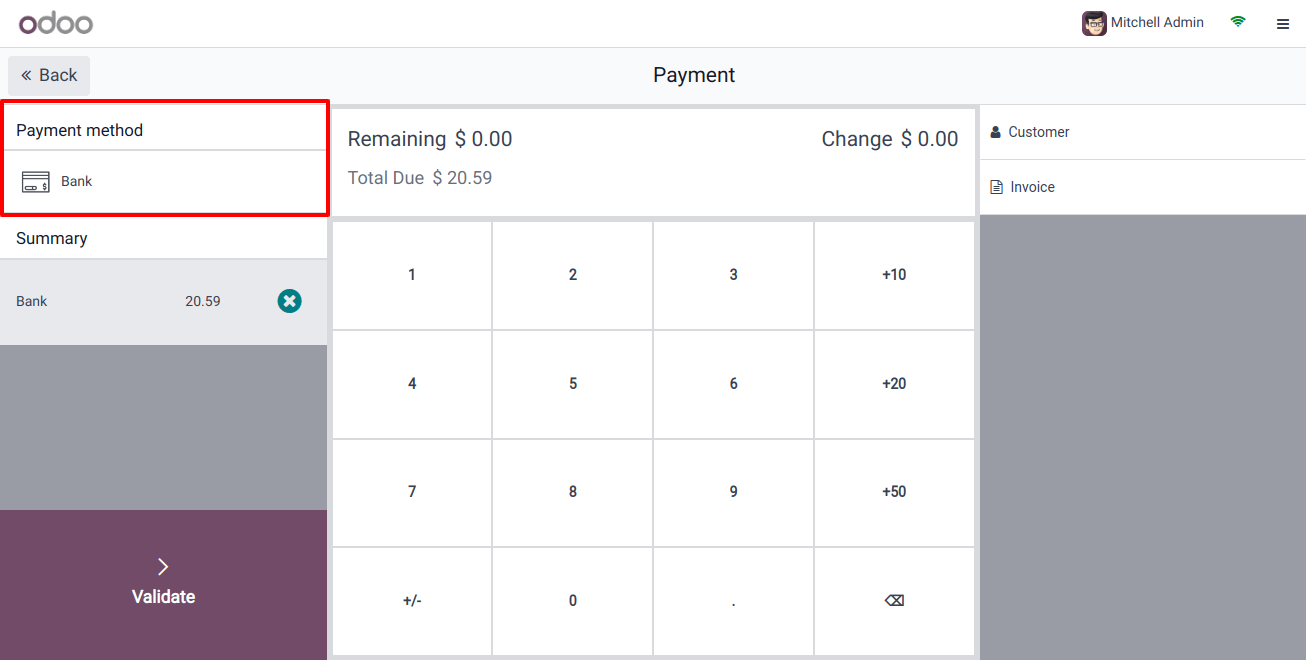
Then, using the keypad, enter the amount being paid by the client, and click the ‘Validate’ button.
Print Invoices
Use the ‘Print Receipt’ option to print or email the receipt to the given email address, which appears on the right side of your screen. Click the ‘New Order’ button to easily create another order without having to manually return to the retail shop window.

Sessions Management
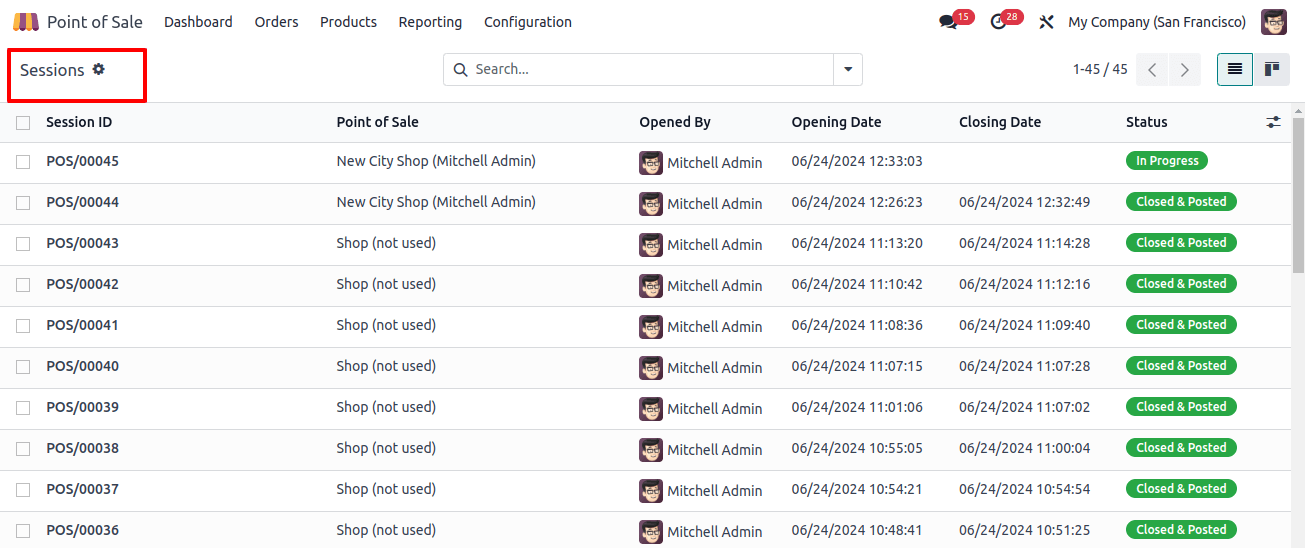
Retail business management requires overseeing sessions. In Odoo, session information is retrieved by selecting the ‘Sessions’ option from the ‘Orders’ menu.
This operation opens the POS dashboard, which provides information about existing POS. Users can then browse the list of sessions, including their details, as shown in the image below.
Configuring your retail store with Odoo 17 Point Of Sale can improve operational efficiency and customer experience. By following the above steps, you can customize the system to match your business requirements.
Odoo's POS module is adaptable and easy to use, allowing you to react to changing market demands and stay ahead in the competitive marketplace.
Change the way you conduct your retail operations by using Odoo 17’s features.
If you need any help related to POS then contact us. We are leading Odoo POS development company.

