In Odoo chatter, improving the user experience includes a specific customization of the chatter. It’s a centralized hub for communication and updates as per required records.
Adding a custom button in the chatter can easily streamline operations, allowing users to perform specific tasks, like triggering workflows or creating reports, directly with the interface.
In this blog, we will explore the process of adding a button to the chatter in Odoo 18, covering all the required steps and code snippets to help you customize the features to better fulfill the business requirements and enhance overall efficiency.
Before customizing Odoo, it’s important to maintain a clear and organized module structure. Hence, it ensures that all the components, like models, views, JavaScript, and templates, are placed properly and function consistently. Before you start writing code, make sure you understand this layout.
Understanding the Chatter in Odoo
Generally, it is used for tracking records and updates to the messages associated with the record. If another user makes any changes, it will be logged in the Chatter.
Benefits of Chatter in Odoo
Real-time Communication: Odoo Chatter provides a real-time messaging system, allowing users to communicate directly about projects, updates, or tasks.

Activity Tracking: Users can easily log activities associated with specific records, including sales orders or leads, making it easier to track progress and updates.

File Sharing: It allows users to easily share files, images, and other fields directly within the Odoo chatter position, keeping all relevant data in one place.

Notifications: Odoo Chatter sends notifications for updates or comments, ensuring that users stay informed about changes or important updates.
Integration with Records: You can integrate chatter with multiple Odoo modules, allowing users to discuss and comment on specific records, such as invoices or projects.
Follow and Unfollow: It allows users to follow specific records to receive updates, allowing them to stay engaged with key projects.

Customization: Users can customize the chatter to fit the workflow of your company, allowing you to create a robust communication style that suits your requirements.
Setting Up the Development Environment
Step 1: Create the Button in the Chatter
Create a new template to add a button in the chatter that extends the existing mail chatter template.
For example:
XML Code
Add the following XML code to your custom module:
<?xml version="1.0" encoding="UTF-8"?>
<templates>
<t t-name="important.Chatter" t-inherit="mail.Chatter"
t-inherit-mode="extension">
<xpath expr="//*[contains(@class, 'o-mail-Chatter-activity')]"
position="before">
<button class="btn btn-warning text-nowrap me-2"
t-att-class="{'my-2': !props.compactHeight }"
data-hotkey="shift+i"
t-on-click="markAsDone">
<span>Mark as Done</span>
</button>
</xpath>
</t>
</templates>
This code will add a ‘Mark as Done’ button in the chatter. The XML template can modify the Chatter component in Odoo by receiving from mail.Chatter and will add a custom button labeled ‘Mark as Done.’
The xpath expression targets the chatter’s activity field and inserts the button before it. The button is styled with a warning color and a dynamic class that adjusts based on the layout height.
Also, a keyboard shortcut (Shift+i) is defined, and when hit, the button invokes the markAsDone JavaScript method.
Step 2: Define the Button's Functionality
Moving on, you must define the functionality that occurs when the button is clicked. You’ll be changing the Chatter component to add the new method.
JavaScript Code
Add the following JavaScript code in your module:
/** @odoo-module **/
import { Chatter } from "@mail/chatter/web_portal/chatter";
import { patch } from "@web/core/utils/patch";
patch(Chatter.prototype, {
async markAsDone() {
await this.env.services.action.doActionButton({
type: "object",
resModel: this.props.threadModel,
resId: this.props.threadId,
name: "action_mark_as_done",
});
},
});
This code defines the markAsDone function that will be triggered when the button is clicked. The code extends the Odoo Chatter component to perform a specified server-side action when a custom button is clicked.
It uses the patch function from Odoo’s core services to improve existing Chatter functionality by introducing a new method called markAsDone. When this function is used, it sends a request to the server via doActionButton, specifying the current record’s model and ID.
The resModel and resId arguments dynamically refer to the model, such as 'sale.order’ and the specific record in the model, respectively, while the action name (action_mark_as_done) specifies a server-side method that will be run.
Step 3: Implement the Logic in Your Model
You will now need to define the logic that updates the record when the button is clicked. Here in the following example, we will change the sale.order model.
Python Code
Add the following code to your sale_order.py file:
from odoo import fields, models
class SaleOrder(models.Model):
_inherit = 'sale.order'
is_done = fields.Boolean("Done", default=False)
def action_mark_as_done(self):
"""Mark the record as done and post a message
in chatter"""
for record in sel10/14/2024 17:27:34f:
record.is_done = True
record.message_post(
body="This record has been marked as done.")
return {
'type': 'ir.actions.client',
'tag': 'reload',
}
In this code, we create an is_done field and define the action_mark_as_done function that marks the record as done and posts a message in the chatter.
Step 4: Add the Field to the View
To ensure that the new field appears in the form view, add it to the relevant view definition.
XML Code
To include the field in the sale, add the XML code shown below. Order Form View:
<?xml version="1.0" encoding="UTF-8" ?>
<odoo>
<record id="sale_order_view_form" model="ir.ui.view">
<field name="name">
sale.order.view.form.inherit.chatter.button
</field>
<field name="model">sale.order</field>
<field name="inherit_id" ref="sale.view_order_form"/>
<field name="arch" type="xml">
<field name="date_order" position="after">
<field name="is_done" invisible="1"/>
</field>
</field>
</record>
</odoo>
The is_done field is added to the sale by this XML code.order form, but it remains hidden.
Step 5: Update the Manifest File
Remember to add the updated XML and JavaScript files to your custom module’s__manifest__.py file:

After completing the above steps, you will successfully add a button to the conversation in Odoo 18. When you click the ‘Mark as Done’ button, the important information will be modified and the message will appear in the discussion.

Adding a Custom Button to the Chatter in Odoo 18
In the following example, we’re creating a custom Odoo module called chatter_button that extends the functionality of the Sales Order module by adding a custom button to Chatter.
This button will allow users to do particular operations directly from the Chatter interface, hence improving workflow and communication.
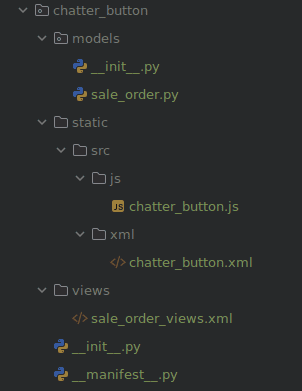
Directory Breakdown:
- models/sale_order.py: The model logic, which is used to modify the sale.order model, is contained in this file. It connects the sales order data to the new button and specifies its unique behavior.
- static/src/js/chatter_button.js: This JavaScript file manages the front-end interaction with the Chatter’s custom button. It ensures that the button is rendered and functional in the user interface, allowing for dynamic behavior when passed.
- static/src/xml/chatter_button.xml: The XML file specifies the structure and positioning of the custom button in the chatter. It describes where the button should appear in the user inference and connects it to the JavaScript features.
- views/sale_order_views.xml: The file alters the sales order view to add the Chatter’s interface's custom button. It connects the back-end logic to the front-end layout, making the button available for the user to interact with.
- manifest.py: The manifest file contains important module metadata such as the module’s name, description, version, and dependencies. It guarantees that the module is properly loaded into Odoo.
The approach makes it simple to add a customized button to the chatter and improve the user experience with sales orders. This button adds more features to Odoo 18 to enhance user interaction and expedite processes, whether it be sending personalized messages or automating tasks.
Testing the Custom Button in Odoo 18:
Once you’ve created the module and added the custom button to the conversation, it’s time to test your work. Here’s how to restart the Odoo server, test its functionality, and fix any issues.
Stop the Odoo server: You must stop your Odoo instance if it is currently operating. In your terminal, enter the following command:
sudo service odoo stop
Update the module: After making modifications to your module (for example, adding the custom button), you must update your Odoo instance to ensure that the changes are restored. To update your module, use the following command:
./odoo-bin -u chatter_button -d <your-database-name>
Restart the Odoo server: Now, using the relevant command according to your configuration, restart the Odoo server:
sudo service odoo start
Log in to Odoo:
Open your Odoo details in the browser (typically at localhost:8069 or your specific domain).
Now simply log in with your credentials.
Navigate to the Sale Order:
Go to Sales > Orders > Sales Orders.
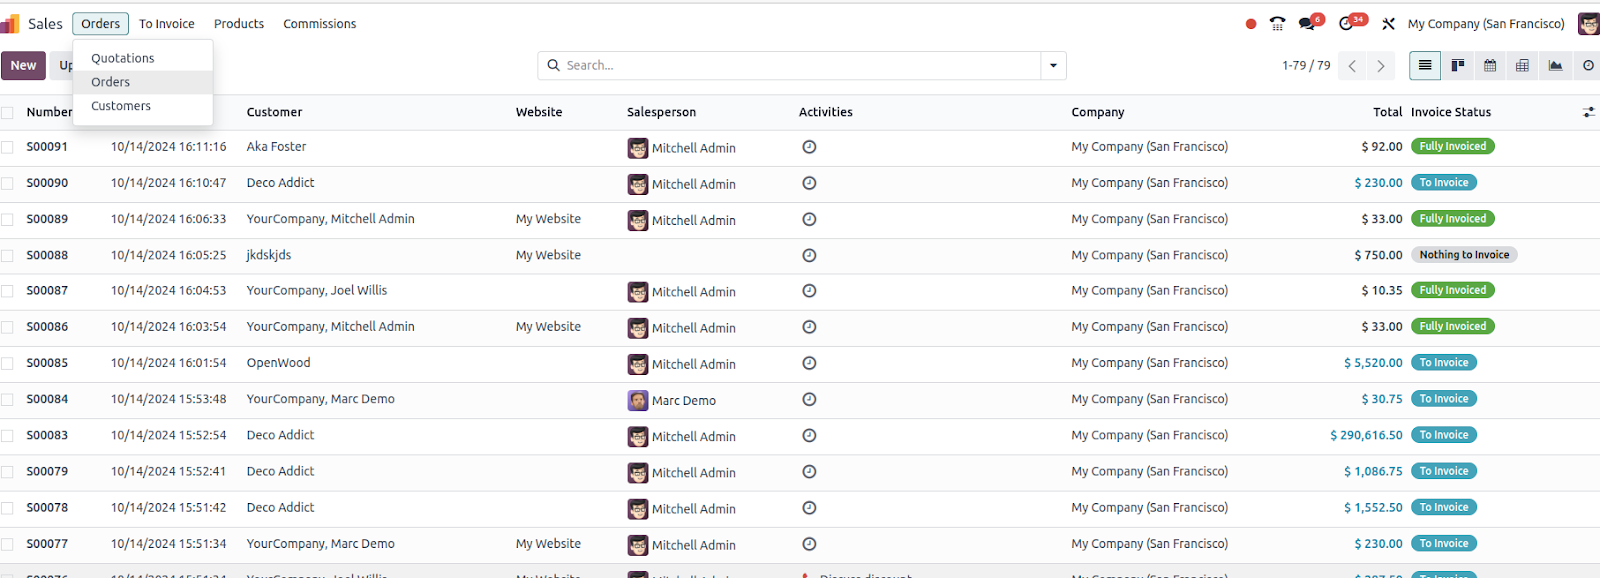
Create a new selling order or open an existing one.
Check the Chatter Section:
Scroll down to the Chatter field on the sale order form.
Check that the custom button you built displays in the chatter interface next to the existing chatter buttons (such as ‘Send Message’ or ‘Log Note’).
Test the Button:
Press the personalized button to verify its operation.
Make sure any server-side logic or JavaScript actions you have added, such as defined behavior or popups, function as intended.
Conclusion
By following the above steps, you will be able to successfully add a custom button to Odoo 18 chatter. It allows users to do specific activities right from the record’s communication hub. The ability to improve the functionality of chatter, from adding buttons to defining custom logics, brings you a world of possibilities for improving user interaction on the platforms.